Building a single post page
If you click on any blog post from the blog posts index page or archive pages, WordPress will take you a page where you can read the entire blog post.
There are two types of Single post page in WordPress.
- A single post page which renders a single blog post.
- A single post page which renders a custom post type like an e-commerce product, a book, an event, etc.
For now, let’s just talk about a blog post based single post page. We will discuss custom post type based single post page in a future module.
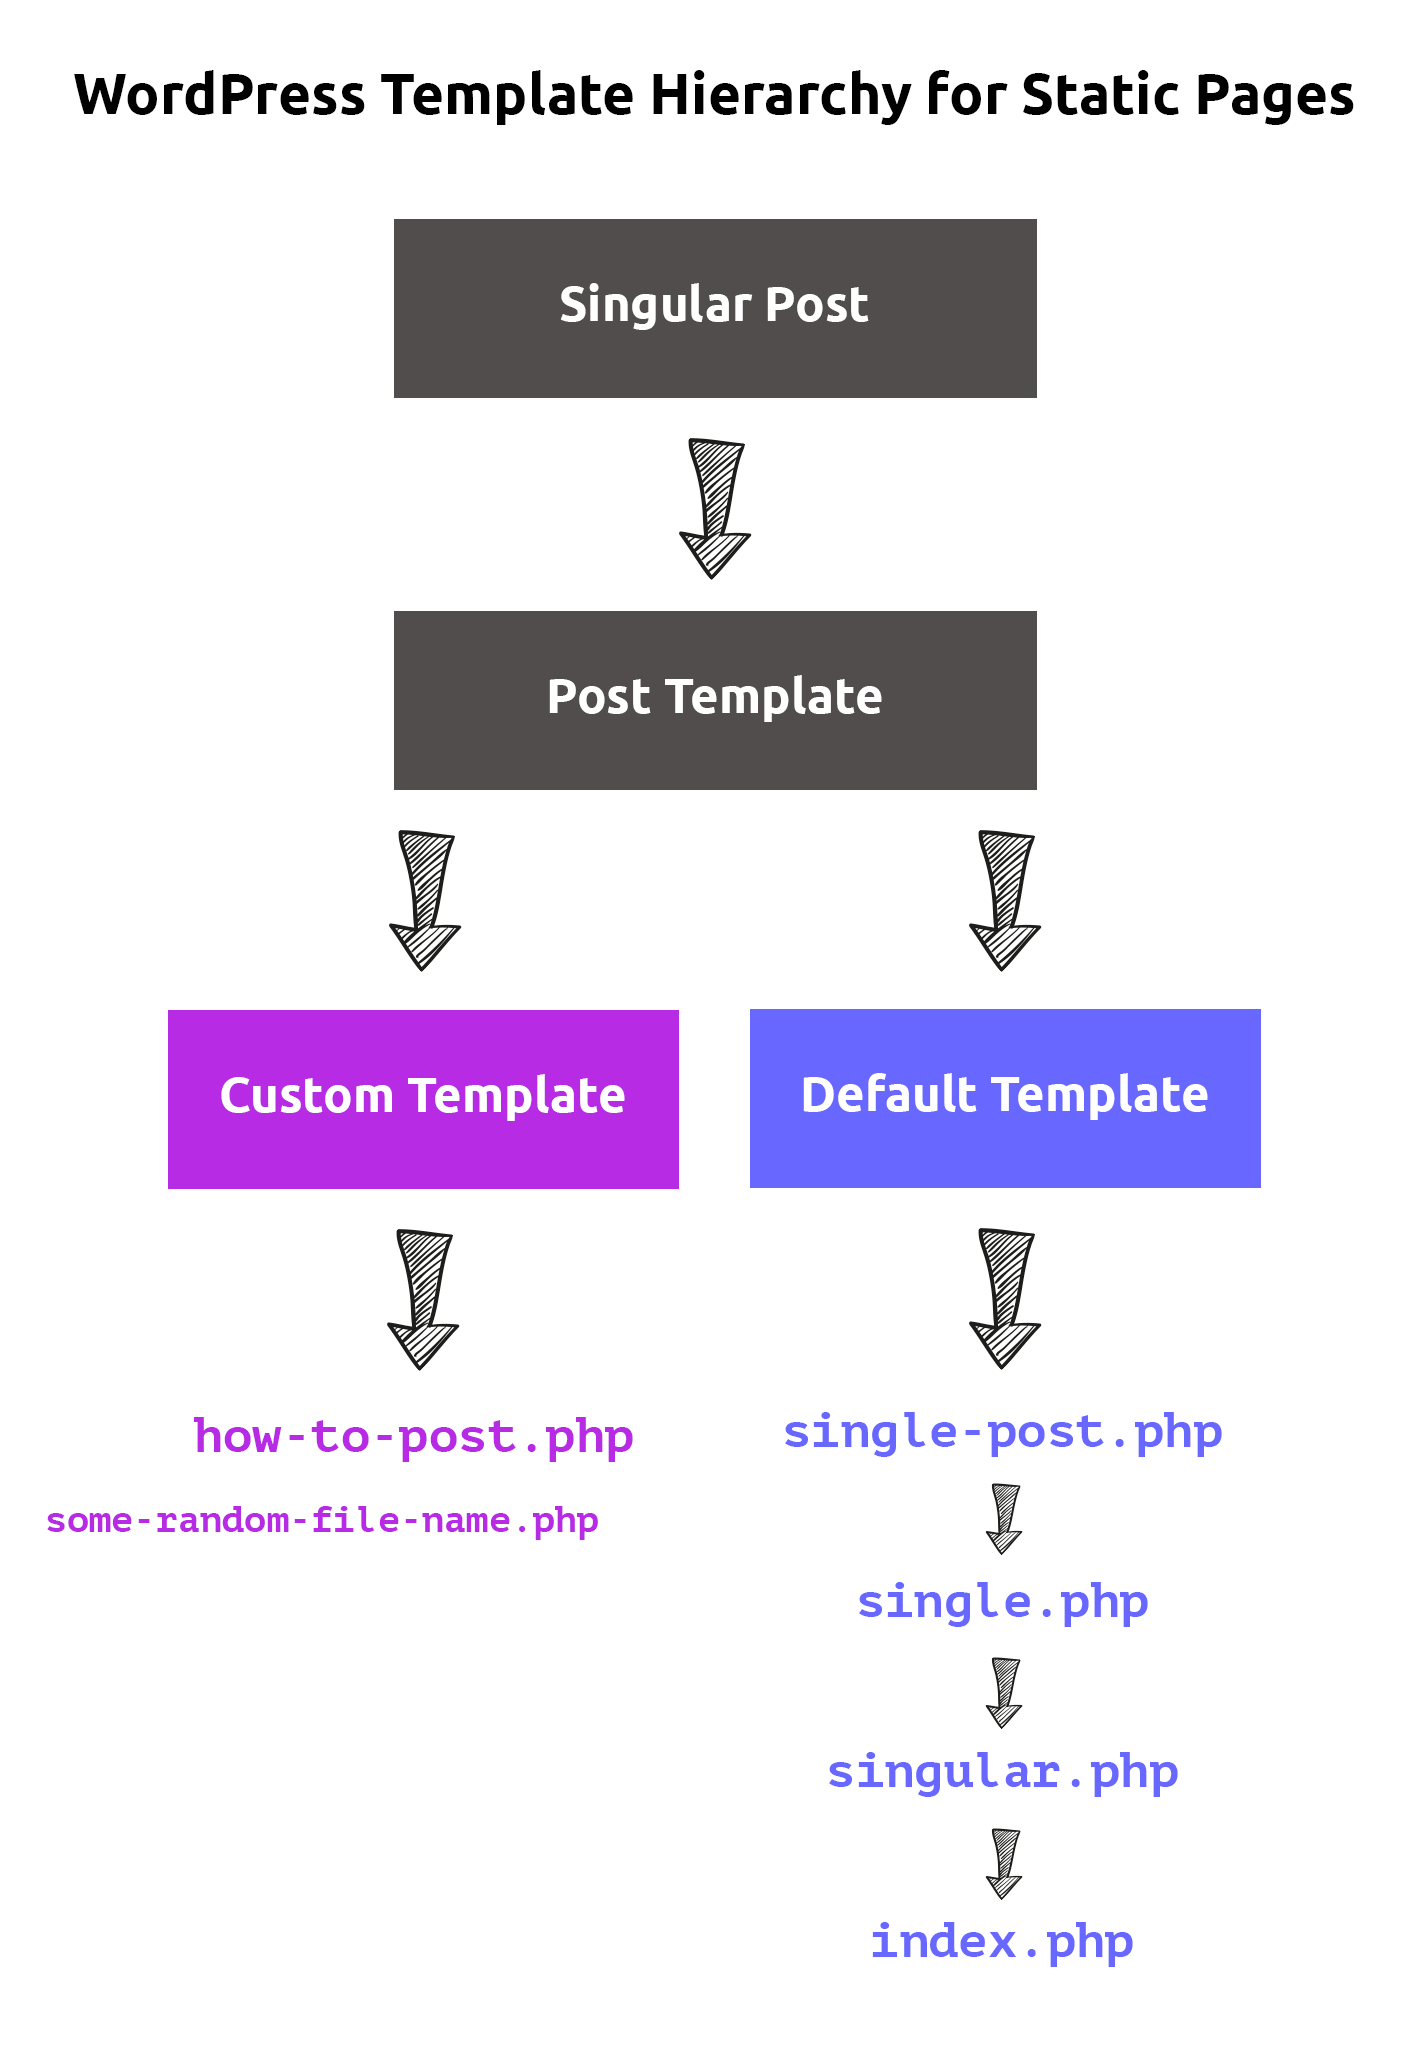
While trying to render a single blog post page:
- WordPress will first see if there is a custom template set for the blog post.
- If there is no custom template is set, WordPress will then look for
single-post.phpfile. - If there is no
single-post.phpfile, WordPress will then look forsingle.phpfile. - If there is no
single.phpfile, WordPress will then look forsingular.phpfile. - If there is no
singular.phpfile, WordPress will finally render the single post page usingindex.phpfile.
Currently, Since there is no specific template file for rendering a single blog post, WordPress is using index.php file.
The advantage of single-post.php file
The word “post” in the single-post.php filename is the post type.
If we create the single-post.php file, WordPress will use this file to render a “single blog post” only. That is post type of “post” only.
Although, It is not written anywhere that a “post” means a blog post. Because most of the fact that most WordPress sites on the web use the post type of “post” to create blog posts only, this became a standard.
So, single-post.php file will give us some fine grain control over the markup of the blog post.
But wait until you here the advantage of single.php file.
The advantage of single.php file
As you already know, WordPress supports three types of Posts in WordPress:
- A Page – For example, About us, Static Front page, Contact us
- A Blog Post or Just a post – For example, “10 best places you must visit before you get married :P”
- A Custom Post – For example, an e-commerce product, a book, a movie, a team member etc.
The advantage of single.php file is, you can use it to render:
- A page with a single blog post.
- As well as, a page with a single post belonging to a custom post type. For example, if there is a custom post type called the book, WordPress will use
single.phpfile to render an individual book.
But, because of design differences between a blog post and a custom post type like “book”, we usually end up using the single.php file for rendering a page with single blog post only.
And for a custom post type like “book”, we create a template like single-book.php.
Having said that, clients install plugins which creates custom post types all the time and some plugins do not come up with single post template file specific to the custom post type that they were creating.
So, it is a common practice to use the single.php file as the fallback file for rendering custom single posts as well.
Simply put, the single.php file is universal file for rendering single detail pages of all types of posts except “static pages”.
So, instead of creating single-post.php file, most developers end up creating single.php file to render the single blog post.
Let’s create single.php file and put the Loop in it
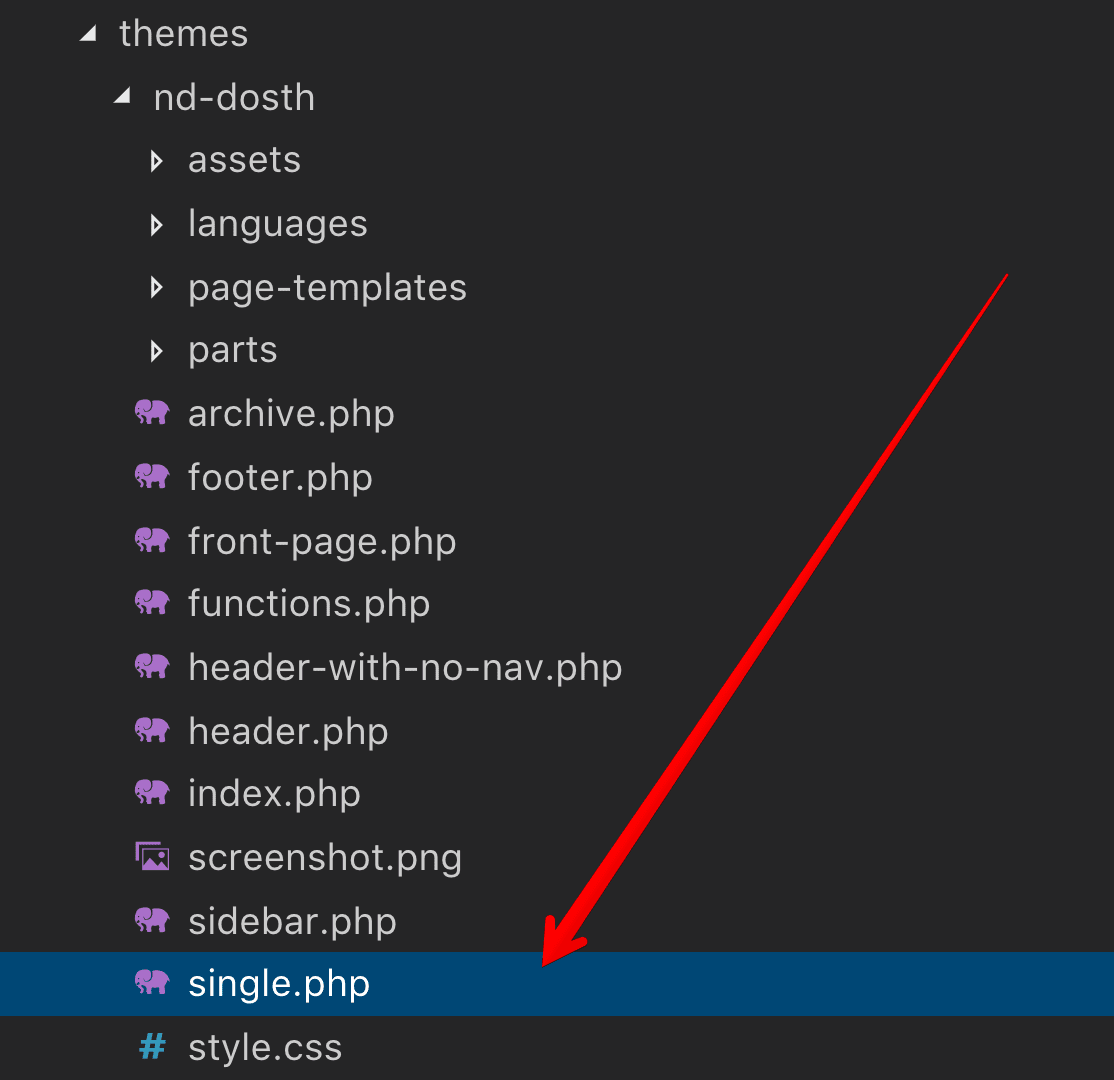
Go ahead and create the single.php file inside our theme directory.
Here is the updated theme directory structure:
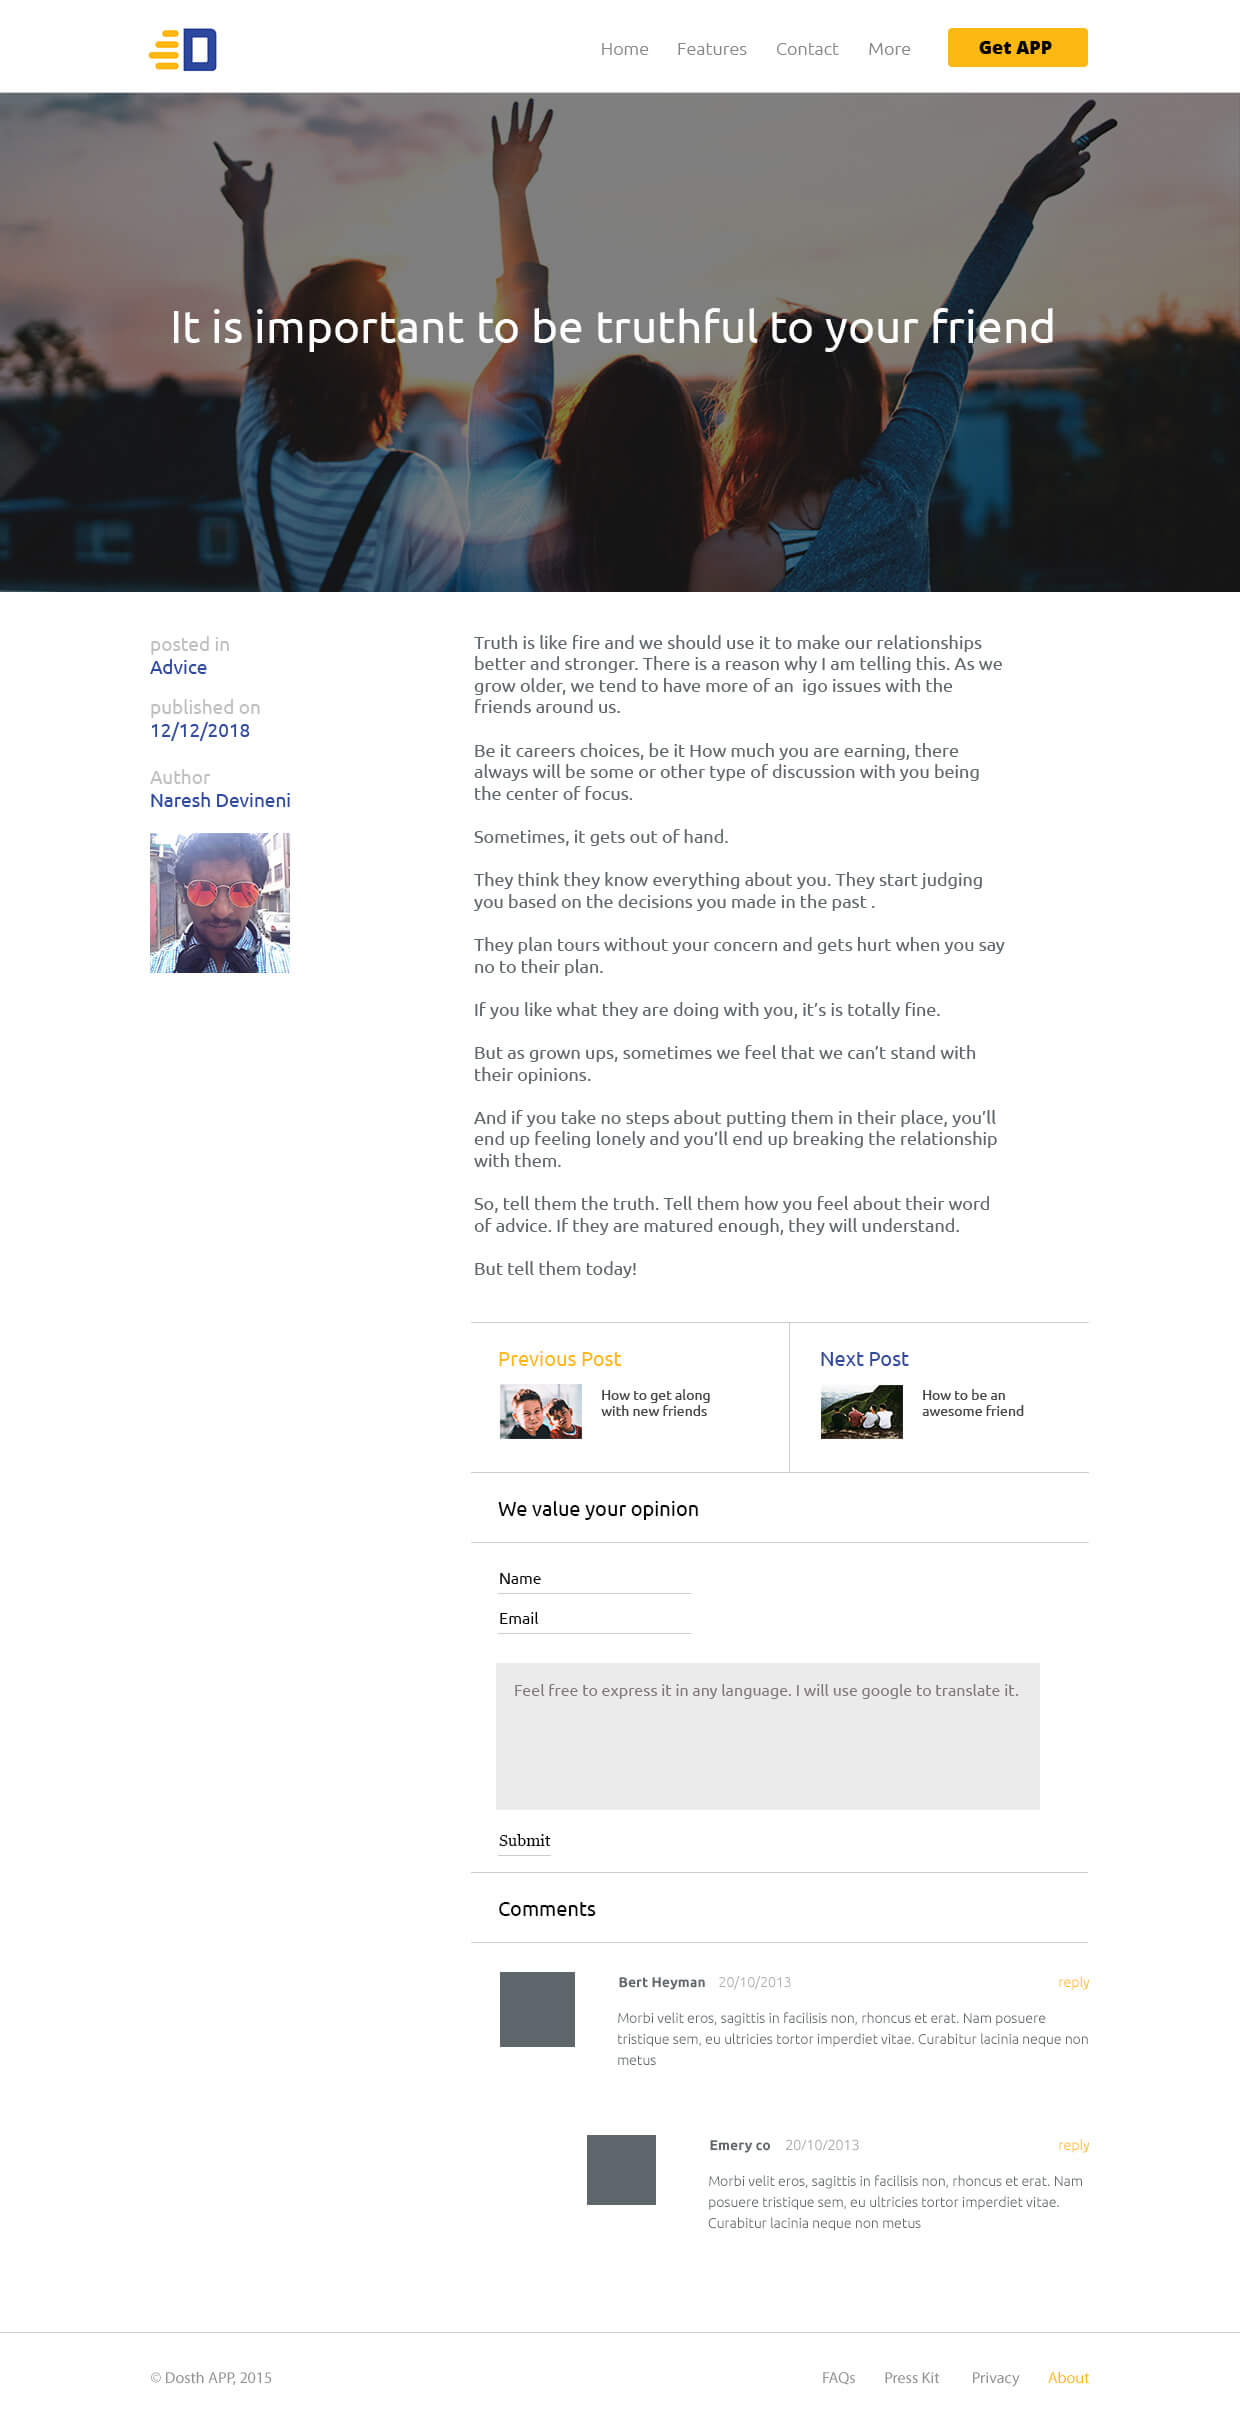
And here is the design we are trying to create:
Next, put the following code inside the single.php file:
<?php
/**
 * The template for displaying all single posts
 *
 * @link https://developer.wordpress.org/themes/basics/template-hierarchy/#single-post
 *
 * @package Dosth
 */
get_header();
?>
<div class="content-container">
    <?php while( have_posts() ): ?>
        <?php the_post(); ?>
        <?php if ( has_post_thumbnail() ) :
            $featured_image = wp_get_attachment_image_src( get_post_thumbnail_id( get_the_ID() ), 'full' ); ?>
            <div class="full-width-featured-image" style="background-image:url(<?php echo $featured_image[0]; ?>);">
                <h2><?php the_title(); ?></h2>
            </div>
        <?php endif; ?>
        <div class="container">
            <div class="row">
                <div class="article-info col-md-3">
                    <?php $categories = get_the_category(); ?>
                    <?php if ( ! empty( $categories ) ) : ?>
                        <div class="posted-in">
                            <h4><?php _e( 'Posted In', 'nd_dosth' ); ?></h4>
                            <?php the_category(); ?>
                        </div>
                    <?php endif; ?>
                    <div class="published-on">
                        <h4><?php _e( 'Publish On', 'nd_dosth' ); ?></h4>
                        <?php the_date(); ?>
                    </div>
                    <div class="post-author">
                        <h4><?php _e( 'Author', 'nd_dosth' ); ?></h4>
                        <a class="author-archive" href="<?php echo esc_url( get_author_posts_url( get_the_author_meta( 'ID' ) ) ); ?>">
                            <?php the_author(); ?>
                        </a>
                        <?php echo get_avatar( get_the_author_meta('ID')  , 100 ); ?>
                    </div>
                </div>
                <div id="actual-article" class="col-md-8">
                    <?php the_content(); ?>
                </div>
            </div>
        </div>
    <?php endwhile; ?>
</div>
<?php get_footer(); ?>
Here is what the above code renders to:
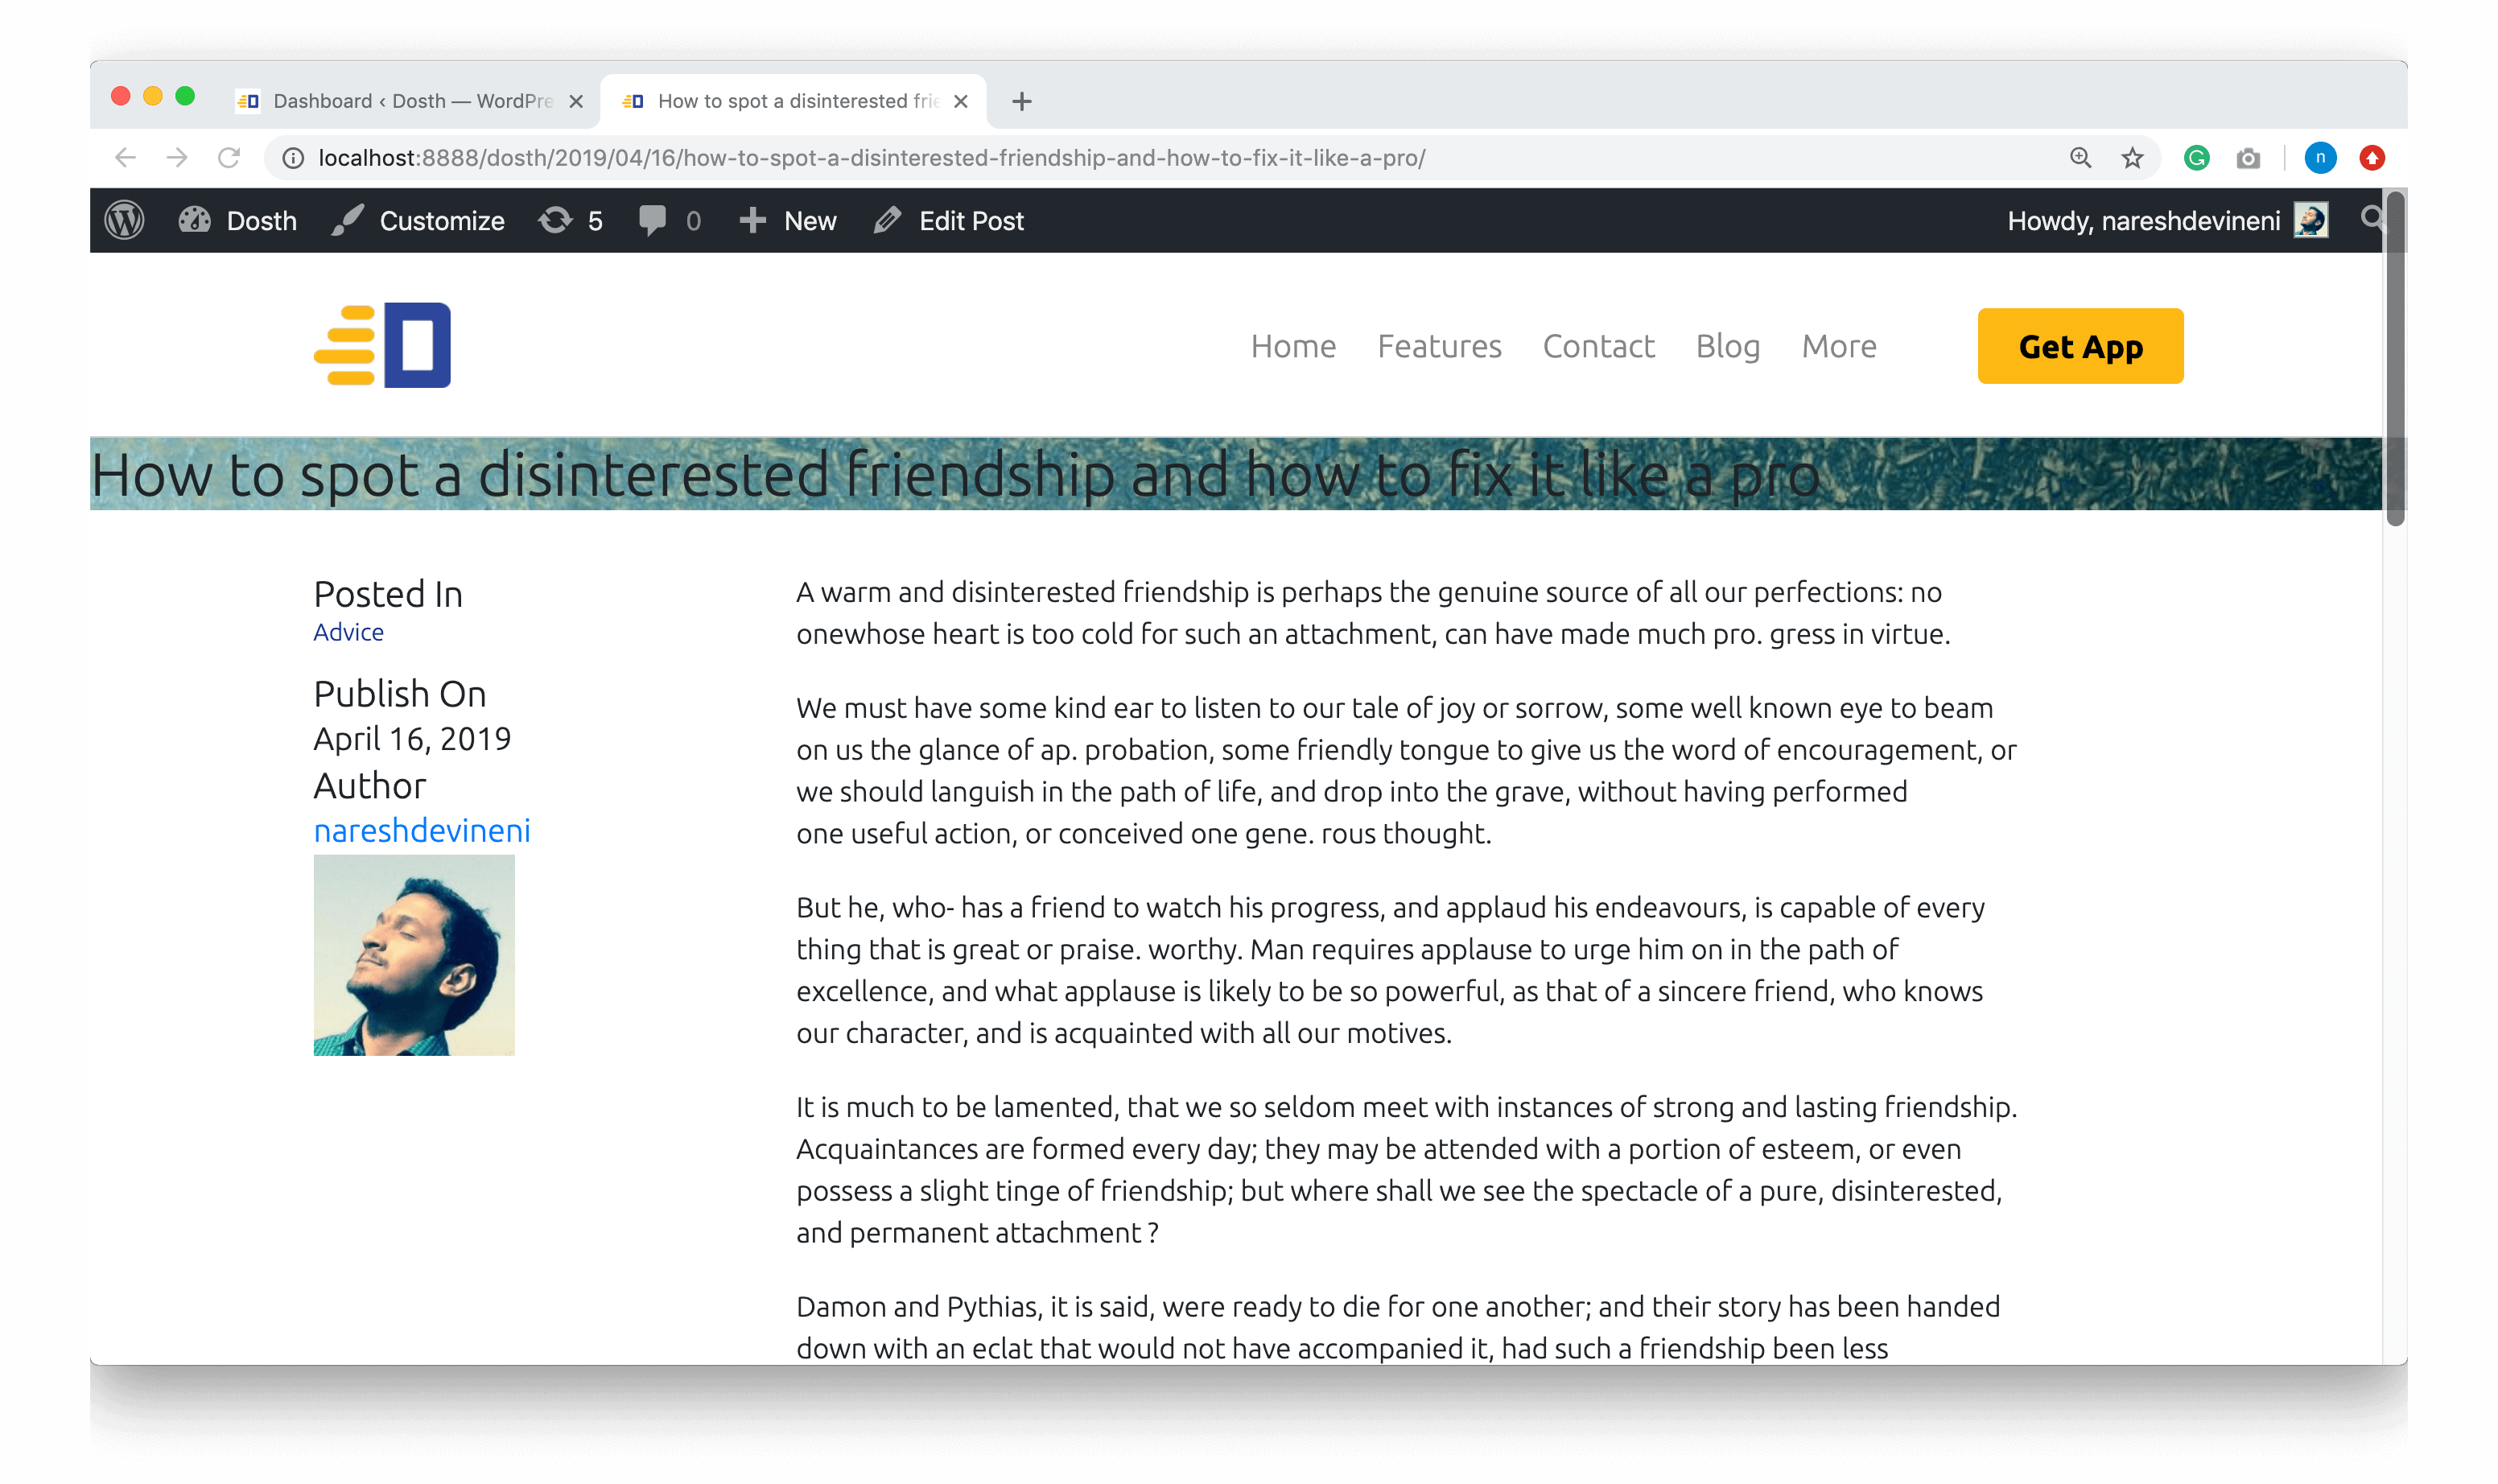
Again! Nothing much is going on the above code.
Just the regular Loop with some standard template tags in it. That’s all.
Inside the Loop, first, we are outputting the featured image. Instead of outputting it using the <img> tag, we are using the featured image as background to achieve the design in the mockup.
<?php if ( has_post_thumbnail() ) :
    $featured_image = wp_get_attachment_image_src( get_post_thumbnail_id( get_the_ID() ), 'full' ); ?>
    <div class="full-width-featured-image" style="background-image:url(<?php echo $featured_image[0]; ?>);">
        <h2><?php the_title(); ?></h2>
    </div>
<?php endif; ?>
“Can’t we just do this in the CSS file?”
There is no easy way to access the image URL of the blog post’s featured image inside a CSS file. So, sometimes it is totally ok to output inline styles.
Next, we created a two column layout using the Bootstrap Framework.
Inside the right-hand column, we are outputting the actual blog post content.
Inside the left-hand column, we are outputting blog post information such as categories and date published.
<div class="article-info col-md-3">
    <?php $categories = get_the_category(); ?>
    <?php if ( ! empty( $categories ) ) : ?>
        <div class="posted-in">
            <h4><?php _e( 'Posted In', 'nd_dosth' ); ?></h4>
            <?php the_category(); ?>
        </div>
    <?php endif; ?>
    <div class="published-on">
        <h4><?php _e( 'Publish On', 'nd_dosth' ); ?></h4>
        <?php the_date(); ?>
    </div>
    <div class="post-author">
        <h4><?php _e( 'Author', 'nd_dosth' ); ?></h4>
        <div class="author-name"><?php the_author(); ?></div>
        <?php get_avatar( get_the_author_meta('ID')  , 100 ); ?>
    </div>
</div>
There only new thing in the above code is:
<div class="post-author">
    <h4><?php _e( 'Author', 'nd_dosth' ); ?></h4>
    <a class="author-archive" href="<?php echo esc_url( get_author_posts_url( get_the_author_meta( 'ID' ) ) ); ?>">
        <?php the_author(); ?>
    </a>
    <?php echo get_avatar( get_the_author_meta('ID')  , 100 ); ?>
</div>
Introducing the_author()
<a class="author-archive" href="<?php echo esc_url( get_author_posts_url( get_the_author_meta( 'ID' ) ) ); ?>">
     <?php the_author(); ?>
</a>
the_author() function outputs the name of the author who is assigned to the blog post.
Currently, our site only has one user. The administrator. We created the administrator while installing WordPress, remember?
And whenever we create a blog post or any other custom post, because we did not create any other user, The administrator becomes the author of every post by default.
So, in my case, it is outputting my name.
But simply outputting the name is not of big use.
When a reader of the blog likes a blog post written by a particular author, he/she wants to see the other articles written by the same author.
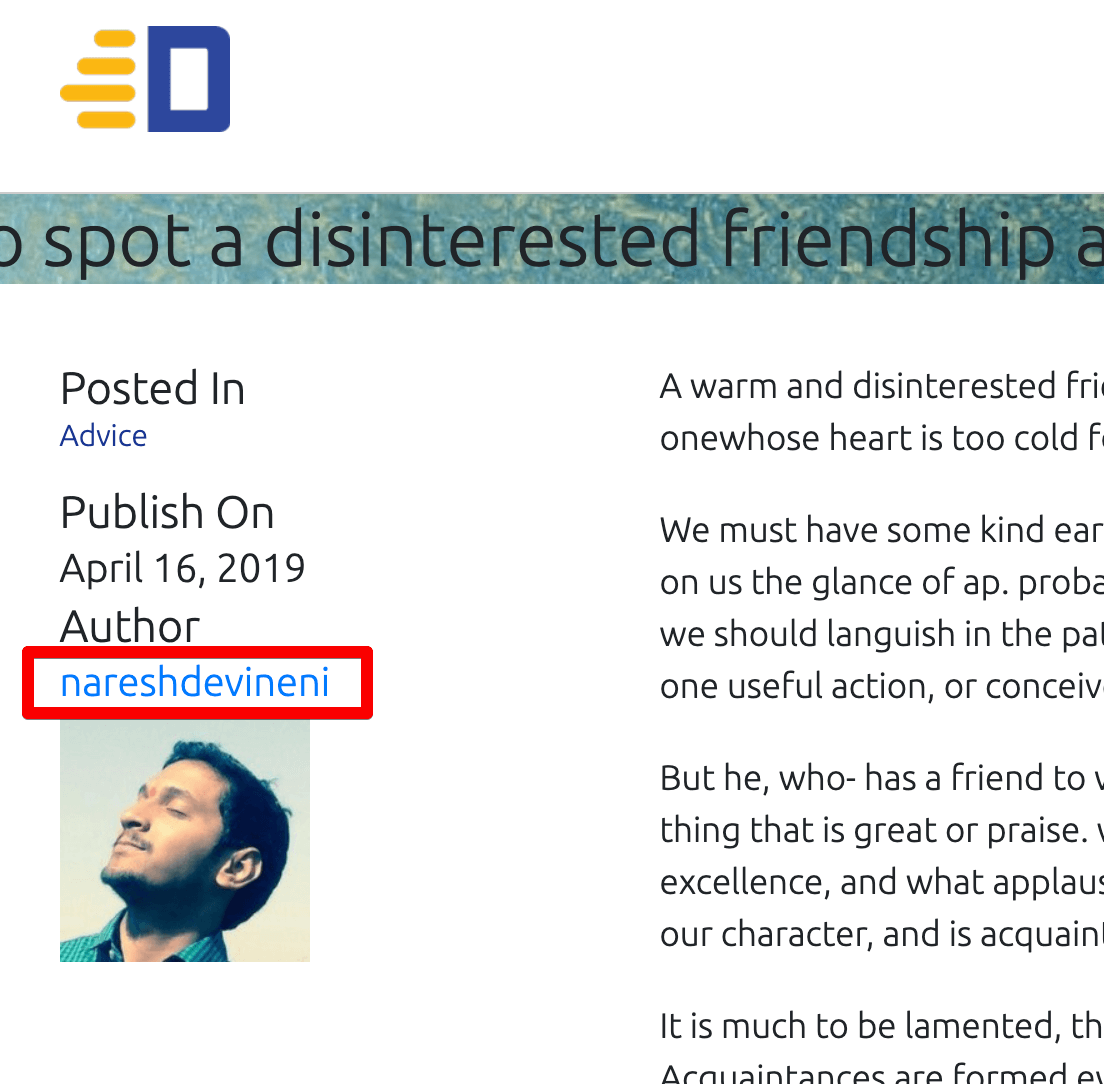
So, we have to link the author’s name to the author’s archive so that when a reader clicks on the author’s name, they should be navigated to the author’s archive page. An author’s archive page contains all the blog posts written by a particular author.
So, instead of just outputting the name of the author, we are wrapping the author’s name inside a hyperlink that points to the author archive.
<a class="author-archive" href="<?php echo esc_url( get_author_posts_url( get_the_author_meta( 'ID' ) ) ); ?>"><?php the_author(); ?></a>
We are getting the author’s archive page link by using the get_author_posts_url() function. This function accepts the author ID as the parameter.
WordPress creates a unique ID for every user( author ) we create. And we are getting the post author ID by using The get_the_author_meta('ID') function. This function accepts a single parameter to pull a specific kind of information about the user who authored the post. In our case, we want the ID of the author of the Post, so, we have provided ‘ID’ as the parameter for the get_the_author_meta() function.
Simply put, the following line of code returns the author’s archive permalink:
get_author_posts_url( get_the_author_meta( 'ID' );
For example:
http://localhost:3000/dosth/author/nareshdevineni
Introducing get_avatar()
Next, we are getting the profile picture of the author by using get_avatar() function.
<?php echo get_avatar( get_the_author_meta('ID') , 100 ); ?>
The get_avatar() function returns the markup of the <img> tag with the image URL of the post’s author.
And because it just returns the markup, we are manually echoing the markup returned by the get_avatar() function.
<?php echo get_avatar( get_the_author_meta('ID') , 100 ); ?>
The get_avatar() function accepts two parameters.
1) Post Author ID
As usual, We are getting the ID of the post author using the get_the_author_meta('ID')
2) Avatar Size
Next, we are providing the image size of the post author in pixels.
In our case, we need to output the 100x100px image of the post author So, I have provided 100 as the second parameter.
<?php echo get_avatar( get_the_author_meta('ID') , 100 ); ?>
“Hey! Where did the image come from?”
I will answer your question in the next lesson!
 © 2026 UsableWP. A project by Naresh Devineni.