How to add the custom Logo to our WordPress website
I don’t need to tell you the importance of a Logo for a website. Logo acts a virtual face to any online or offline business.
So, it is extremely important that we provide an easy way for the client to upload and change the site logo at any time and place. And, we can achieve this in a ton of different ways.
For example, we can put the logo inside our theme’s assets/images directory and echo it out like this:
<img src="<?php echo get_template_directory_uri() . '/assets/images/logo.png' ?>" alt="Company Name" />
At the end of the day, all we need is the URL of the logo so that we can give it to the image tag.
Most of the beginner theme developers use the above technique and they ask the client to replace the site logo image inside the assets/images directory. If you dig up some old themes in the market, you can still see this.
But, you shouldn’t use this technique. We have to make our client’s life easier by providing an upload logo image button instead of saying “Hey Client! Go the theme directory and upload your logo with a specific file name.”
And, in the last lesson, you have also learned that ‘custom-logo’ theme feature upload logo button. So let’s enable the support for the ‘custom-logo’ theme feature.
Open up the functions.php file and put the following highlighted code inside the nd_dosth_theme_setup action, like this:
function nd_dosth_theme_setup() {

    // Add <title> tag support
    add_theme_support( 'title-tag' );

    // Add custom-logo support
    add_theme_support( 'custom-logo' );

}
add_action( 'after_setup_theme', 'nd_dosth_theme_setup');
Alright, this tells WordPress that our theme supports an uploadable custom logo and forces WordPress to provide an upload logo section inside the Site Identity Options Panel.
So, let’s go to the Admin Dashboard -> Customize -> Site Identity Options Panel and check it out.
Now that we have a button to upload the site logo, let’s upload the following logo:
The size of the above logo is 140x88px. This is a 2x version of the actual logo and we should always upload a 2x logo version to support retina mobile devices and retina desktop/laptop monitor.
Now, I am not going to suggest you upload 2x version of every image. I only suggest this 2x image strategy for the logo. Because a few extra kilobytes of a logo image does not really impact your frontend page load speed.
Also, I am not going to brag that the theme we are building is retina ready. WordPress has nothing to do with the retina devices.
If you want your WordPress website to be retina ready, use SVGs or Font-Icons.
Anyway, back to the task at hand.
If we uploaded the logo, WordPress will provide us with a chance to crop the image and I will skip cropping because I already properly cropped the logo inside Adobe Photoshop.
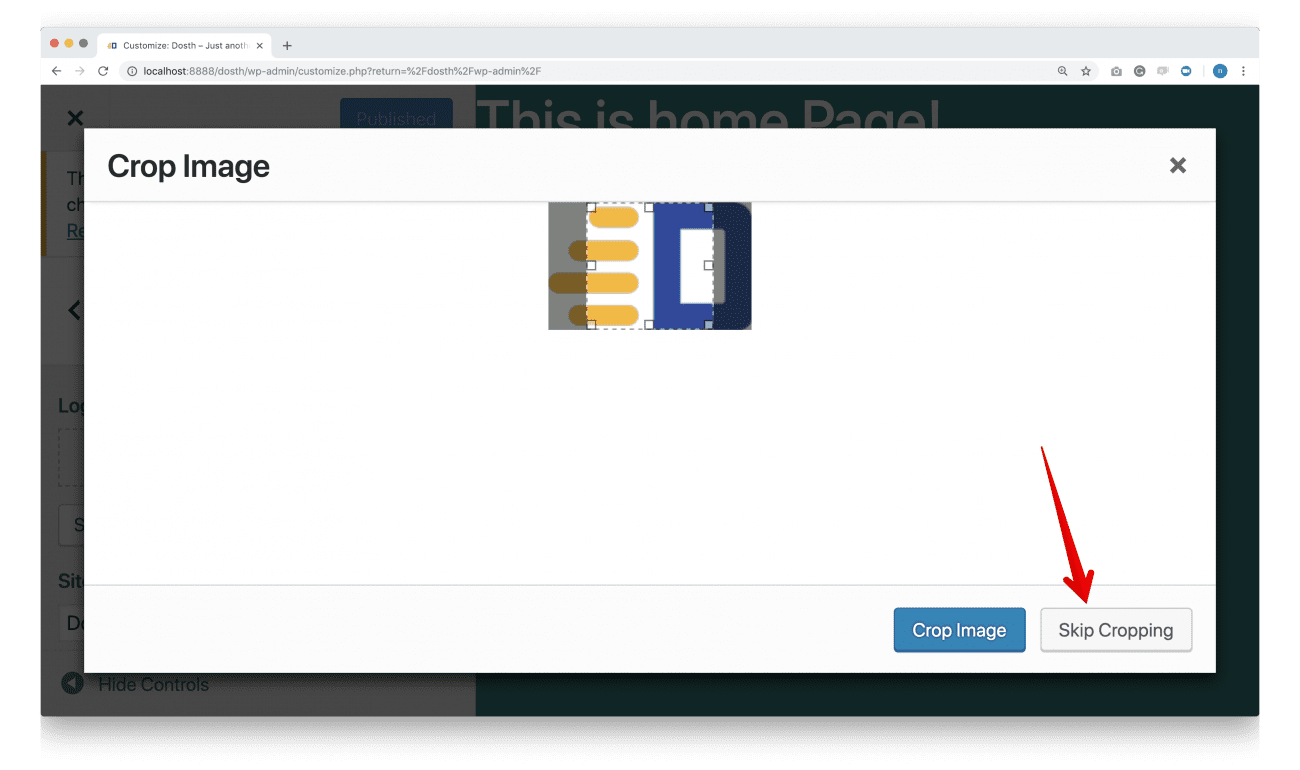
Once you have uploaded the logo, hit the publish button at the top to save the changes. Anyway, you can always change your mind by removing or changing the logo at a later point in time.
So, What next? Where and How does WordPress displays this logo?
Our job is only half done
Unlike the “title-tag” feature, WordPress is not going to display this logo automatically. It just doesn’t know where to display it. So, we have to tell it.
It is our responsibility as the theme developer to query this logo image from the database and display it on the frontend webpage using the theme template files. This is how we truly add theme support for some features. ‘custom-logo’ theme feature is the best example for this case.
the_custom_logo() function will display the custom logo anywhere you want
WordPress provides us with the the_custom_logo() function to display the logo.
This only responsibility of this function is to generate the following markup:
<a href="http://localhost:8888/dosth/" class="custom-logo-link" rel="home" itemprop="url">
     <img width="140" height="88" src="http://localhost:8888/dosth/wp-content/uploads/2019/01/dosth-logo-2x.png" class="custom-logo" alt="Dosth" itemprop="logo">
</a>
As you can see, this function generates an HTML image link. The link points the users to the Homepage of our website and the image source is the URL of the logo we just uploaded.
How convenient?
So, go back to the header.php file and call the above function inside the <div> with class logo.
<div class="logo">
     <?php the_custom_logo(); ?>
</div>
Now let’s test this out by visiting the Homepage in the browser.
Of course, It Works! But convenience always comes at a cost.
Let’s take over the control with the manual method
There is one problem in the above image link markup. If you notice the <img> tag, you can see the width and height attributes on it. And the width and height attributes on the <img> tag forces us to write CSS in a limited way. It also limits the responsiveness of the image.
In my opinion, It is better we generate the above Logo Image link markup manually by taking the full control.
It is not straightforward. But don’t you worry, always remember that WordPress has our back :P
Let’s take a look at the above image link markup one more time:
If you notice the image link markup in the above figure, there are only three pieces of dynamic information that needs to be pulled from the database.
- URL of the Homepage
- Image URL of the Logo
- Site Name
“Hey! Why Should we pull the above information from the database, we know all the values, Can’t we just hard-code them?”
No! Don’t ever do that. WordPress is a dynamic CMS and our clients love WordPress because it easily allows them to modify all the above pieces of information with just a few clicks.
Some clients even ask me to change the website name. It is a fair request. We should never hard-code any values that a client can change via the Admin Dashboard. It is a very bad theme development practice.
Anyway, if we can pull the above URLs and site name from the database, we have all the necessary information to re-create the above markup manually.
And we can use the following WordPress functions to get access to the information we need:
home_url()function returns the Homepage URL of the WordPress site.get_theme_mod('custom-logo')function call returns the image ID of the custom logo. Yep, in WordPress every image upload will have a unique ID. And if we provide this image ID to thewp_get_attachment_image_src()function, it will return the full URL of our custom logo.bloginfo()function returns a whole lot of information about of WordPress site and Site name is one of them.
Now, let’s put the above WordPress functions to the practice.
Go to the header.php file and replace the following code:
<div class="logo">
     <?php the_custom_logo(); ?>
</div>
With this:
<div class="logo">
    <?php if( has_custom_logo() ):  ?>
        <?php
            // Get Custom Logo URL
            $custom_logo_id = get_theme_mod( 'custom_logo' );
            $custom_logo_data = wp_get_attachment_image_src( $custom_logo_id , 'full' );
            $custom_logo_url = $custom_logo_data[0];
        ?>

        <a href="<?php echo esc_url( home_url( '/' ) ); ?>"
           title="<?php echo esc_attr( get_bloginfo( 'name' ) ); ?>"
           rel="home">

            <img src="<?php echo esc_url( $custom_logo_url ); ?>"
                 alt="<?php echo esc_attr( get_bloginfo( 'name' ) ); ?>"/>

        </a>
    <?php else: ?>
        <div class="site-name"><?php bloginfo( 'name' ); ?></div>
    <?php endif; ?>
</div>
“Ouch! What is that?”
Don’t panic. Nothing much happening in there! You’ll agree with me if we break it down piece by piece.
And, if you switch back to the browser, you’ll still see the same out.
Anyway, Let’s start with the IF/Else statements.
The IF Condition
Before we output the markup for the logo, we must always check if the logo has been uploaded in the first place. So, we are performing the check with the help of a WordPress conditional tag called:
has_custom_logo();
The above WordPress function returns true only if the custom logo is uploaded. If not, it returns false.
In our case, we have uploaded the logo, so the above function will return true and WordPress will process the code inside the IF condition and outputs the image link markup to the browser.
Now, a conditional tag is nothing but a PHP function which returns a true or false. Nothing more than that. And we can only use a conditional tag only inside a conditional statement like IF, ELSE IF, WHILE, etc.
Remember the Template Tags? WordPress divides its functions into categories so that we can easily find them and discuss them with our fellow developers :P
Anyway, what if the logo is not uploaded or removed for some reason?
The ELSE Condition
If the logo is not uploaded, we can not a show empty space in the place of the logo, right? So, just as a fallback, we need to output the name of the site using:
bloginfo( 'name' );
WordPress pulls the site name from “Site Title” option set in Admin Dashboard -> Settings > General and echoes it to the browser. Simple.
Inside the IF Condition: Getting the custom logo image URL
If we are inside the IF condition, that means someone has uploaded the custom logo inside the Admin Dashboard -> Customize -> Site Identity Options Panel.
To display this custom logo, we need to get its URL first. And getting the URL of the custom logo involves the following steps:
Step 1: Get the Image ID and save it to a variable
$custom_logo_id = get_theme_mod( 'custom_logo' );
As I have mentioned in a previous lesson, WordPress provides a unique ID to every image that has been uploaded to the media library. And, we need the image ID of a particular image to get its URL.
So, we are getting the Image ID for the custom logo using:
get_theme_mod( 'custom_logo' );
And we are saving it to the $custom_logo_id variable.
Now if we var_dump() the variable like this:
var_dump( $custom_logo_id );
We can see the actual ID of the logo image on the Homepage:
See? The ID of the image we have uploaded for the logo is 18.
Pro Tip: It is always a good idea to var_dump any WordPress function that returns something. It makes thing easy to debug if something goes wrong.
Step 2: Now let’s use this ID to get the custom logo Image data
$custom_logo_data = wp_get_attachment_image_src( $custom_logo_id , 'full' );
In the above line, using the wp_get_attachment_image_src() WordPress function, we are getting the custom logo like its dimensions, URL etc. and we are saving these details to the $custom_logo_data variable.
Now, let’s var dump the $custom_logo_data variable to examine what wp_get_attachment_image_src() is returning.
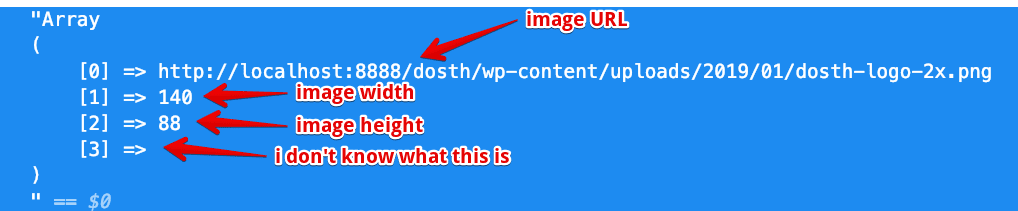
Ah! It is returning an array.
The first item inside the array is the image URL that we need. So remember this.
The second and third items are width and height values in pixels respectively. We can use these values to set the width and height attributes on the <img> tag. But we are not doing that.
Now let’s take a look at the wp_get_attachment_image_src() WordPress function more closely. We will be using this function quite a lot when we build the blog portion of the website.
For starters, It accepts three parameters.
1)The $image_id Parameter – integer
We must provide the ID of the image and it must be a numerical value.
So, In our case, we provided the $custom_logo_id variable as the first argument.
2) The $image_size Parameter – string or array
WordPress automatically generates various thumbnails sizes for every uploaded image. So, We need to specify the image size that we are interested in. If we don’t specify the image size, by default, WordPress gives us the image data for the thumbnail version of the actual uploaded image.
And here is the full list of the default image sizes that WordPress generates.
- small – smaller thumbnail with 100x100px
- thumbnail – 150x150px ( Square )
- medium – 300x300px (maximum width or height is 300px)
- large – larger thumbnail (maximum width or height is 1024px)
- full – the original image with the actual dimensions
When it comes to the logo, we need a high-quality one. So, it is a good idea to go for the full size. This is why in our case, we are providing a string with a value ‘full’. By providing the value ‘full’ we are telling WordPress that “Hey! I want the image data of the actual full image that I have uploaded.”
Now, instead of one of the images sizes mentioned above, we can also specify custom image dimensions in the form of an array. For example:
$custom_logo_data = wp_get_attachment_image_src( $custom_logo_id , array( 100, 50 ) );In the above example, we are instructing WordPress to return us the image by cropping it to 100x50px. We will be seeing this in practice when we build our blog’s archive pages.
3) The $icon Parameter – boolean (true or false)
Ah! It is not that important. I never really used it. This parameter is by default set to false. So, don’t worry about it :P
Step 3: Extract the URL from the custom logo Image data
$custom_logo_url = $custom_logo_data[0];
From step 2, we know that the URL is inside the first item of the array returned by the wp_get_attachment_image_src() WordPress function.
So, we are just storing the value of the first item of the $custom_logo_data array inside the $custom_logo_url variable.
That’s it, we finally have the URL of the custom logo. Its time to put it to use.
Inside the IF Condition: Let’s sanitize and use the logo URL
<img src="<?php echo esc_url( $custom_logo_url ); ?>"
     alt="<?php echo esc_attr( get_bloginfo( 'name' ) ); ?>"/>
Let’s take a look at the src attribute and the esc_url() function
If you notice the src attribute in the above code, we are sanitizing the URL before echoing it to the browser. We are using the esc_url() WordPress function to sanitize the URL.
We can also directly echo the URL without sanitizing it. But, it is ideal to not trust any piece of data in the World of the Internet. Even if it is coming from your own site’s database. Who knows, your database could have been compromised by a Hacker.
So, before we output any data from the database to the browser, it is always a good idea to sanitize it.
“Woah! Stop! What is sanitization? Tell that first!”
Introduction to Data Sanitization in WordPress
Data Sanitization is just a security precaution. It is a process of escaping or removing potentially malicious content from the data if it exists. In the case of our URL, the esc_url() function checks if the URL is valid. If it is valid, it returns the URL as is. But, If it is not valid URL, it escapes and removes any malicious characters that shouldn’t be used inside a URL.
“I understand the removing part! But What the heck is escaping?”
Escaping just means turning invalid data into HTML entities so that they are harmless. For example, a hacker can put a script tag inside the URL and attempt a Cross Site Scripting ( XSS ) attack.
Common, let’s try out the following code. You can put this code anywhere inside the <body> element
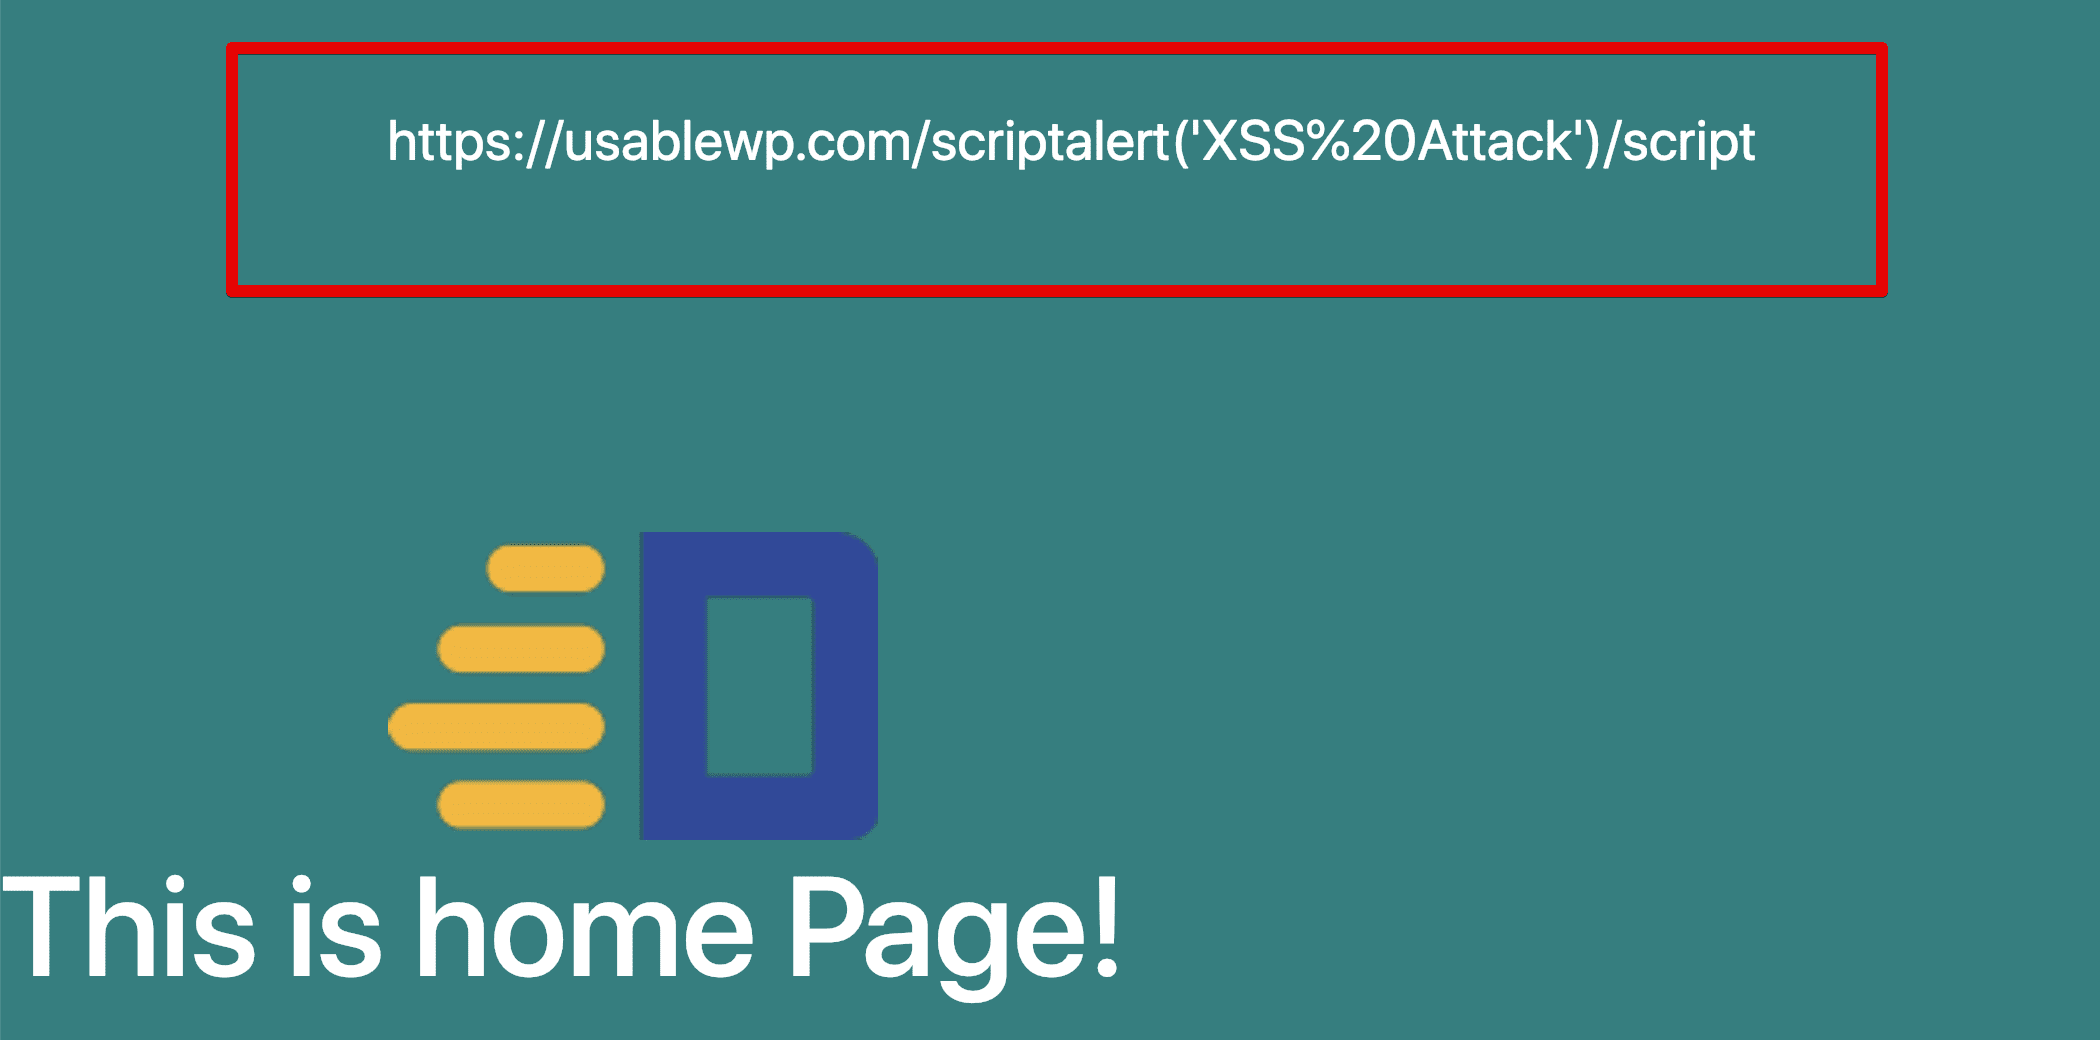
$url = "https://www.usablewp.com/<script>alert('XSS Attack')</script>";
echo $url;
If we echo the above URL directly to the browser, It is basically an XSS attack and you’ll see the following alert in the browser:

Now let’s sanitize the above malicious URL using the esc_url() function like this:
$url = "https://www.usablewp.com/<script>alert('XSS Attack')</script>";
echo esc_url( $url );
And this is output you’ll see:
If you notice the above URL, the esc_url() function removed the less than( < ) and greater than( > ) symbols from the URL all together. With those symbols missing, the browser fails to recognize the <script> tag and doesn’t execute it. So, the humble user of our Website doesn’t see any browser alert window.
Also, Spaces doesn’t belong in a URL. So, esc_url() function turned the space into %20 HTML Entity. This is character escaping in action.
WordPress ships with tons of sanitization functions. We will be going through them when the time comes.
Let’s shift our focus to the alt attribute and the esc_attr() function
<img src="<?php echo esc_url( $custom_logo_url ); ?>"
     alt="<?php echo esc_attr( get_bloginfo( 'name' ) ); ?>"/>
We are sanitizing and echoing out the Site name inside the alt attribute using the esc_attr() and get_bloginfo() functions.
Just like URLs, We must sanitize any dynamic data before we echo it inside an HTML attribute and the esc_attr() function does just that.
“Hey! Why are you using the get_bloginfo() instead of the bloginfo()function?”
There is one important difference between the get_bloginfo() and the bloginfo()functions.
The bloginfo()function echoes out the data instead of returning it. Because this function is directly echoing the data, we can not sanitize or manipulate the data.
The get_bloginfo()function just returns the value instead of echoing it. Because this function returns the data, we can sanitize or manipulate the data to fit our needs.
So, in our case, we need to sanitize the Site title before echoing it. Hence, we are going with the get_bloginfo()function.
That’s all about the <img /> tag.
Inside the IF Condition: Linking the site logo to the Homepage
Let’s take a look at the href attribute and the home_url() function
<a href="<?php echo esc_url( home_url( '/' ) ); ?>"
   title="<?php echo esc_attr( get_bloginfo( 'name' ) ); ?>"
   rel="home"><img src="<?php echo esc_url( $custom_logo_url ); ?>"
        alt="<?php echo esc_attr( get_bloginfo( 'name' ) ); ?>"/>

</a>
It is a common pratice to link the site logo to the homepage of the website. The internet users accepted and got habituated to this practice as well. So, we are wrapping the Logo inside a hyperlink that takes the user to the Homepage of the website.
We are getting the URL of the HomePage using the home_url()function and then sanitizing the URL using the esc_url()function.
By default, the home_url()function returns the Homepage URL without the trailing slash at the end of the URL. For example, if you are using MAMP, this is what you get:
http://localhost:3000/dosth
But, you can change this by using the parameters that the home_url()function accepts.
And this function accepts two parameters.
1)The $path Parameter – string
Using this parameter, we can attach any path relative to the Homepage URL.
In our case, We are using this parameter to just add the trailing slash ( / ) at the end of the URL.
http://localhost:3000/dosth/
<a href="<?php echo esc_url( home_url( '/' ) ); ?>">
2)The $scheme Parameter – string
The parameter deals with the Protocol of the URL. You can provide “http”, “https” and “relative” as values for this parameter.
Frankly speaking, We don’t use this parameter that often in our local development environment. So, I did not provide the parameter at all.
But this parameter becomes extremely useful if we are migrating our website to HTTPS from HTTP.
If we use HTTPS as the second parameter for the home_url()function like this:
<a href="<?php echo esc_url( home_url( '/', 'https' ) ); ?>">
This is the output we get:
https://localhost:3000/dosth/
Instead of
http://localhost:3000/dosth/
The title attribute
<a href="<?php echo esc_url( home_url( '/' ) ); ?>" title="<?php echo esc_attr( get_bloginfo( 'name' ) ); ?>"
   rel="home"><img src="<?php echo esc_url( $custom_logo_url ); ?>"
        alt="<?php echo esc_attr( get_bloginfo( 'name' ) ); ?>"/>

</a>
You already know what is happening with the title attribute. We are just printing the Site name inside it by sanitizing it.
And that is all you need to know about manually outputting the custom logo.
Here is the final fheader.php file for this lesson:
<?php
/**
 * The header for our theme.
 *
 * Displays all of the <head> section and everything up till <div id="content">
 *
 * @package Dosth
 */
?>
<!DOCTYPE html>
<html <?php language_attributes(); ?>>
    <head>
        <meta charset="<?php bloginfo( 'charset' ); ?>">
        <meta name="viewport" content="width=device-width, initial-scale=1">
        <link rel="profile" href="http://gmpg.org/xfn/11">
        <link rel="pingback" href="<?php bloginfo( 'pingback_url' ); ?>">

        <?php wp_head(); ?>
    </head>
    <body <?php body_class('no-js'); ?> id="site-container">
<header role="banner">
    <div class="container">
        <div class="row">
            <div class="col-sm-4">
                <div class="logo">
                    <?php if( has_custom_logo() ):  ?>
                        <?php
                            // Get Custom Logo URL
                            $custom_logo_id = get_theme_mod( 'custom_logo' );
                            $custom_logo_data = wp_get_attachment_image_src( $custom_logo_id , 'full' );
                            $custom_logo_url = $custom_logo_data[0];
                        ?>

                        <a href="<?php echo esc_url( home_url( '/', 'https' ) ); ?>"
                        title="<?php echo esc_attr( get_bloginfo( 'name' ) ); ?>"
                        rel="home">

                            <img src="<?php echo esc_url( $custom_logo_url ); ?>"
                                 alt="<?php echo esc_attr( get_bloginfo( 'name' ) ); ?>"/>

                        </a>
                    <?php else: ?>
                        <div class="site-name"><?php bloginfo( 'name' ); ?></div>
                    <?php endif; ?>
                </div>
            </div>
            <div class="col-sm-8">
                <nav class="primary-navigation">
                </nav>
            </div>
        </div>
    </div>
</header>
Now that we are done with the HTML markup of Site Logo, in the next lesson, we will fix the styling of the Header.
 © 2026 UsableWP. A project by Naresh Devineni.
Nice one this!
Superb! Working fine
Thank you very much. It work perfectly.
I am glad :)
I am following this tutorial after becoming bored of youtube videos.
Amazing content. Thanks alot Naresh Sir.
This was REALLY helpful, thorough and easy to understand as a WordPress newbie. Thanks for putting this together!
Good Explanation! Great Job 👍