Registering a custom taxonomy
Custom taxonomies in WordPress help us organize content in a much more manageable way.
If you are running a Car magazine type of blog, category and tag-based organization is definitely not enough. So, you end up creating custom taxonomies like “Engine Type”, “Brands” to give users of your blog more ways of filtering the content.
Custom taxonomies content organization solve problems and We are facing such a problem right now in the case of our reviews.
Currently, we are outputting Review “Source” information of an individual review using a custom field.
But this is not the ideal way.
If you visit any Mobile App Promoting Website, they’ll often publish app user reviews mentioning the sources of those reviews and these reviews stack up on the site along with the time.
And asking the client/content editor to type the Review Source every time they enter a review is bad! It leads to Human errors like Typos.
Of course, plugins like ACF allows us to provide a default value for a particular custom field. But that doesn’t cut it if you are entering different Review Sources all the time.
Also, If the client is running a social media campaign targetting “Google Play Store”, he/she would end up creating a landing page which showcases reviews from “Google Play Store” only.
So, it is better to use a custom taxonomy to categorize the reviews based on their sources. This also gives us the power to display reviews based on their source anywhere on our site.
Uff…
Let’s cut the talking and let’s just register a custom taxonomy for our Reviews post type.
The process of registering a Custom Taxonomy is totally similar to the process of registering a Custom Post Type.
All we have to do is register_taxonomy() function with a bunch of arguments. And, as usual, we have to hook this register_taxonomy() function to the init action hook.
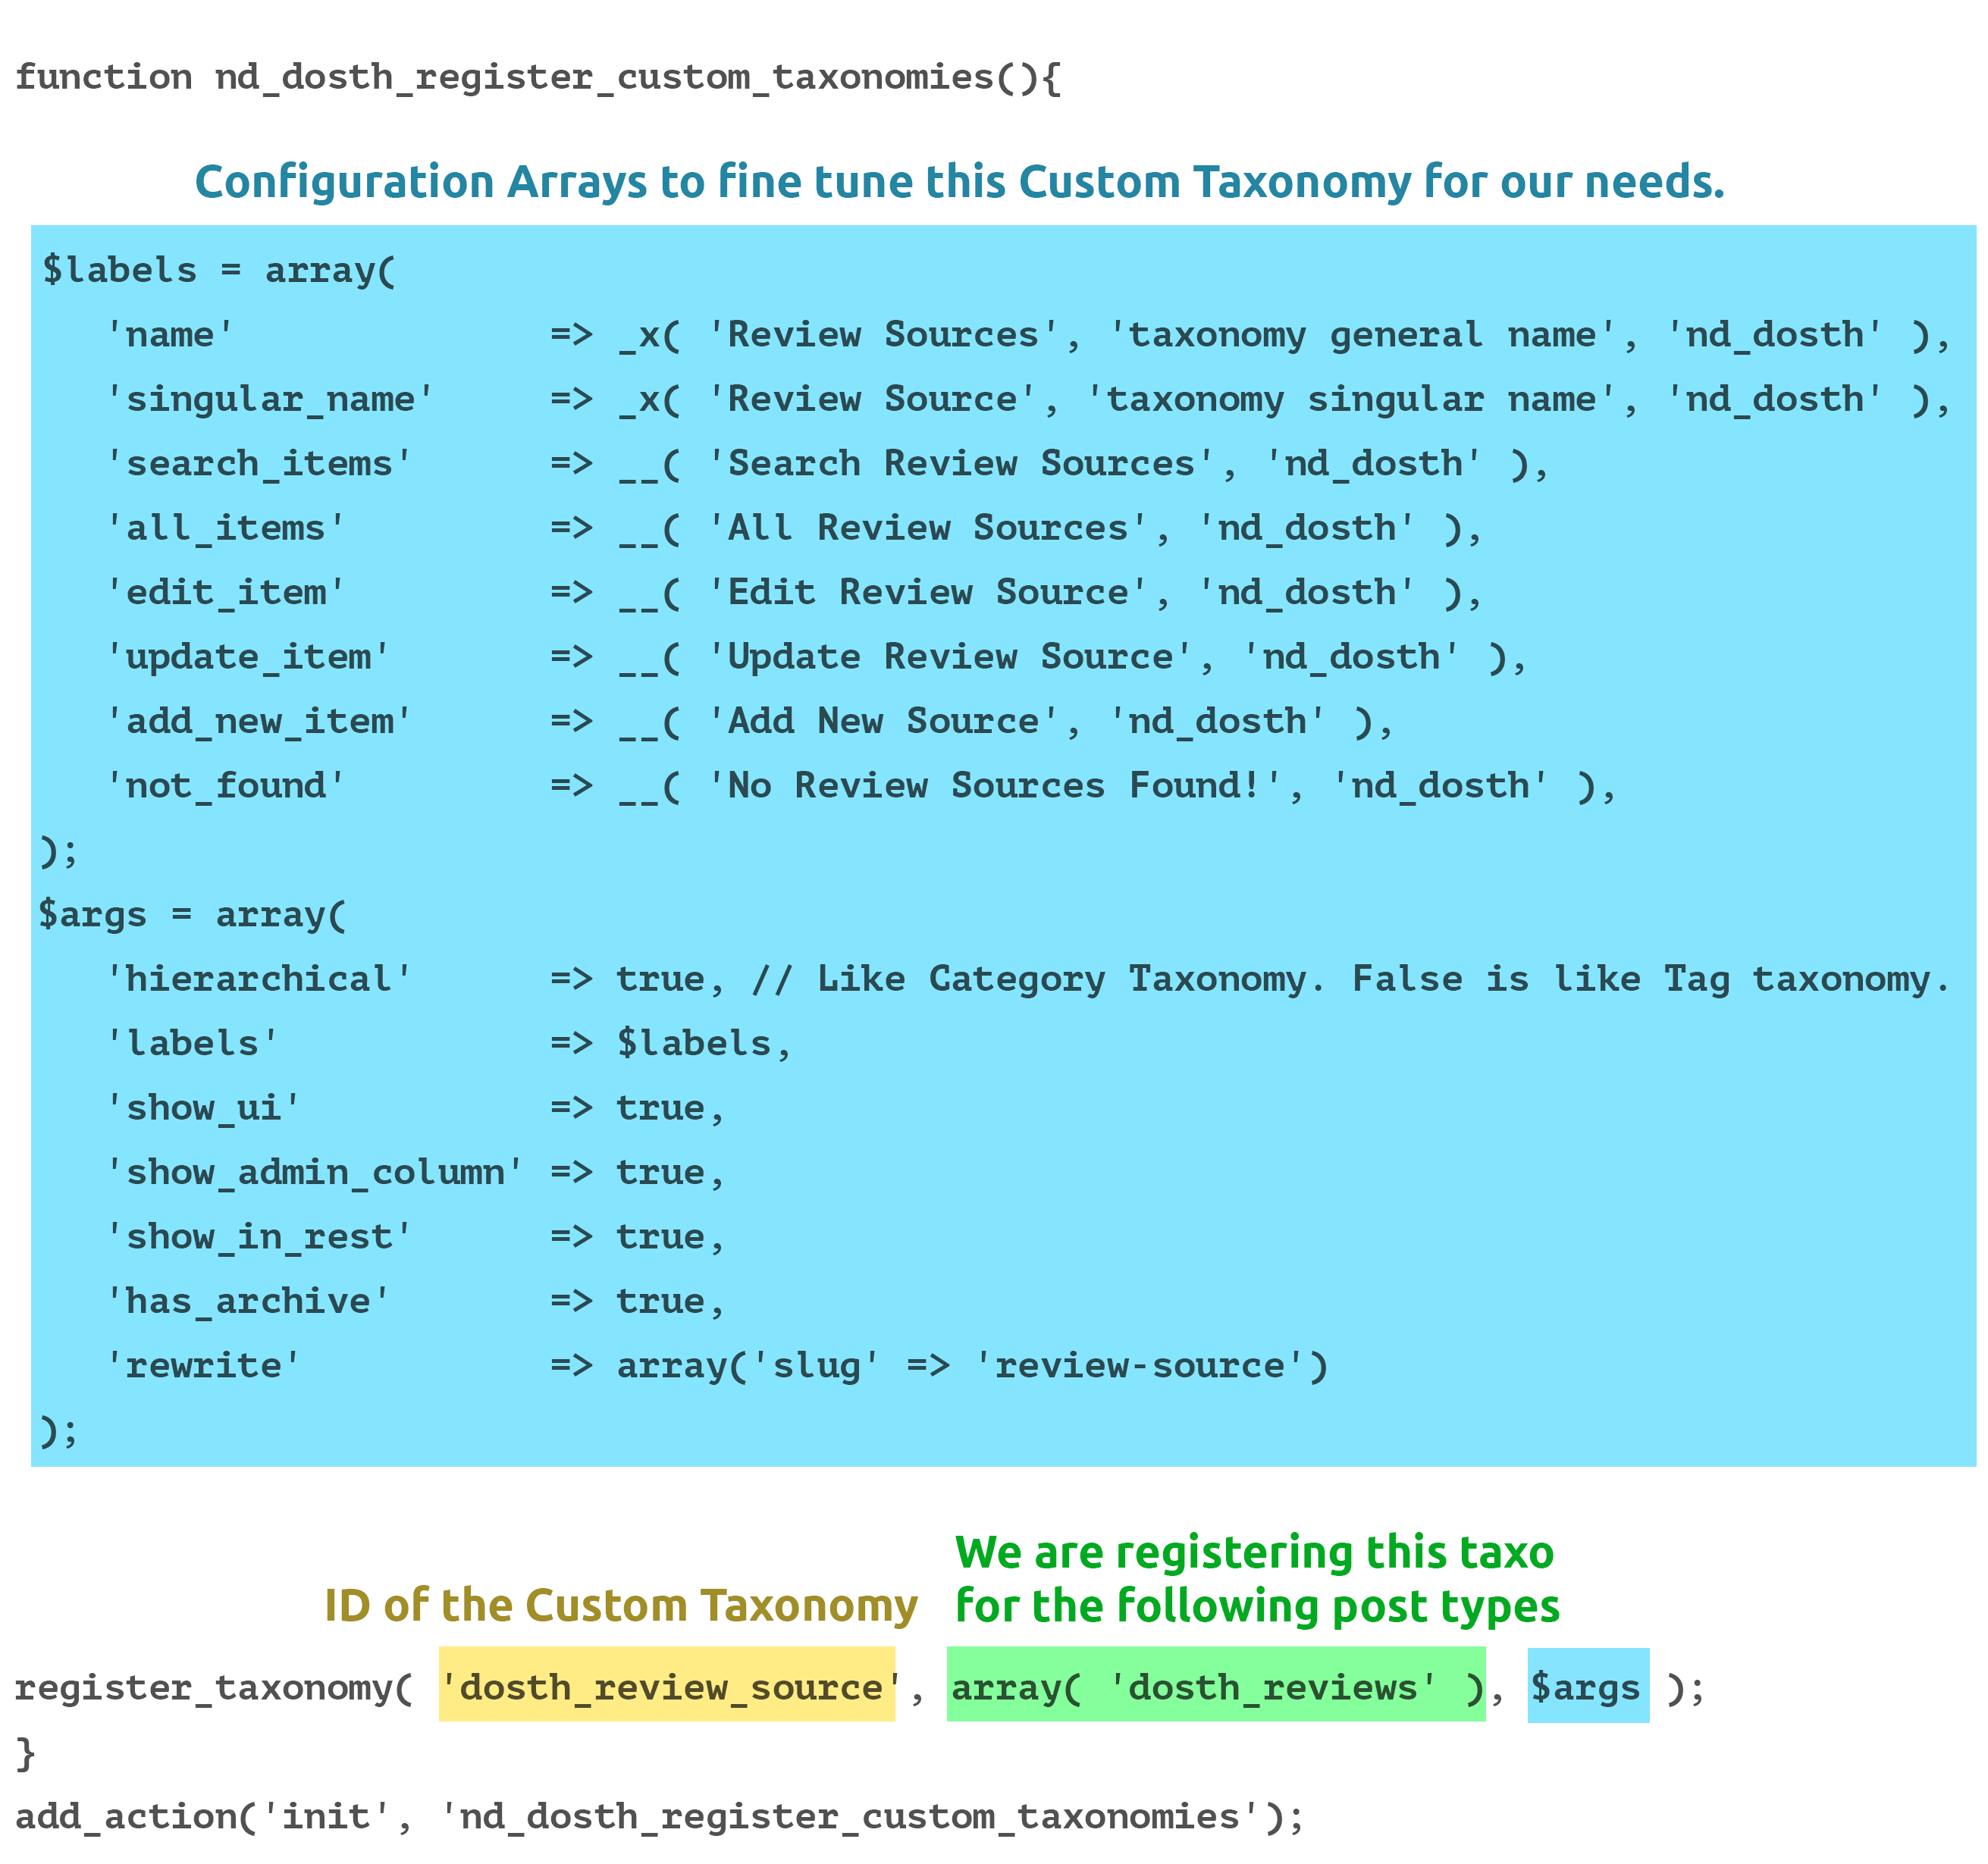
Open up the functions.php file and put the following code at the end of it.
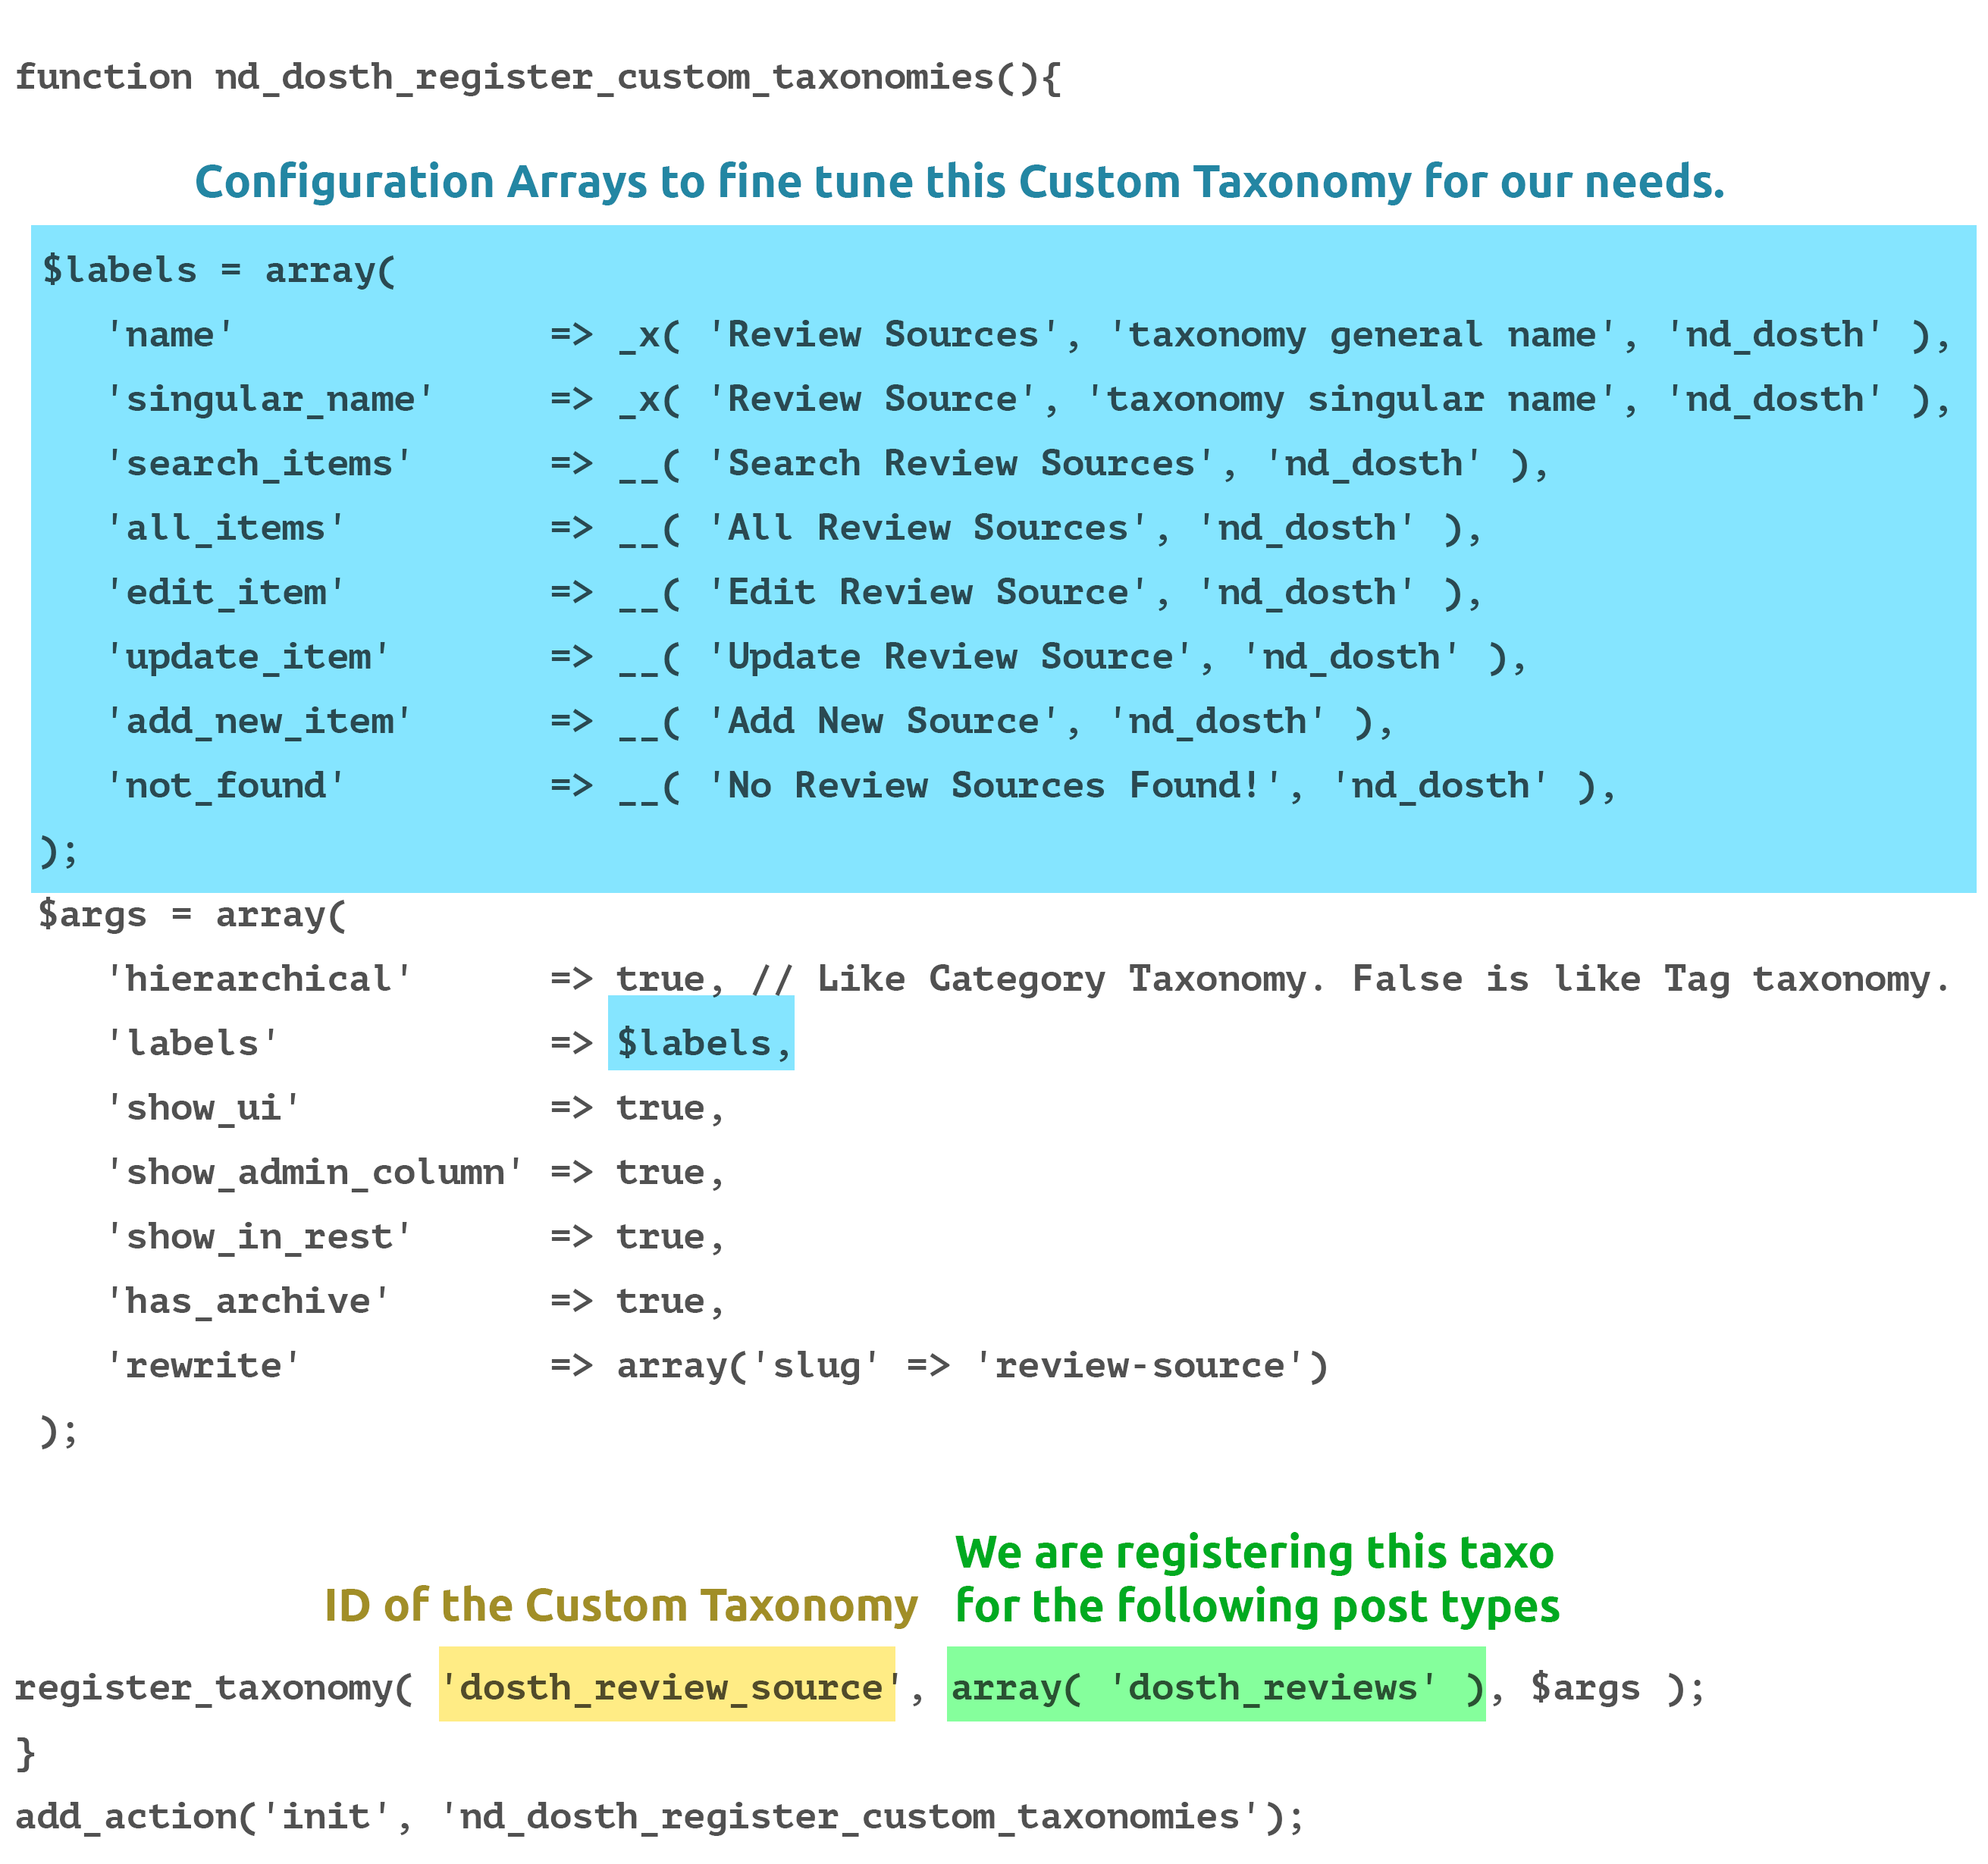
function nd_dosth_register_custom_taxonomies(){
// Add new taxonomy, make it hierarchical (like categories)
$labels = array(
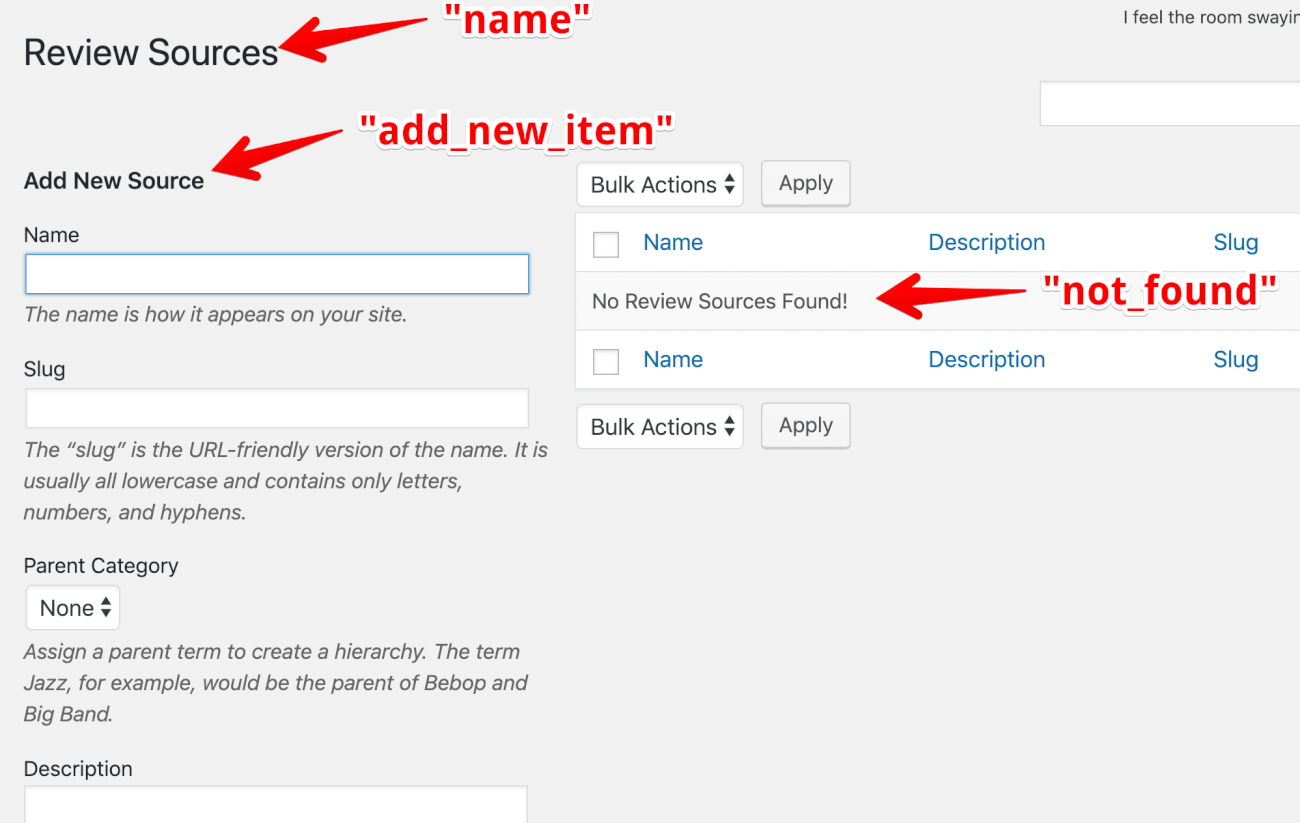
'name' => _x( 'Review Sources', 'taxonomy general name', 'nd_dosth' ),
'singular_name' => _x( 'Review Source', 'taxonomy singular name', 'nd_dosth' ),
'search_items' => __( 'Search Review Sources', 'nd_dosth' ),
'all_items' => __( 'All Review Sources', 'nd_dosth' ),
'edit_item' => __( 'Edit Review Source', 'nd_dosth' ),
'update_item' => __( 'Update Review Source', 'nd_dosth' ),
'add_new_item' => __( 'Add New Source', 'nd_dosth' ),
'not_found' => __( 'No Review Sources Found!', 'nd_dosth' ),
);
$args = array(
'hierarchical' => true, // Like Category Taxonomy. False is like Tag taxonomy.
'labels' => $labels,
'show_ui' => true,
'show_admin_column' => true,
'show_in_rest' => true,
'has_archive' => true,
'rewrite' => array('slug' => 'review-source')
);
register_taxonomy( 'dosth_review_source', array( 'dosth_reviews' ), $args );
}
add_action('init', 'nd_dosth_register_custom_taxonomies');
That’s all it takes to create a Custom Taxonomy in WordPress. Easy, right?
We can register multiple custom post types inside the above nd_dosth_register_custom_taxonomies action. You are not limited to register only one custom taxonomy per action.
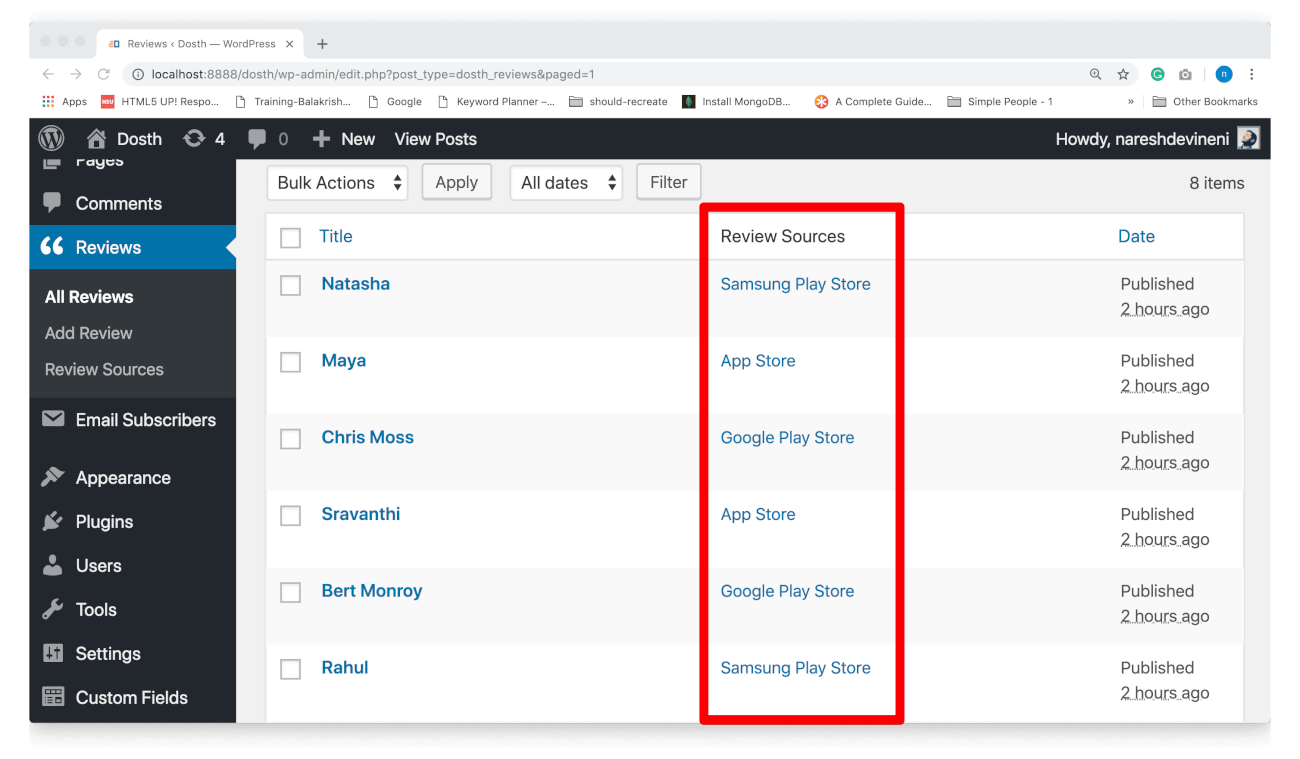
Once we register a custom taxonomy and because we linked this taxonomy to our “dosth_reviews” post type, a new sub-panel called “Review Sources” will be added to the “Reviews” panel inside Admin Dashboard.
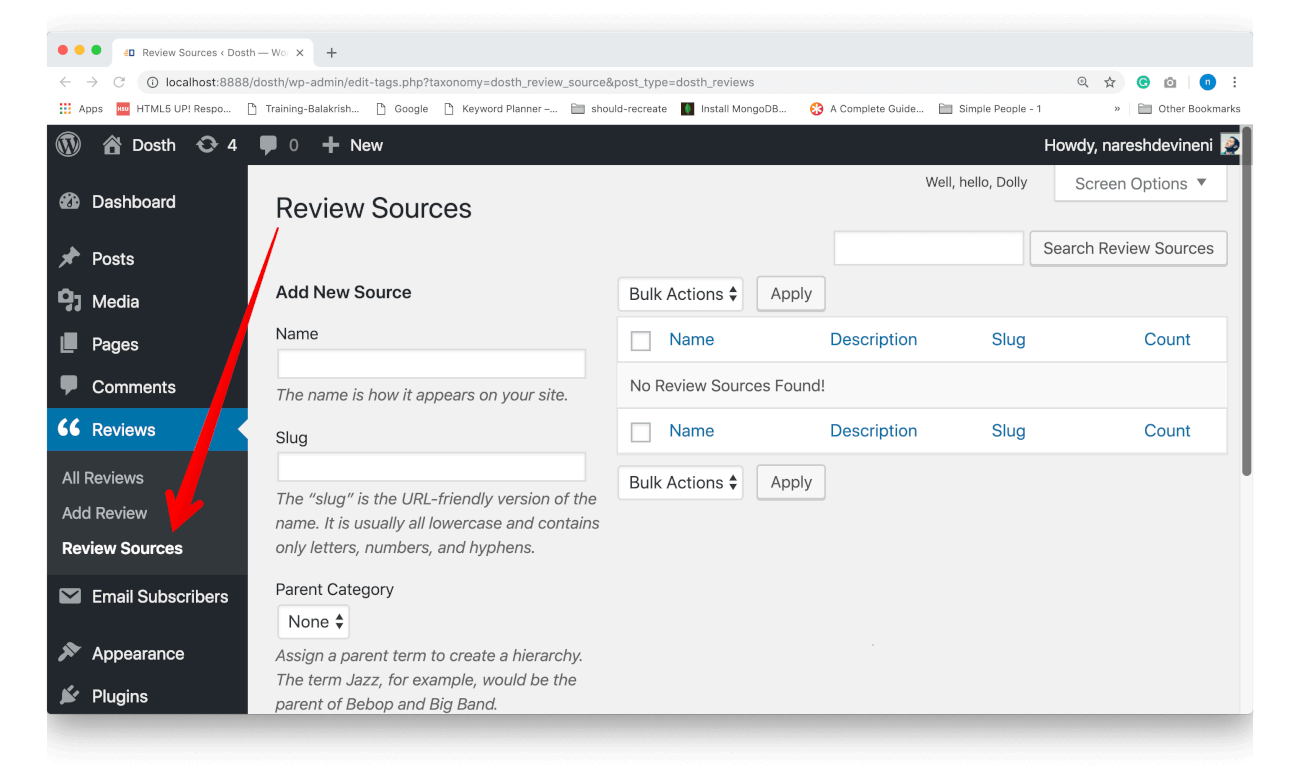
Go ahead and add the following terms to this taxonomy:
- App Store
- Google Play Store
- Samsung Play Store
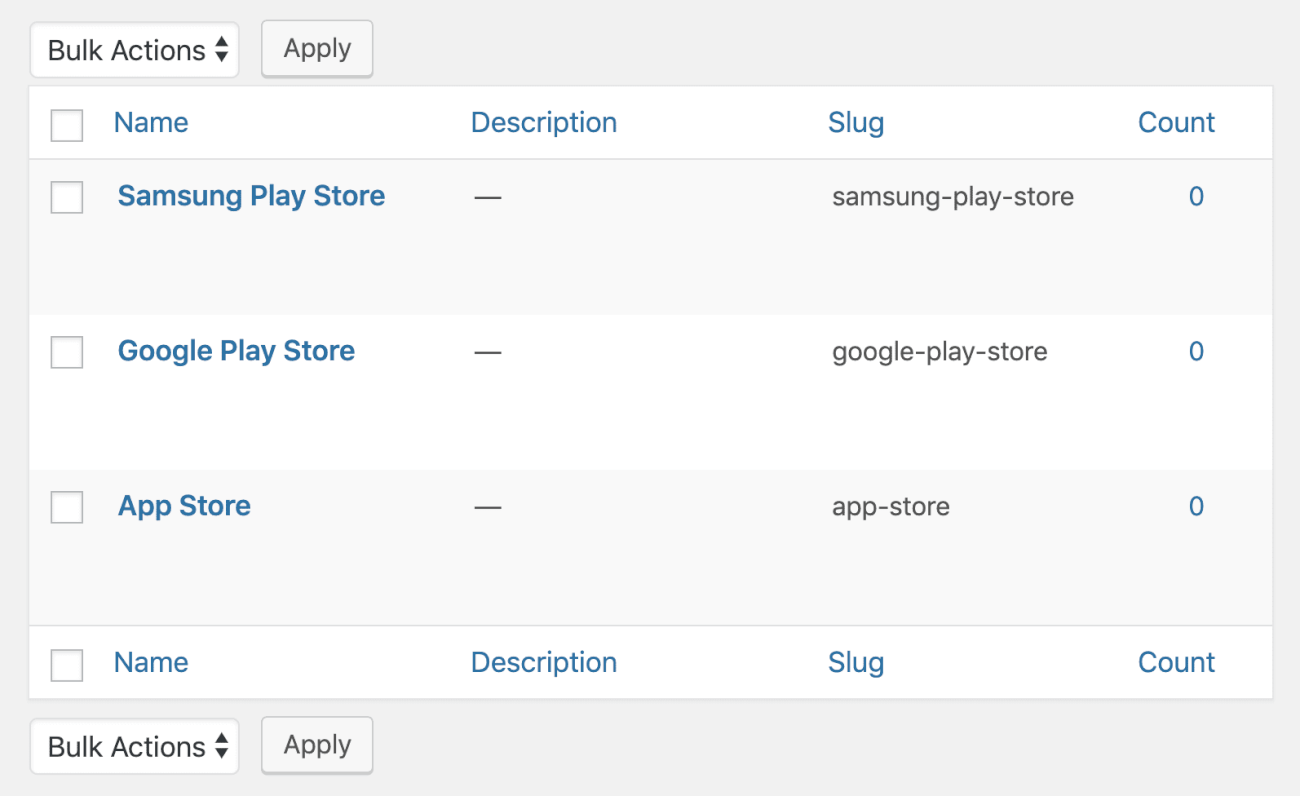
And assign these terms to the reviews.
Now, let’s break down the above code.
Now, don’t panic! This is just a different yet easy-to-read way of organizing the code. Otherwise, this code is pretty similar to the custom post type registration code that we have seen a few lessons back.
Anyway, first of all, we are registering a new custom taxonomy called “dosth_review_source” using the register_taxonomy() function call.
The register_taxonomy() function accepts three parameters.
First one is the Unique ID of the Custom Taxonomy. We use this ID when we are writing Custom Queries to output the Posts of this Custom Taxonomy to the frontend.
The second parameter is the Post Types array. We are registering the custom taxonomy for the use with post types present in this array.
In our case, we want this taxonomy to be used with “dosth_reviews”. You can provide both default and custom post types for this array. For example:
array( 'post', 'dosth_reviews' );
Finally, the third parameter is the configuration array that we must provide to fine tune the Custom Taxonomy for our needs. It is this array that tells WordPress “Hey! I want my custom taxonomy to behave like this!”
The Configuration arguments of the Custom Taxonomy
Let’s go through the above arguments one by one.
The $hierarchical argument
As you already know, there are two default taxonomies in WordPress.
1) Category – Hierarchical because you can have sub-categories, right?
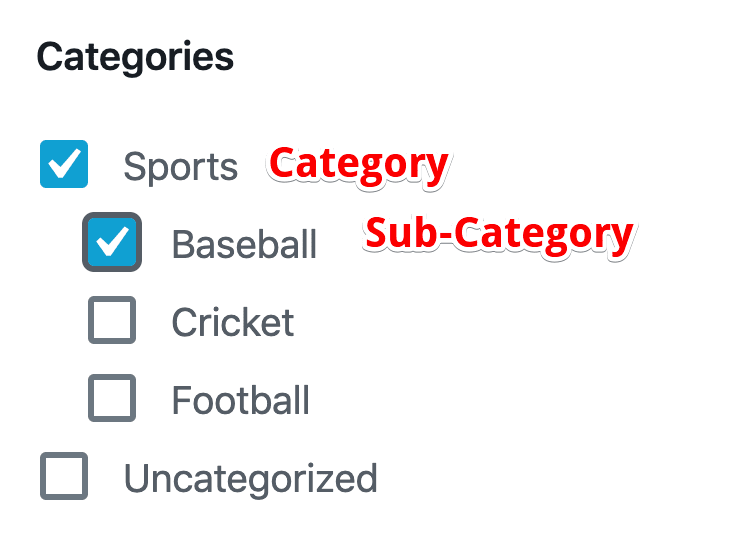
2) Tag – Not Hierarchical like category taxonomy. You can create sub-tags, right?
The $hierarchial argument lets you decide whether the custom taxonomy should be hierarchical like categories or non-hierarchial like tags.
Honestly, in my entire career of WordPress theme development, I have never created a non-hierarchical taxonomy. Probably, you’d never will :P
The $labels argument
You already know what this argument does. By default, WordPress creates the same interface for all post types and taxonomies. So, the only thing you have to worry about is the labels of that interface.
Also, this time, I have decided to keep the configuration array a bit neatly organized. So, I created $labels array separately and just referenced it inside the actual configuration array.
The $public argument
You can’t see this argument in the above code. The default value of this argument is true. So, I omitted it.
This is not the case with Custom Post Types. If you remember, the default value of $public argument for custom post type is false. So, we did not omit this argument and specified True.
The $show_ui argument
Now because the $public argument is true, all other arguments which depend on it will also be true. The $show_ui argument is one of them. So, you can totally omit it. But, I just kept it around for no reason :P
Anyway, Setting this argument to true will let you manage the terms of this custom taxonomy like the way you manage the terms of other taxonomies like Category and Tag.
The $show_admin_column argument
This argument lets you decide whether to show this taxonomy in the custom post list screen for filtering purposes.
Neat, right?
The $show_in_rest argument
If you set this argument to False, the Gutenberg editor would not show this taxonomy terms in the post edit screen sidebar.
https://github.com/WordPress/gutenberg/issues/3369#issuecomment-342499734
The comment in the above URL reads “The editor operates using the REST API, taxonomies and post types must be whitelisted to be accessible within the editor. This is a restriction of the API itself, and one which has caused some trouble in the past.”
The $query_var argument
I did not use this argument this but it is a special one.
This argument allows you to make URL Queries like:
/review-source=$source_name
For example:
http://localhost:8888/dosth/review-source="app-store"
And for direct queries through WP_Query like:
new WP_Query(
    array(
        'dosth_review_source'=>'app-store',
    )
)
Setting $query_var argument to false will disable these methods, but you can still fetch posts with an explicit WP_Query taxonomy query like:
new WP_Query(
    array(
        'taxonomy'=>'dosth_review_source',
        'term'=>'app-store'
    )
)
I will set this argument to true for testing out the custom taxonomy for future enhancements. Testing doesn’t hurt much, right?
The $rewrite argument
You already know what’s happening with this argument.
Simply put, this argument lets us customize the URL structure of the Custom Taxonomy.
For example, by default, in our case, if we don’t specify this argument, WordPress displays the archive of this taxonomy when a user visits the URL with Custom Taxonomy ID and its term, like this:
http://localhost:8888/custom_taxonomy_id/term
For example:
http://localhost:8888/dosth_review_source/google-play-store
If you remember, we gave “dosth_review_source” as the ID to our “Review Source” taxonomy.
But that doesn’t look good, right? Clients always want the URL of the taxonomy page to be like:
http://localhost:8888/review-source/google-play-store
And the $rewrite argument lets us do just that. It helps us use the desired URL for the archive of our custom taxonomy.
The $rewrite argument allows us to fine tune the URL mechanism of our Custom taxonomy by accepting sub-arguments in the form of an Associated array.
In our case, we are only using the ‘slug’ sub-argument to specify the ‘slug’ of our taxonomy archive page.
Honestly, apart from the ‘slug’, I have never used other sub-arguments. Anyway, you can always learn more about them by visiting the following Codex page:
https://codex.wordpress.org/Function_Reference/register_taxonomy
That’s all
That’s all it takes to register a custom taxonomy and link it to the existing custom post type.
In the next lesson, we will do some cleanup and will start using our custom taxonomy.
 © 2026 UsableWP. A project by Naresh Devineni.
Awsome!
Thank you Naresh, very helpful!