Get best domain name and web hosting along with an SSL certificate
Long story short: Use Godaddy for purchasing the domain name and use Rocket.net for web hosting. This will ensure that you get best domain name and web hosting for your website.
Long story…
For the world to view your website, you must do three things:
- Get a domain name using Godaddy
- Get web hosting service that creates a web server for you and installs WordPress on it. We will be using Rocket.net.
- Finally, link the domain name with the web hosting service.
When you do these things, you’ll have a WordPress site that is accessible by the people of the internet.
Now don’t panic if it looks too technical for you. These steps are easy and quick to perform.
Shall we get started?
Step 1: Purchase domain name from Godaddy
If you have no clue about how to name your website, please read the do’s and don’t of getting a domain name.
Anyway, many websites allow you to purchase a domain name.
But according to my experience, there are only three websites that provide a reliable domain registration service:
I have purchased many domain names from these companies but never faced any problems.
And if I have to recommend only one company, I would recommend godaddy.com because their support team is pretty awesome.
Many of my clients faced many problems with Godaddy’s web hosting. So, I don’t recommend them for hosting your website.
Anyway, let’s purchase a domain name for our website now.
I will use Godaddy for mine, but feel free to go with any other company you like.
First, visit GoDaddy and search for the domain name you want to purchase
The design of GoDaddy’s website could change by the time you are reading this lesson, but the goal here is to look for the search bar:
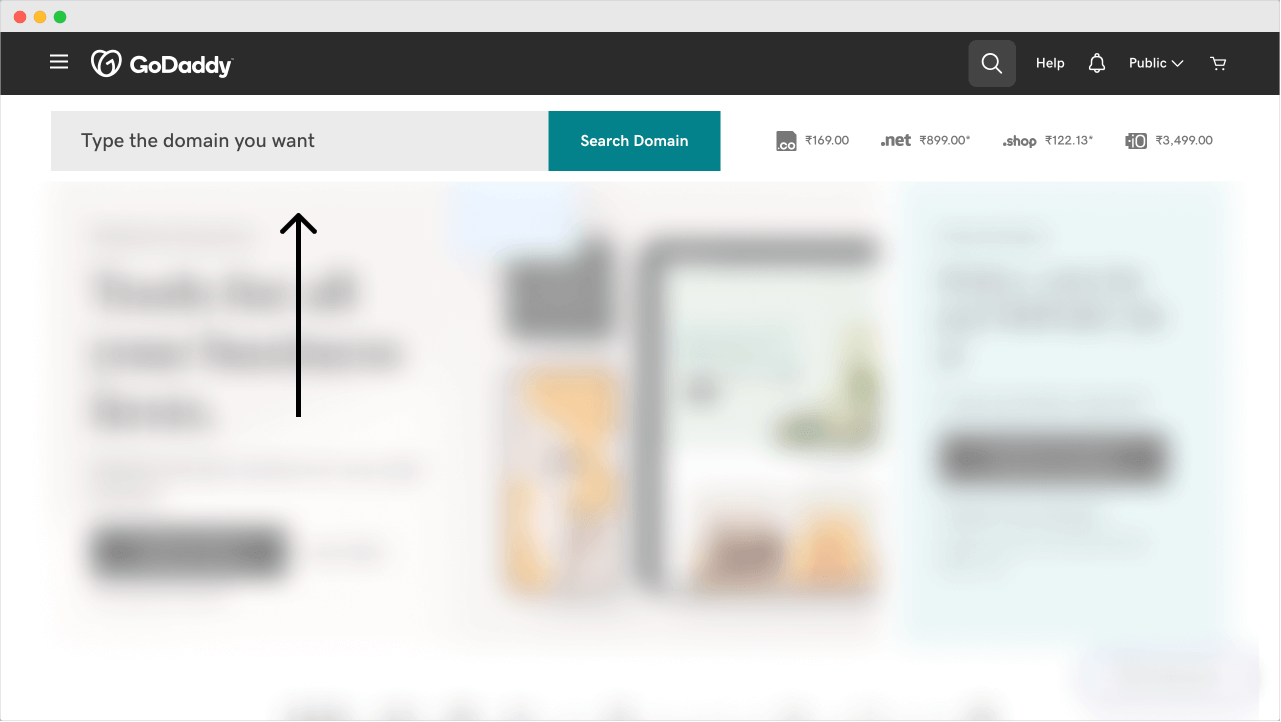
For some reason, if the domain name you’re looking for is not available, feel free to look for other domain extensions by scrolling down.
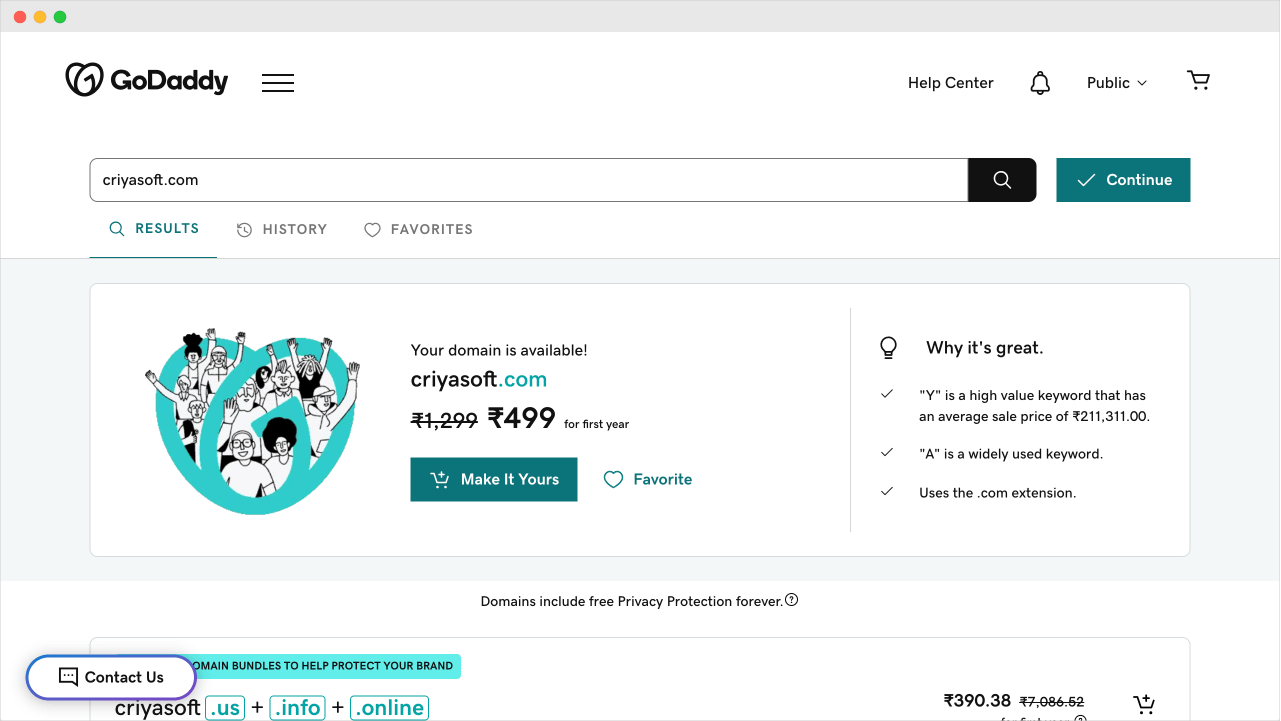
Anyway, add the domain name to the cart and proceed to the next step.
Protect your domain name but don’t get a professional email address
As the next step, Godaddy will ask us whether we want to protect our domain name.
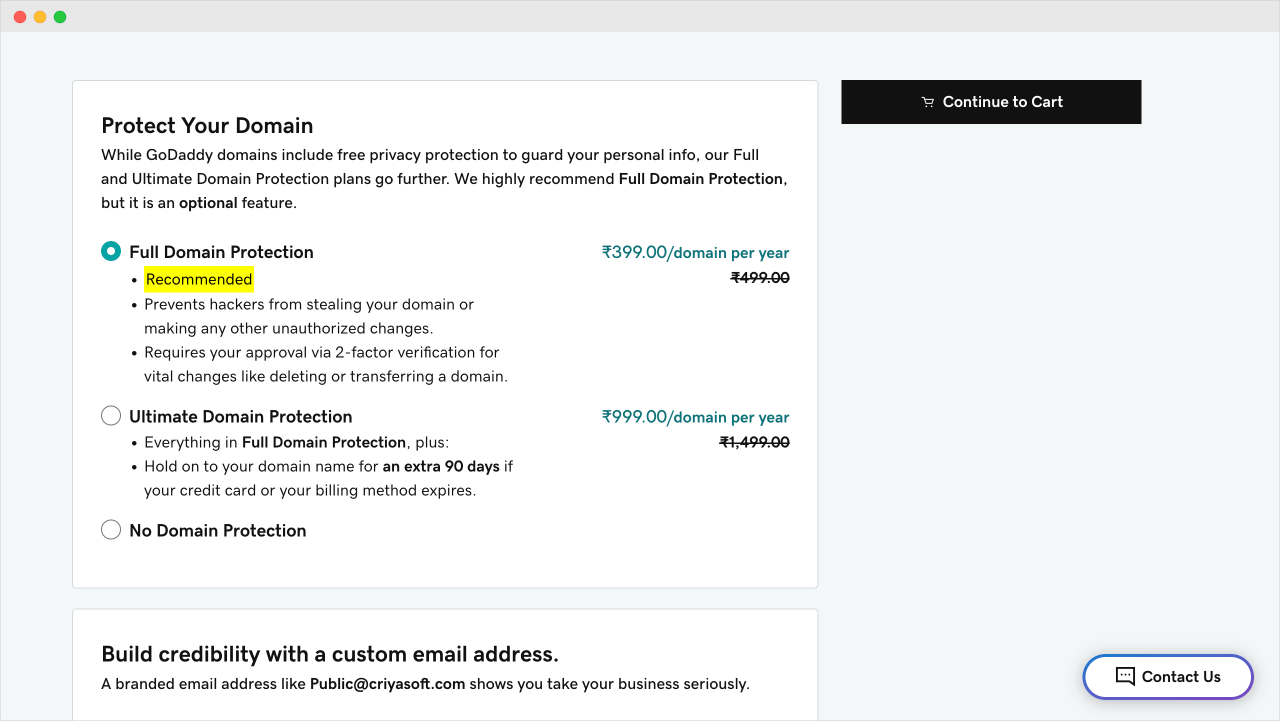
If you choose “Full Domain Protection”, Godaddy will hide your details when someone searches for your business or personal details using the domain name.
It prevents hackers from stealing your domain or making unauthorized changes.
So, stick with the “Full Domain Protection” option, although it costs you money.
For the next option about “Custom Email Address”, Stick with the “No Professional Email” option.
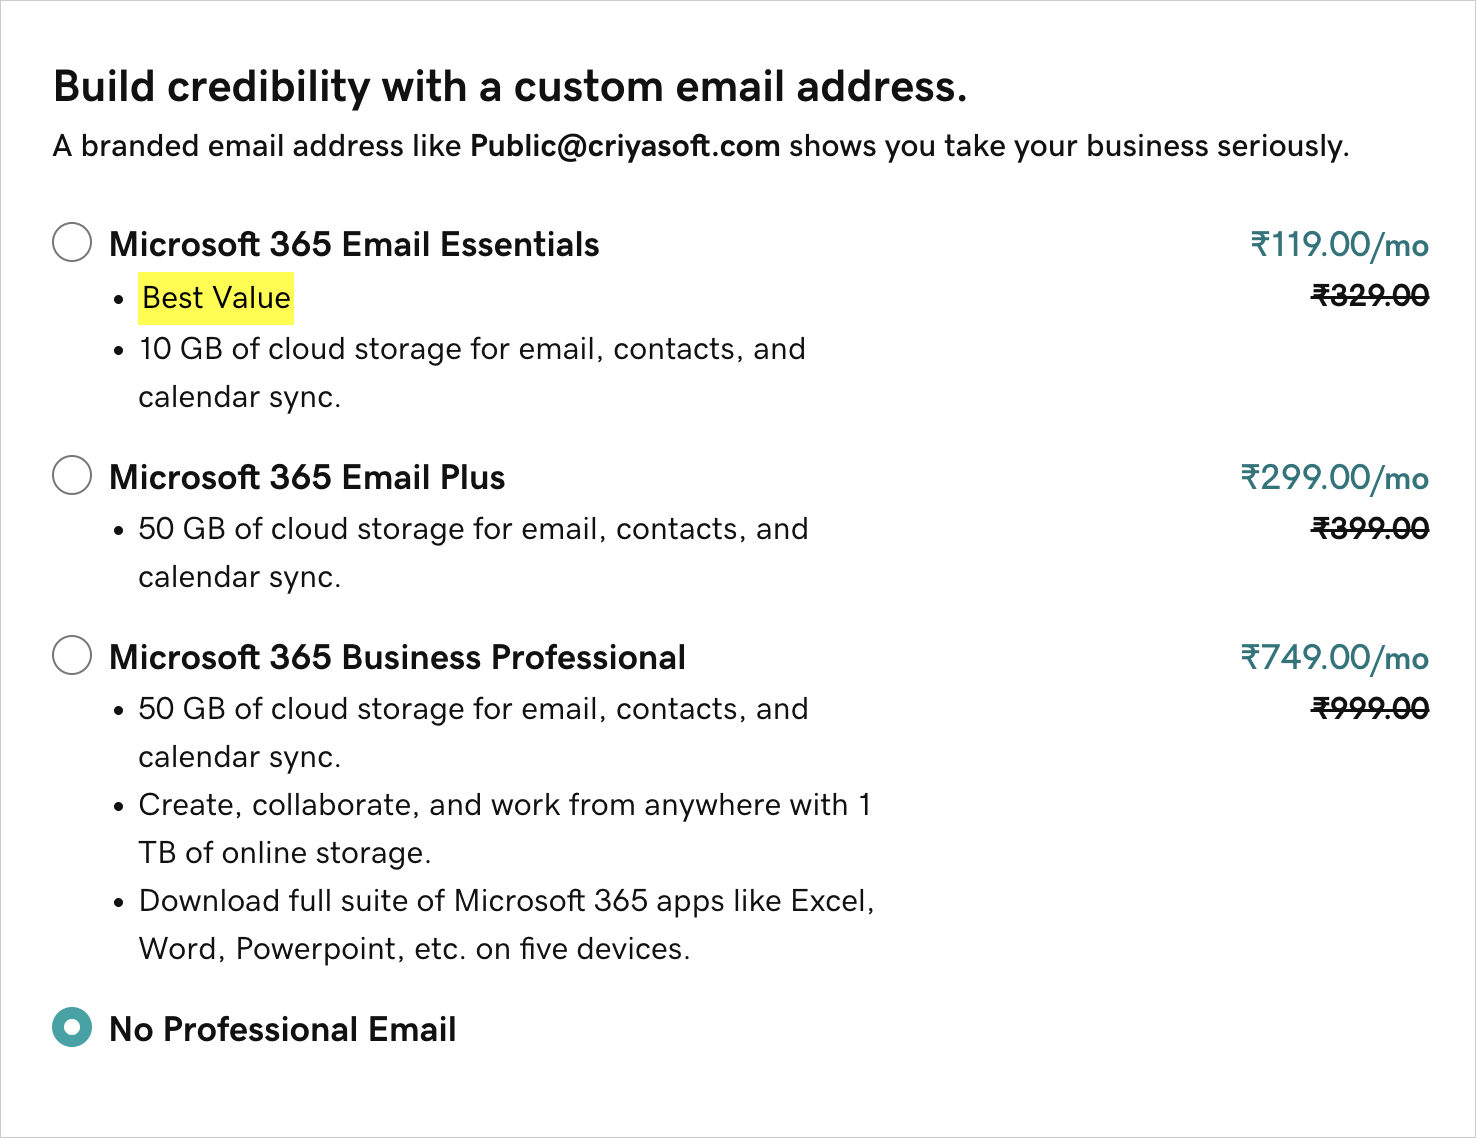
We will get a professional email address from “Google Workspace” (formerly GSuite).
Many clients faced problems with professional email addresses bought from Domain Registrars or Web Hosting companies.
Their emails used to land in the spam folders of their customers.
But as soon as they got migrated to “Google Workspace”, the emails started landing in their customers’ inboxes instead of the spam folders.
Anyway, click on the “Continue to Cart” button.
Select the number of years that you want to purchase the domain name for
Buying the domain name is not a one-time job.
You should keep renewing the domain name every year. Otherwise, it will get expired, and someone else could buy it in the future.
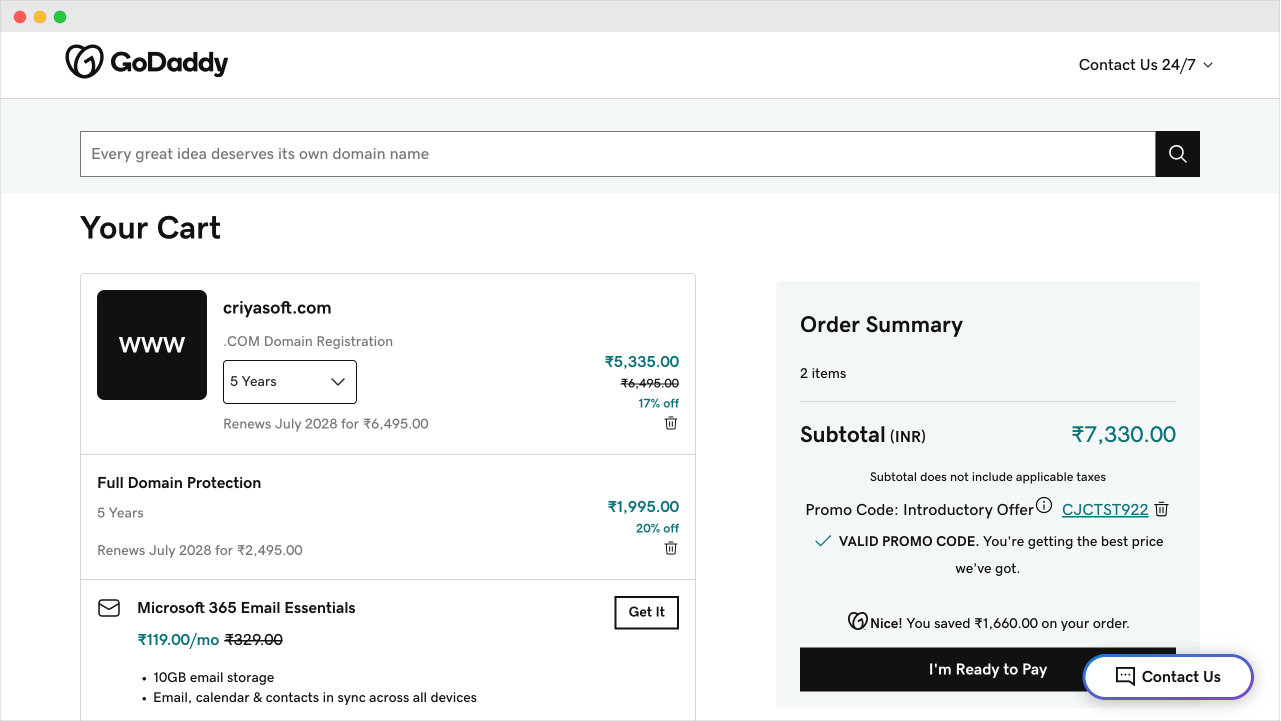
By default, GoDaddy puts the domain renewal period upto five years, which will be expensive.
So, I would recommend starting with one year or two years.
This way, if you don’t want to use the domain name after the initial period, you could leave it for expiration and save money.
I am going with only one year because I am buying my domain for demonstration.
Anyway, finish the purchase by creating an account and not falling for any other upsells:
My purchase is now done too.
We will come back to Godaddy’s dashboard when we are done with purchasing the web hosting.
So…
Step 2: Purchase web hosting from Rocket.net
I go with with Rocket.net for my client websites because:
- It backups the website every single day and comes with a 14-day backup retention.
- It provides us with Cloudflare Enterprise at no additional cost and makes our website load super fast.
- The customer service is great and super fast
- Ships with essential security measures at no additional cost.
- Provides a quick-to-deploy staging site so that we can safely test updates and new features.
If you want to proceed forward with Rocket.net as your hosting service, click on this link to pay only $1 for the first month of hosting on Rocket.net. (Affiliate Link).
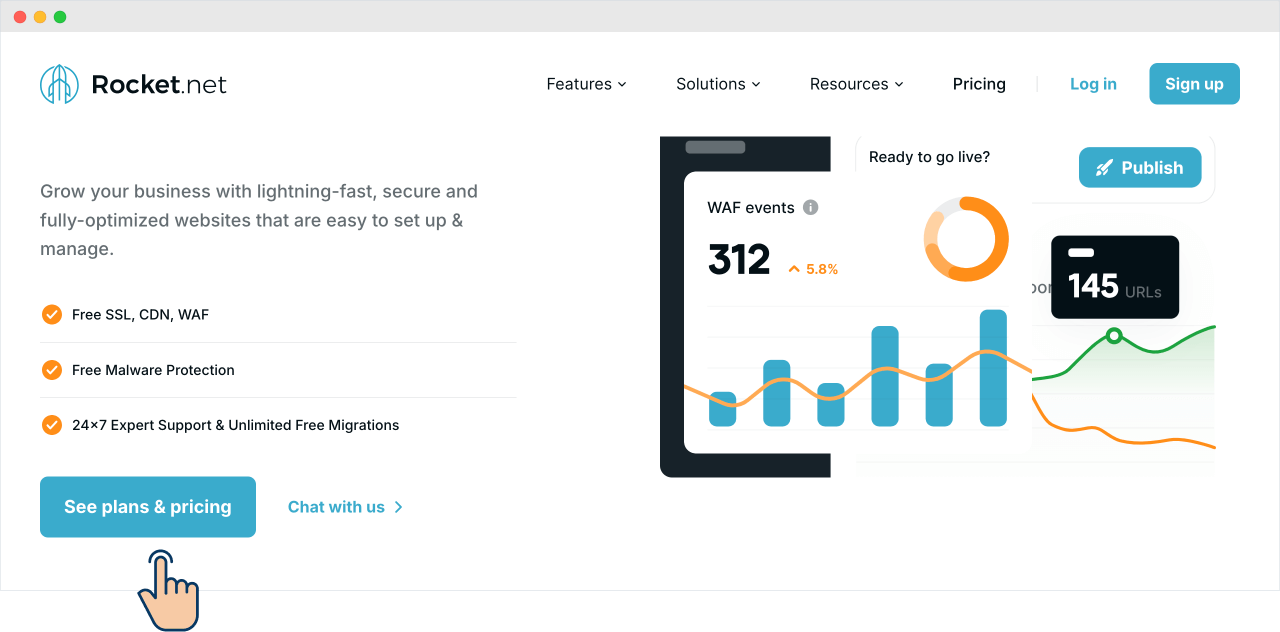
As soon as you click on the above link, you’ll land on the Homepage of Rocket.net.
Next, click on the Pricing button to go the pricing page:
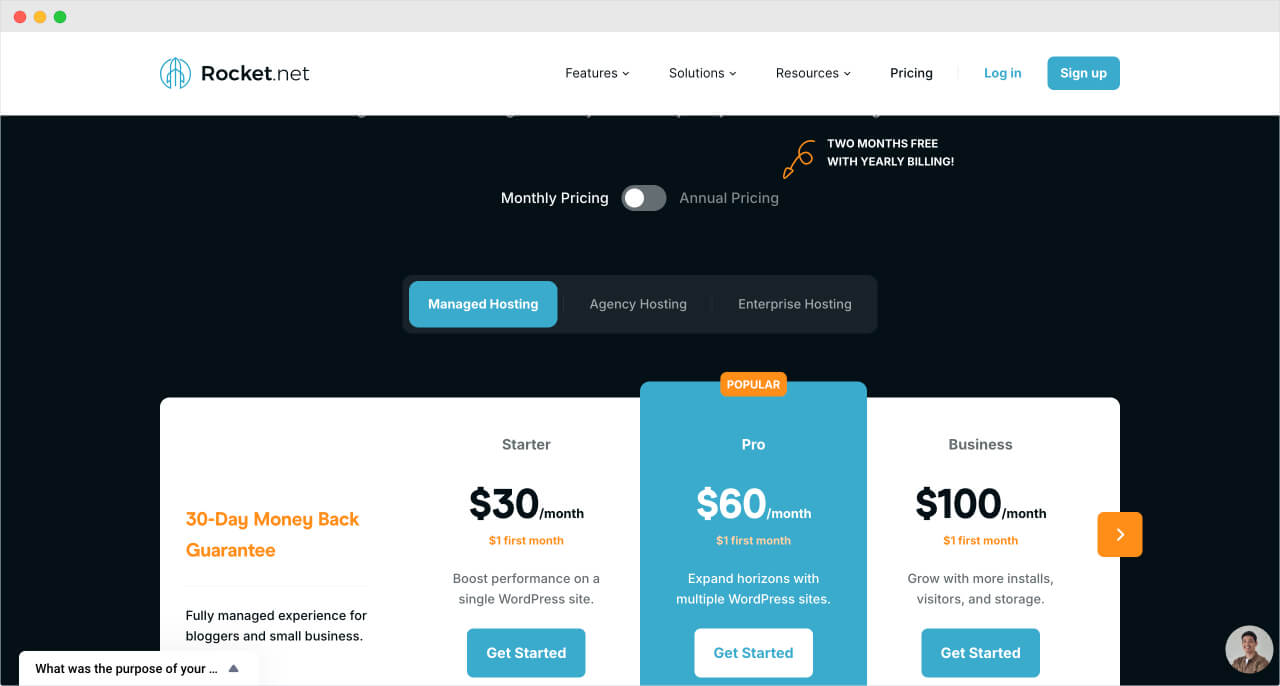
Next, choose the right term and plan that fits your business goals:
- If you are going with monthly payments instead of paying upfront for an year, you need to pay only $1 for the first month and then $30 per month. If you’re skeptical about Rocket.net, this will help you see if it is the right hosting service for your business.
- Having said that, if you have long term goals with your website and since Rocket.net is a reputable company, go with an yearly payment so that you don’t want have to worry renewals for an year.
Anyway, once you are ready, click on the “Get Started” button associated with your plan.
I went with a monthly plan for my needs.
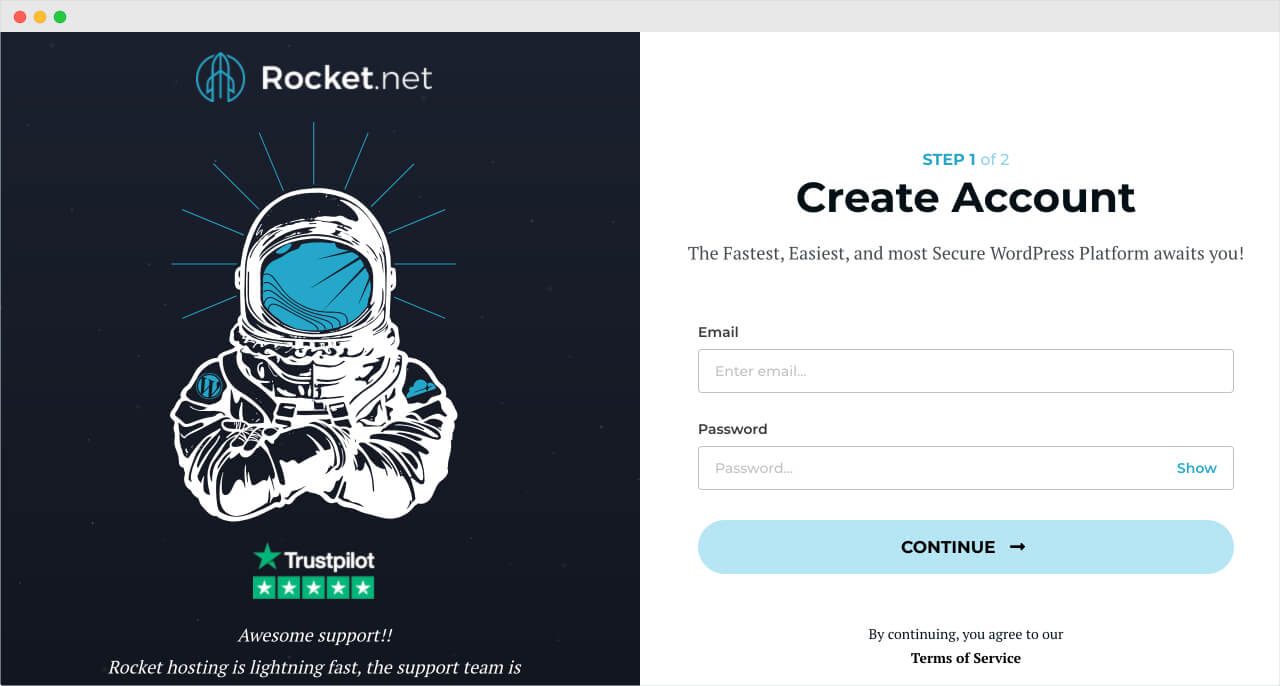
Getting started with the Rocket.net involves two steps
Step 1: Create an account by providing and email password. Then, click on the “Continue” button.
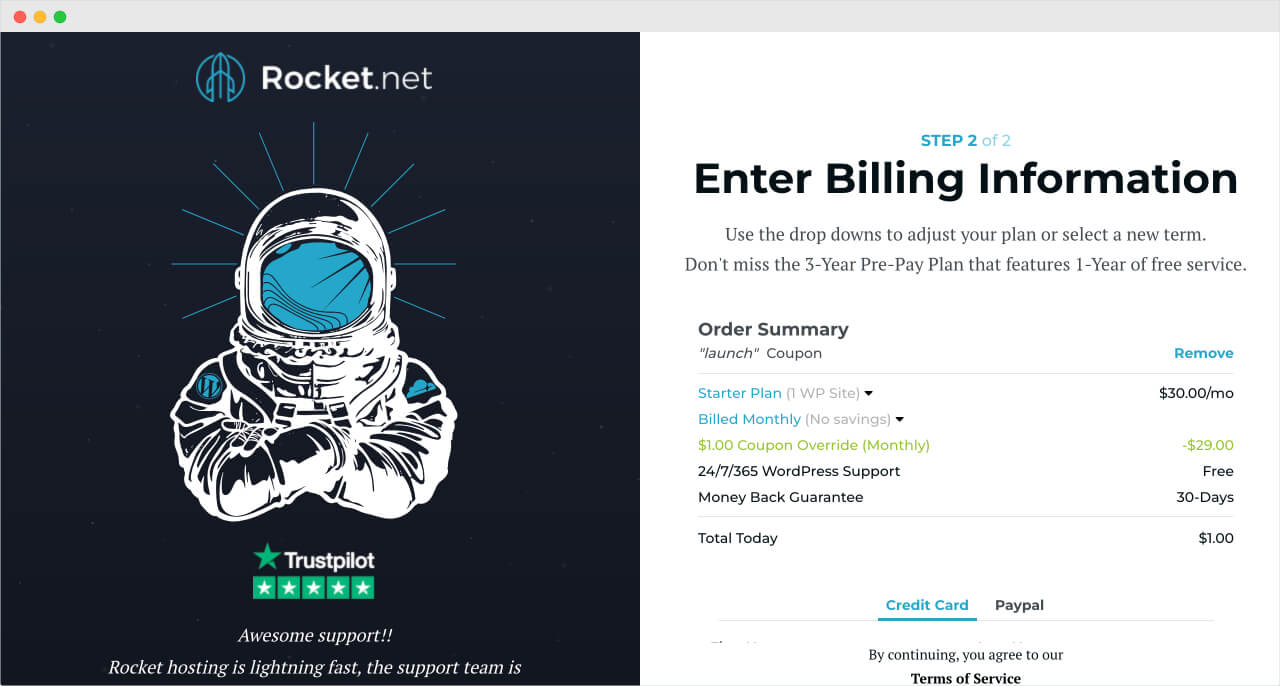
Step 2: Enter your billing information and click on the signup button.
Once the payment is complete, you’ll be taken to the order confirmation page.
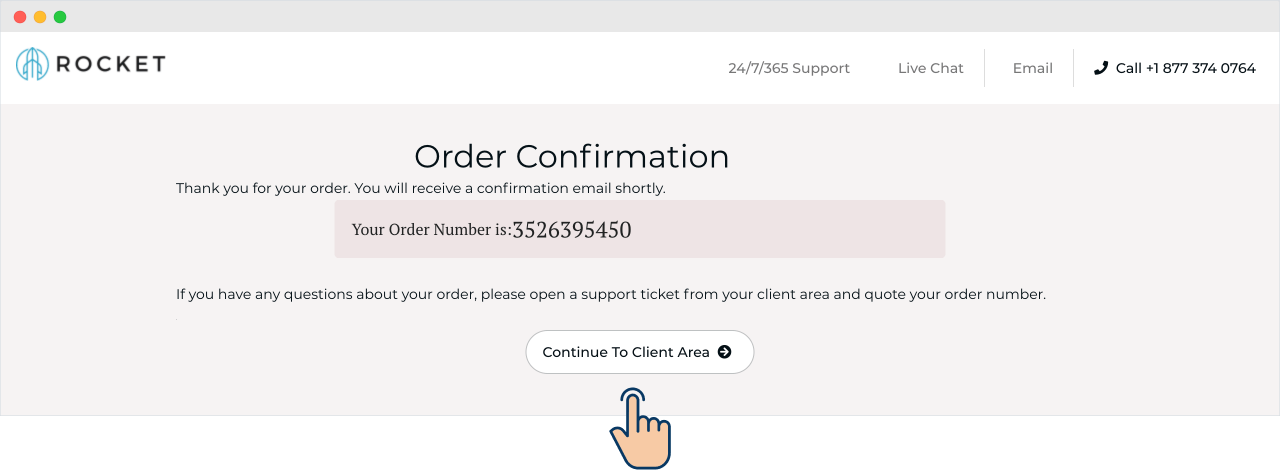
Next, click on the “Continue to Client Area” button to start creating our WordPress site.
Create a WordPress site on Rocket.net
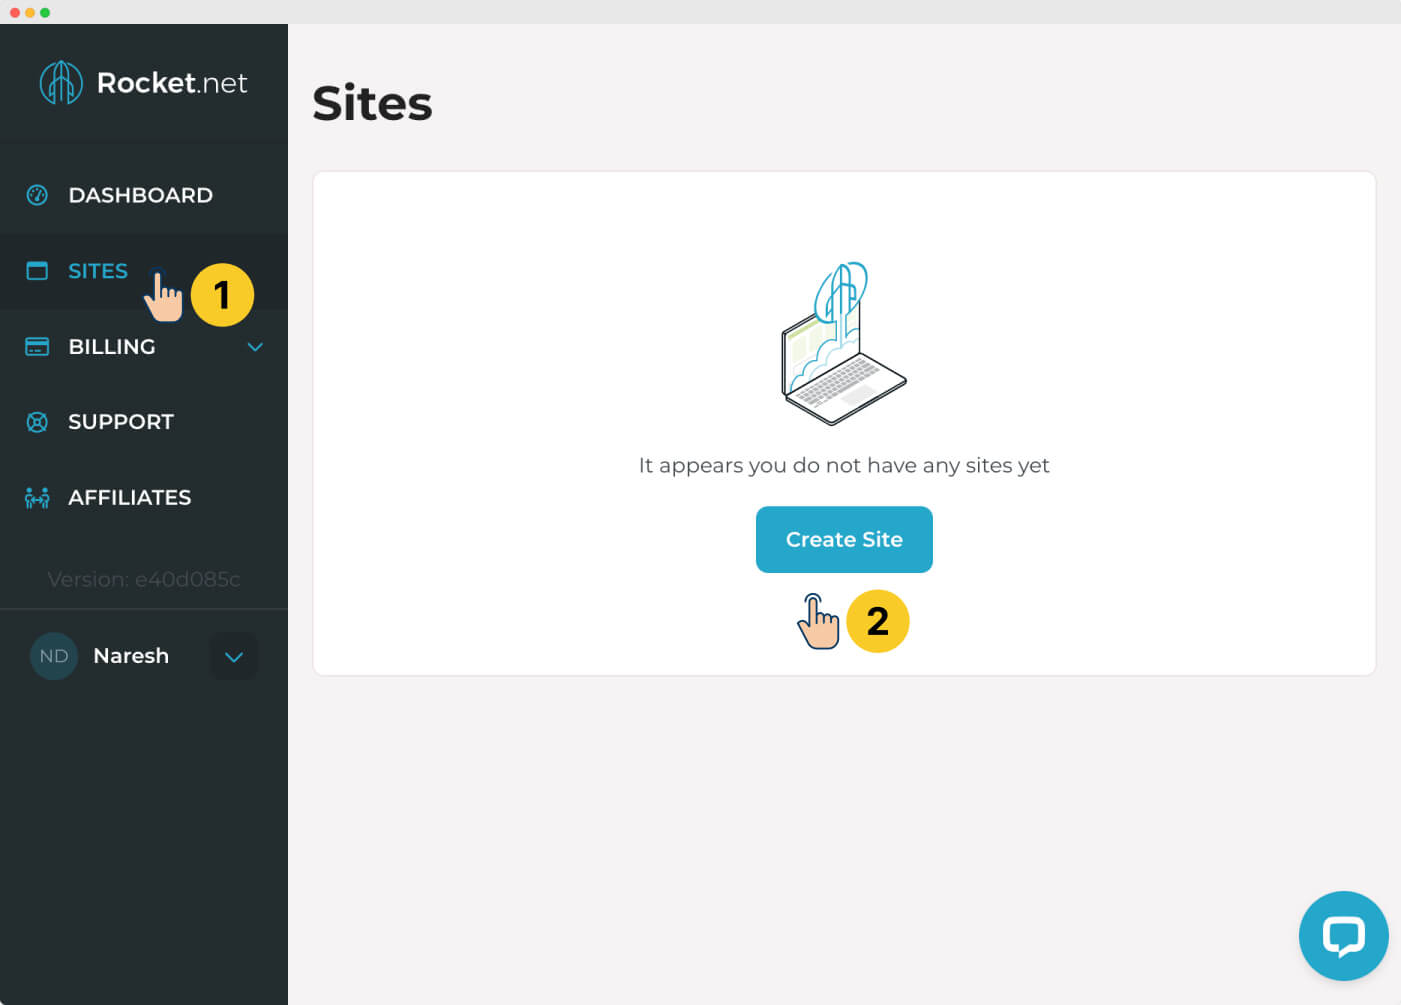
First, Click on the “Sites” link from the dashboard menu on the left and then click on “Create Site” button.
From here, creating a site on Rocket.net involves two steps.
Step 1: Enter site details
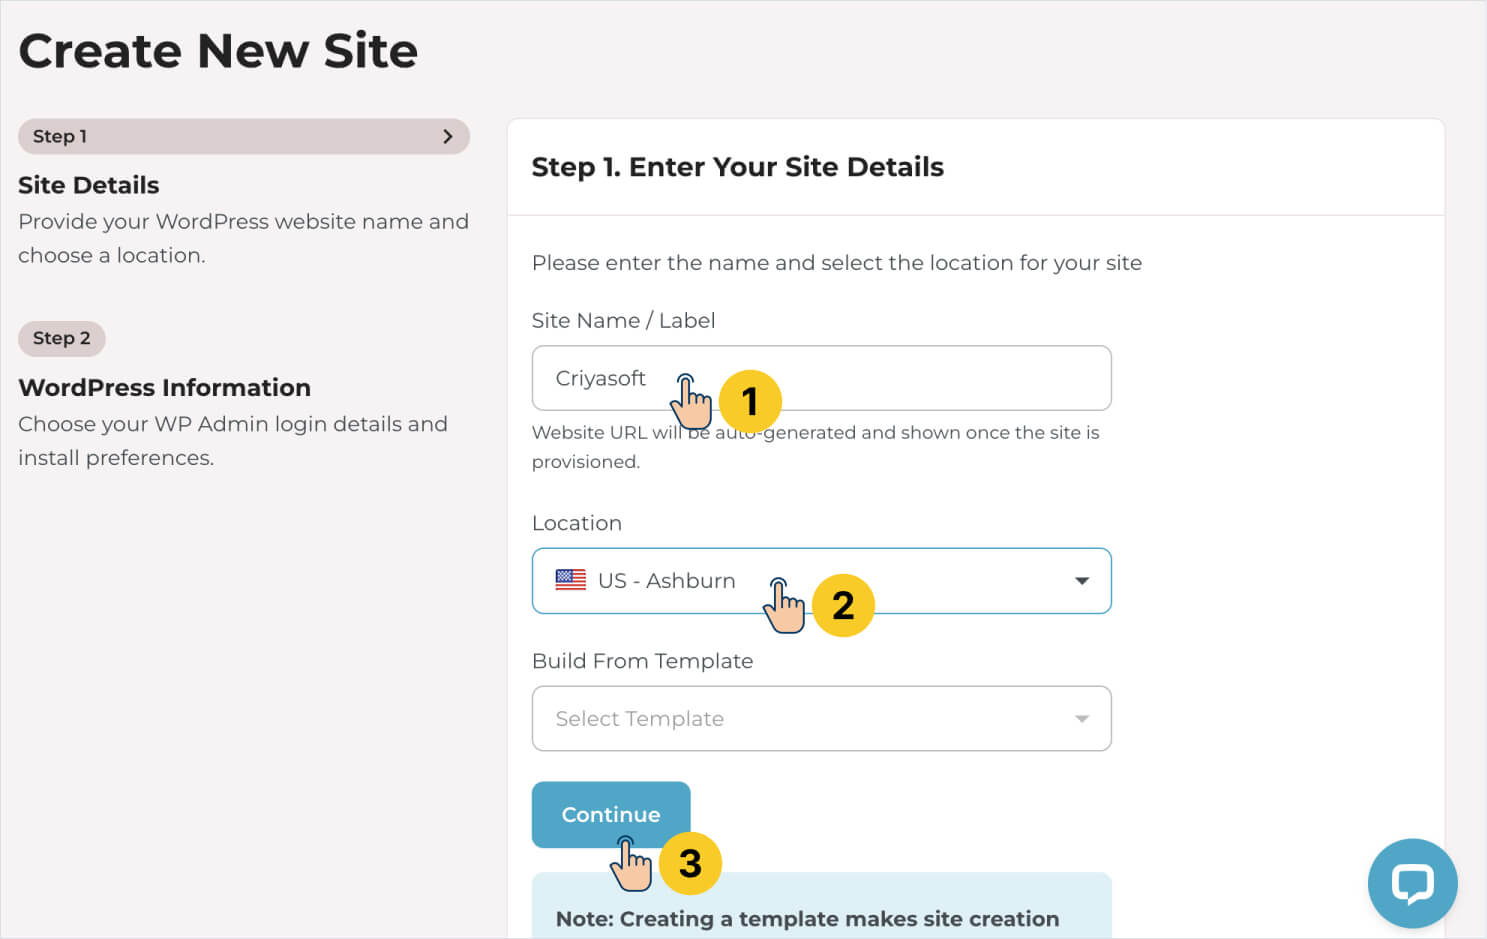
For the site name, enter your website name. For my needs, I entered a dummy brand name called Criyasoft.
Next comes the “Location” option. It is about choosing your server location.
To choose a server location, you need to answer the following question:
“From which country are you expecting your website visitors?”
For example, pick one of the United States locations if it is the United States.
This will make the website load faster for people in the United States because Rocket.net will create and place your server inside the United States.
Most of my website visitors are from United States. So, I went with “US-Ashburn” option as the server location for my website.
Next, please ignore the “Template” option because you’re creating your first website with Rocket.net. This option is onlly helpful if you want to use an existing site hosted on Rocket.net as a starting point for your new website.
Finally, don’t forget to click on the “Continue” button to move the next step.
Step 2: Choose your WordPress Admin login details and uncheck the “WP Recommended Plugins”.
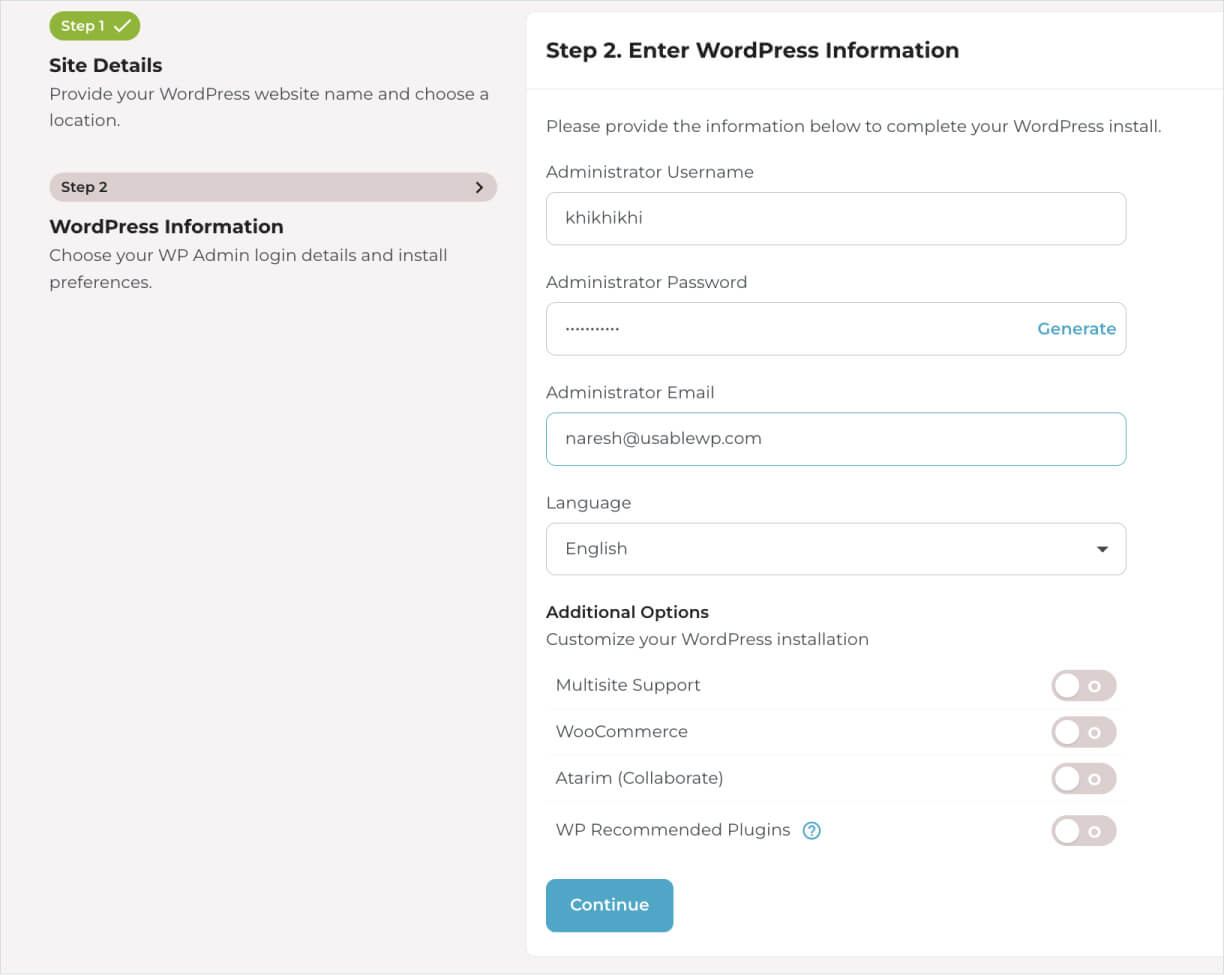
When entering a username, enter a username that is hard to guess for hackers and easy to remember for yourself.
Similarly, choose a hard to guess password to keep hackers at bay. Use special characters in your password to make a strong password.
Also, please remember that no website is 100% secure. We can just make a hacker’s life difficult to get in to our site by choosing strong username and password.
Anyway, next, please enter the administrator’s email. WordPress sends notifications about your website to this email only. So, choose an email on which you regularly keep an eye on.
Make sure to remember the username, password, and email entered because we will use these details when logging into our WordPress Admin Dashboard.
Next, choose your site “Language”. I am creating a website for visitors who’s can read and understand english. So, I chose “English”. You can choose any language of your preference.
Also, make sure that none of the additional options are checked because they are not relevant to us at this point. If we want to make use of those options later, we can easily make use of them inside the WordPress Admin dashboard.
Finally, click on the “Continue” button to finish the site creation process.
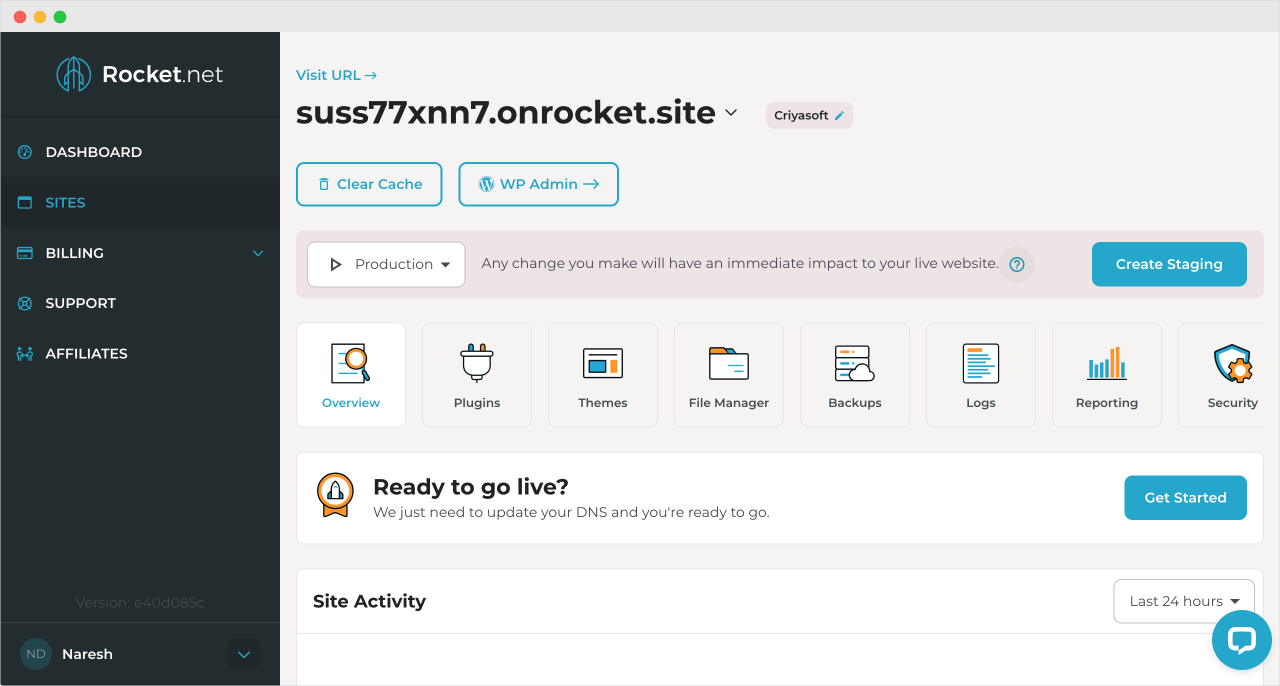
That’s all. Our WordPress site is now created and hosted on Rocket.net.
If you notice, Rocket.net has assigned a temporary domain name for our newly created website.
In my case it is: suss77xnn7.onrocket.net.
Your’s will be different.

If you notice, there is a “Visit URL” link on top of the temporary domain name. Clicking on it takes you to the frontend of your WordPress site.
Come on, go ahead and try it.

Wow!
So, that’s what the initial version of your first website looks like 😛
The default WordPress site looks truly basic.
Our end goal is to transform this basic site into a well-designed blog or a business website.
Also, please remember that we are currently previewing our website using a Temporary URL.
A temporary URL is usually used for creating the website in secret. And when you are ready to launch your website for the world, you could easily replace this temporary URL with a purchased domain name for accessing your website.
Having said that, we have already purchased our domain name anyway.
So, now comes the last step.
And that is?

Linking the domain name purchased on Godaddy with the WordPress website hosted on Rocket.net.
Correct. You are one of my sharp students :)
Domain mapping allows you to replace the temporary URL provided by Rocket.net with your custom domain, making your website look professional and easier to access.
Step 3: Linking domain name to the WordPress site hosted on Rocket.net
Here is the progress we have made so far:
- We purchased the domain name on Godaddy
- We purchased Rocket.net hosting by creating an account. During the account creation process, Rocket.net automatically created a web server for us.
- On that web server, we created a basic WordPress site.
- We have also accessed this basic website using the temporary URL.
Our next step is to link the purchased domain name with our WordPress website.
This will help people on the internet access our website with the purchased domain name instead of the temporary URL.
We call this domain-linking process as “Domain Mapping”.
And we can perform the “Domain Mapping” in three easy steps:
- Step A: Set the name of your domain name as Site URL inside the Rocket.net’s dashboard.
- Step B: Install an SSL certificate for it.
- Step C: Go to Godaddy and map the IP address of the Rocket.net’s web server to the DNS records of the domain name bough.
Step A: Set the name of your domain name as Site URL inside the Rocket.net’s dashboard.
To achieve this, go to the “Manage” screen of your site again:
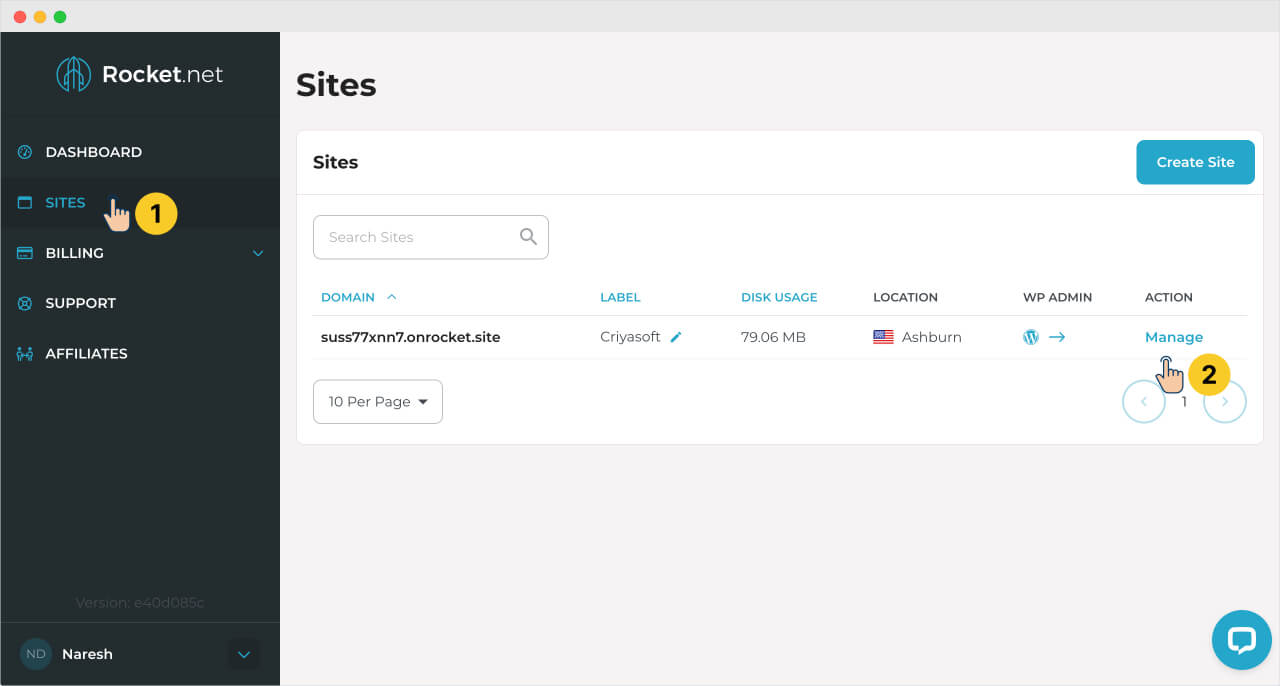
And find the box that says, “Ready to go live”:
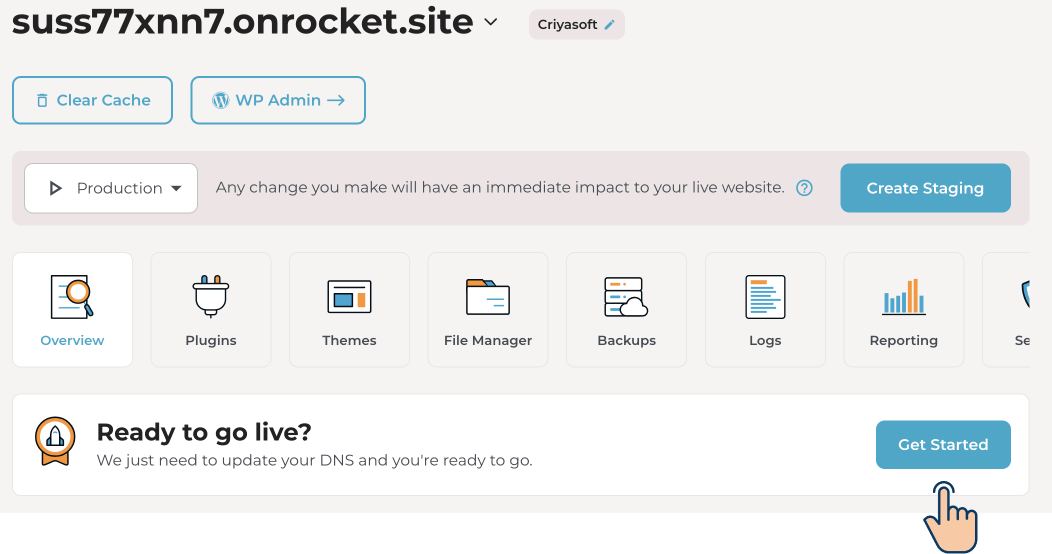
Click on the “Get started” button located inside that box to open up the domain and SSL certificate options of your website:
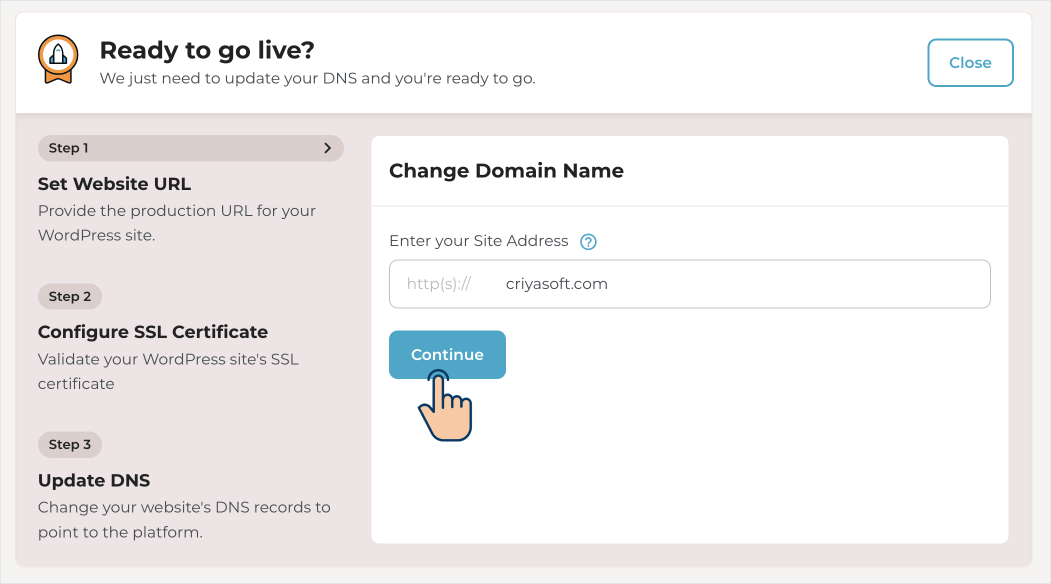
The first option you’ll find is “Change Domain Name”.
Add the domain name you bought on Godaddy. In my case, I bought Criyasoft.com.
Next, click on the “Continue” button to install SSL certificate for your website.
Step B: Adding SSL certificate to your WordPress site
SSL stands for Secure Socket Layer and it helps keep the site secure in certain ways and most importantly it helps the SEO of our website.
People trust the websites with an SSL certificate. So, it is important that we add an SSL certificate to our site.
Luckily, Rocket.net also provides an SSL certificate for free.
So, let’s just add it.
There are many ways to add an SSL certificate to your website.
Rocket.net follows a unique approach to assign an SSL certiticate for your website.
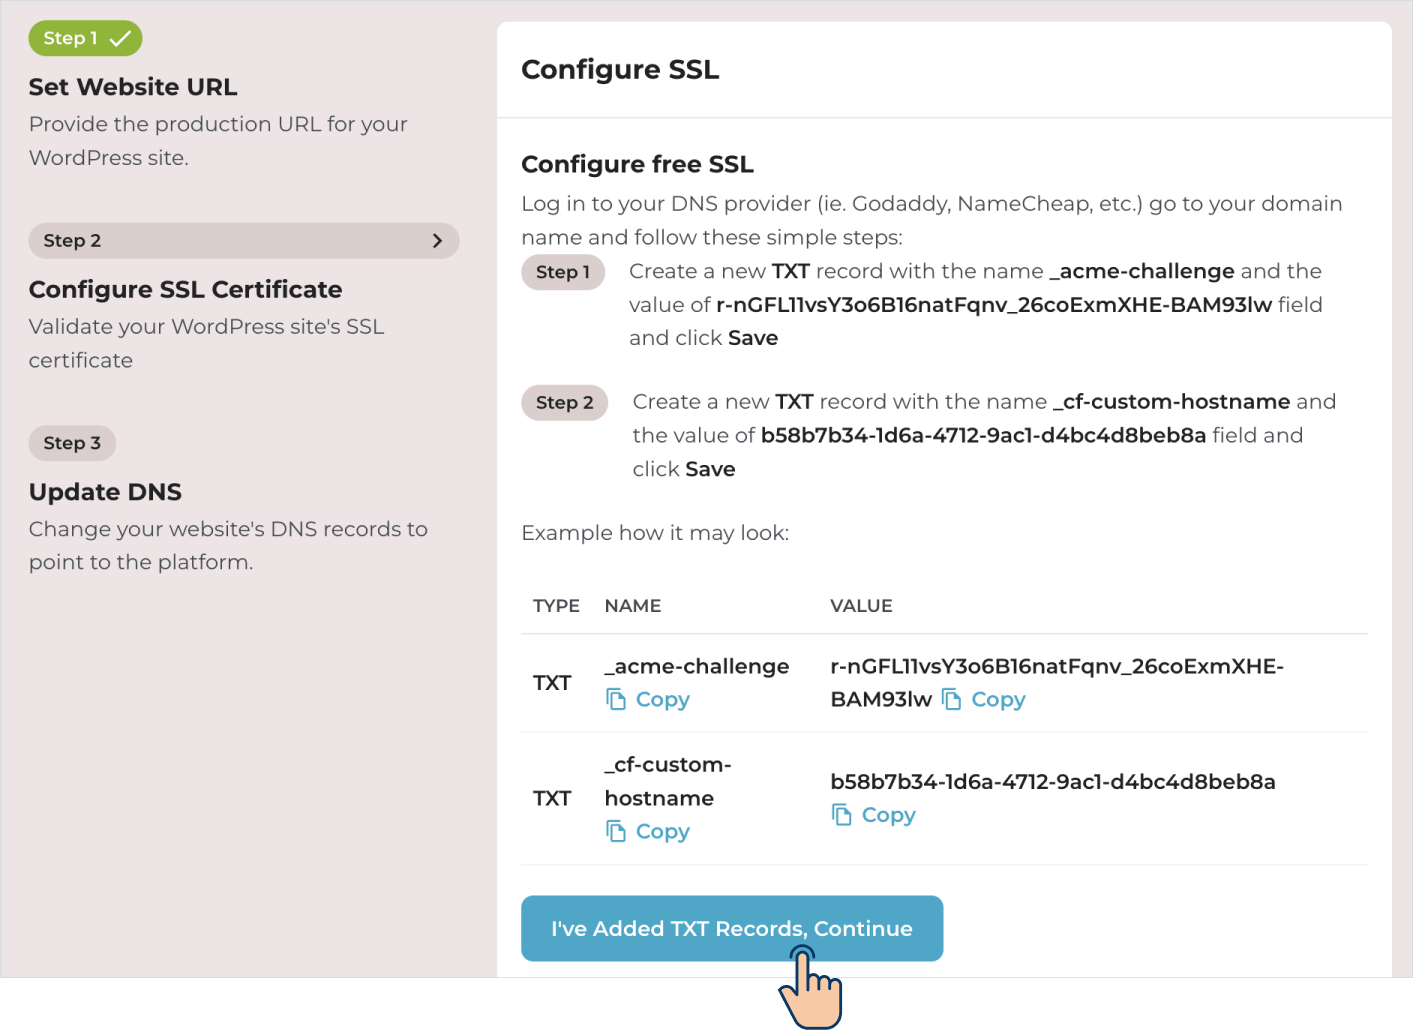
And, we need to follow the instructions provided on the “Configure SSL Certificate” tab:
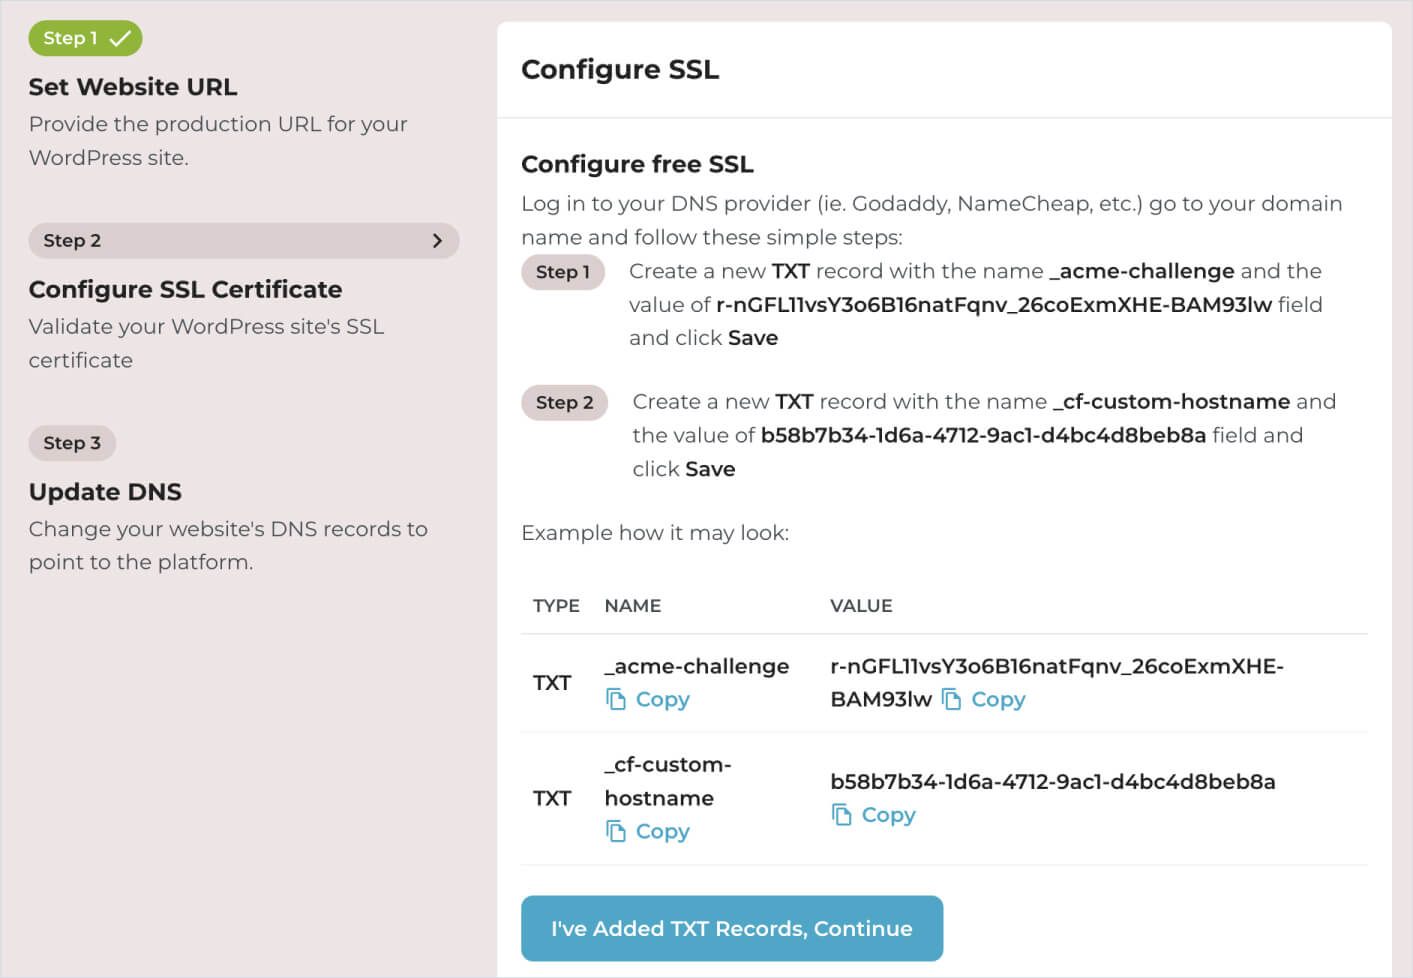
Simply put, we need to add the following two “TXT” records to the DNS of our domain bought on Godaddy to install SSL certificate for your website:
_acme-challengeRecord_cf-custom-hostnameRecord.
Come on, let’s do this.
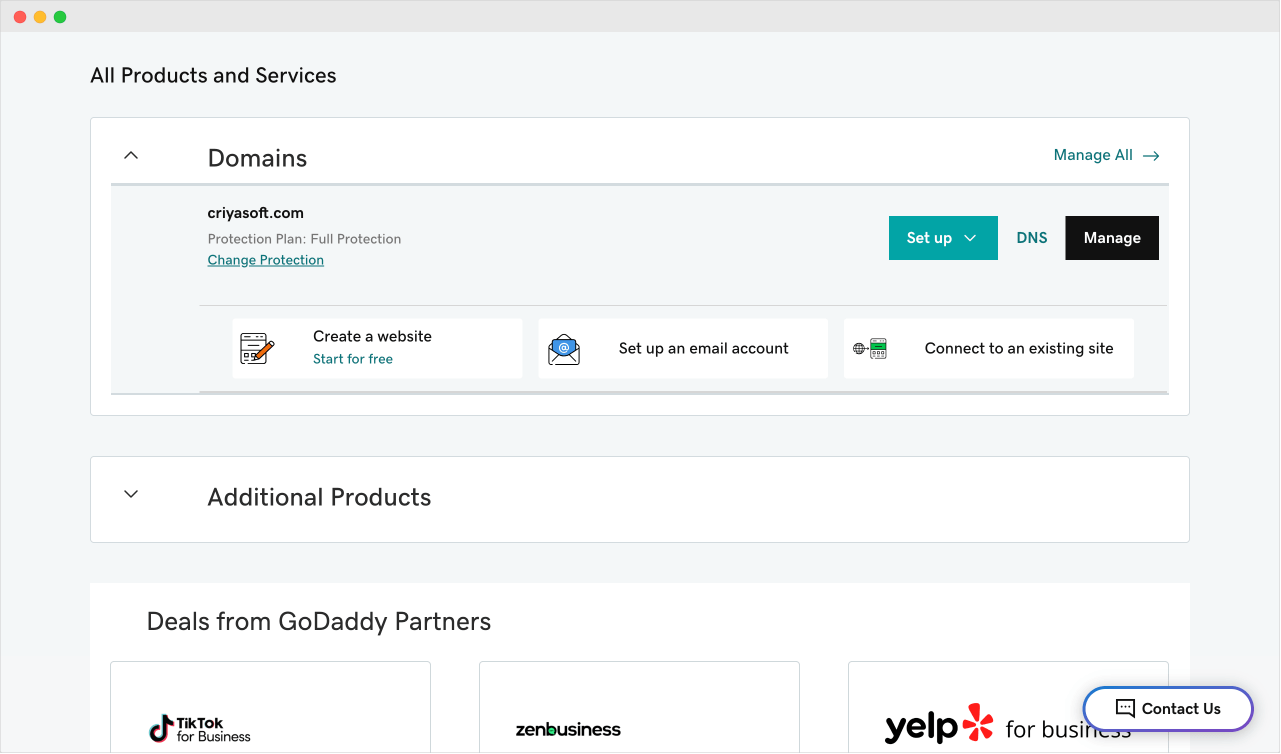
First, go to the Products screen inside Godaddy’s dashboard and scroll down until you see the “All Product and Services” section.
Inside this section, there is a sub-section called “Domains”.
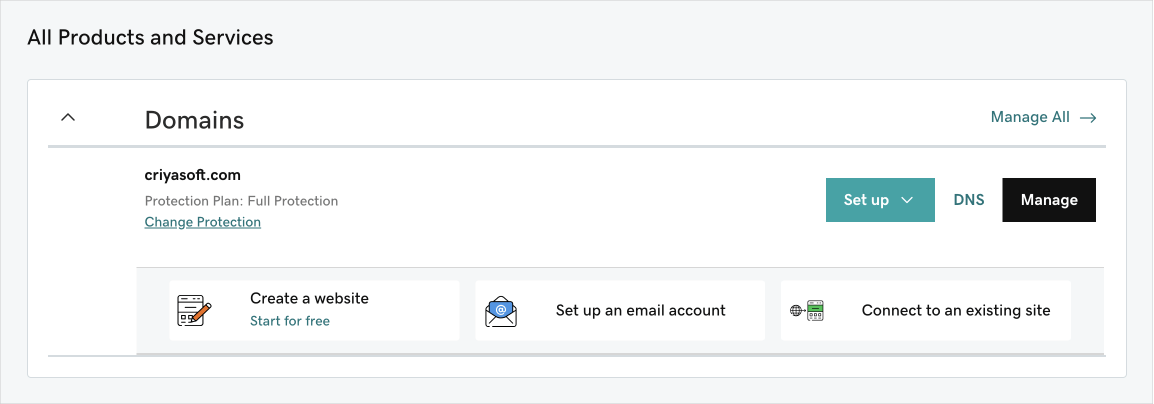
And inside “Domains”, you can see the domain name you have purchased recently.
In my case, the purchased domain name is criyasoft.com.
Also, if you notice, there are three action buttons for this domain name:
- Set up
- DNS
- Manage

Click on the “DNS” button to access the DNS records of your domain.
DNS stands for Domain Name System.
And every domain name will have some DNS records:
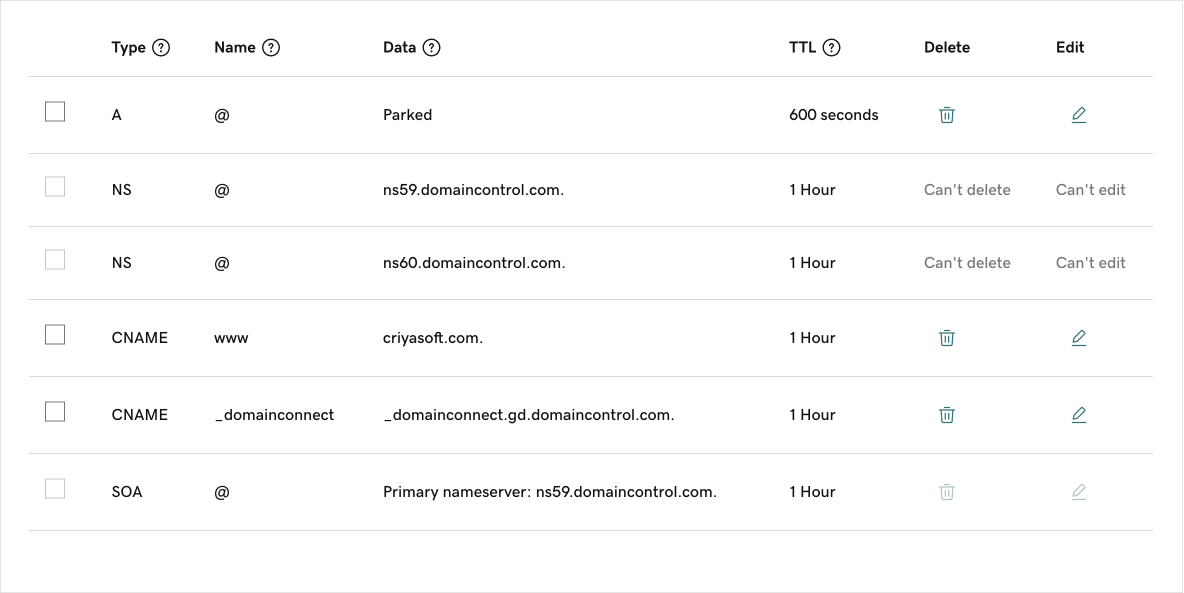
We will not modify the existing records for now.
We want add a new TXT record, instead.
So, click on the “Add New Record” button.
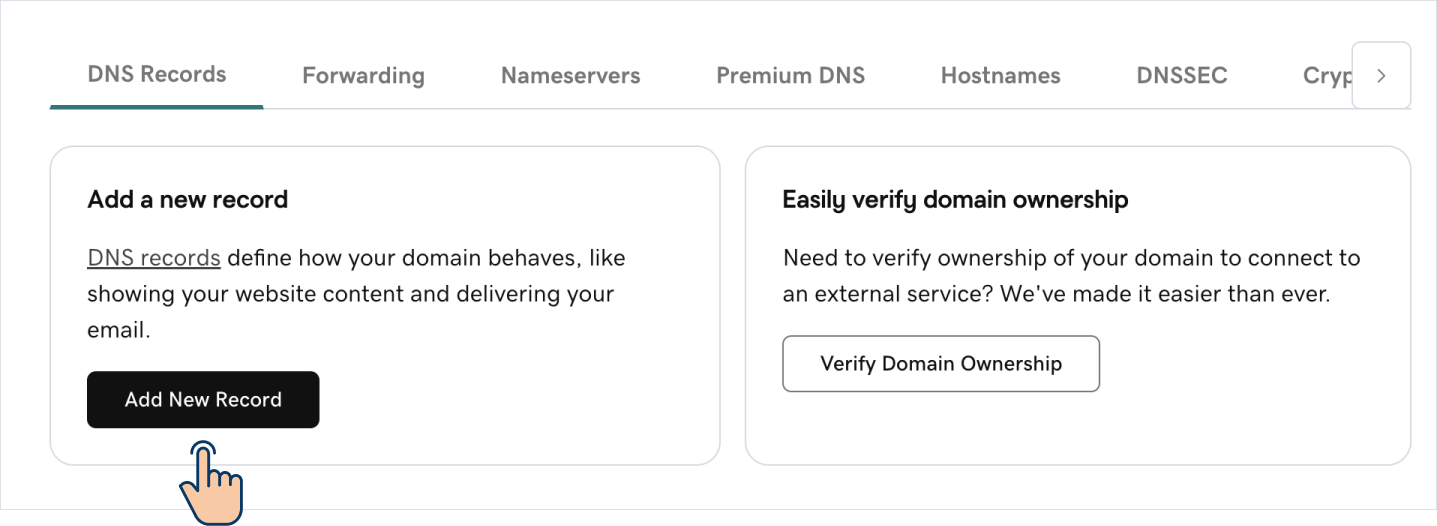
This will bring up a form to create a TXT record.
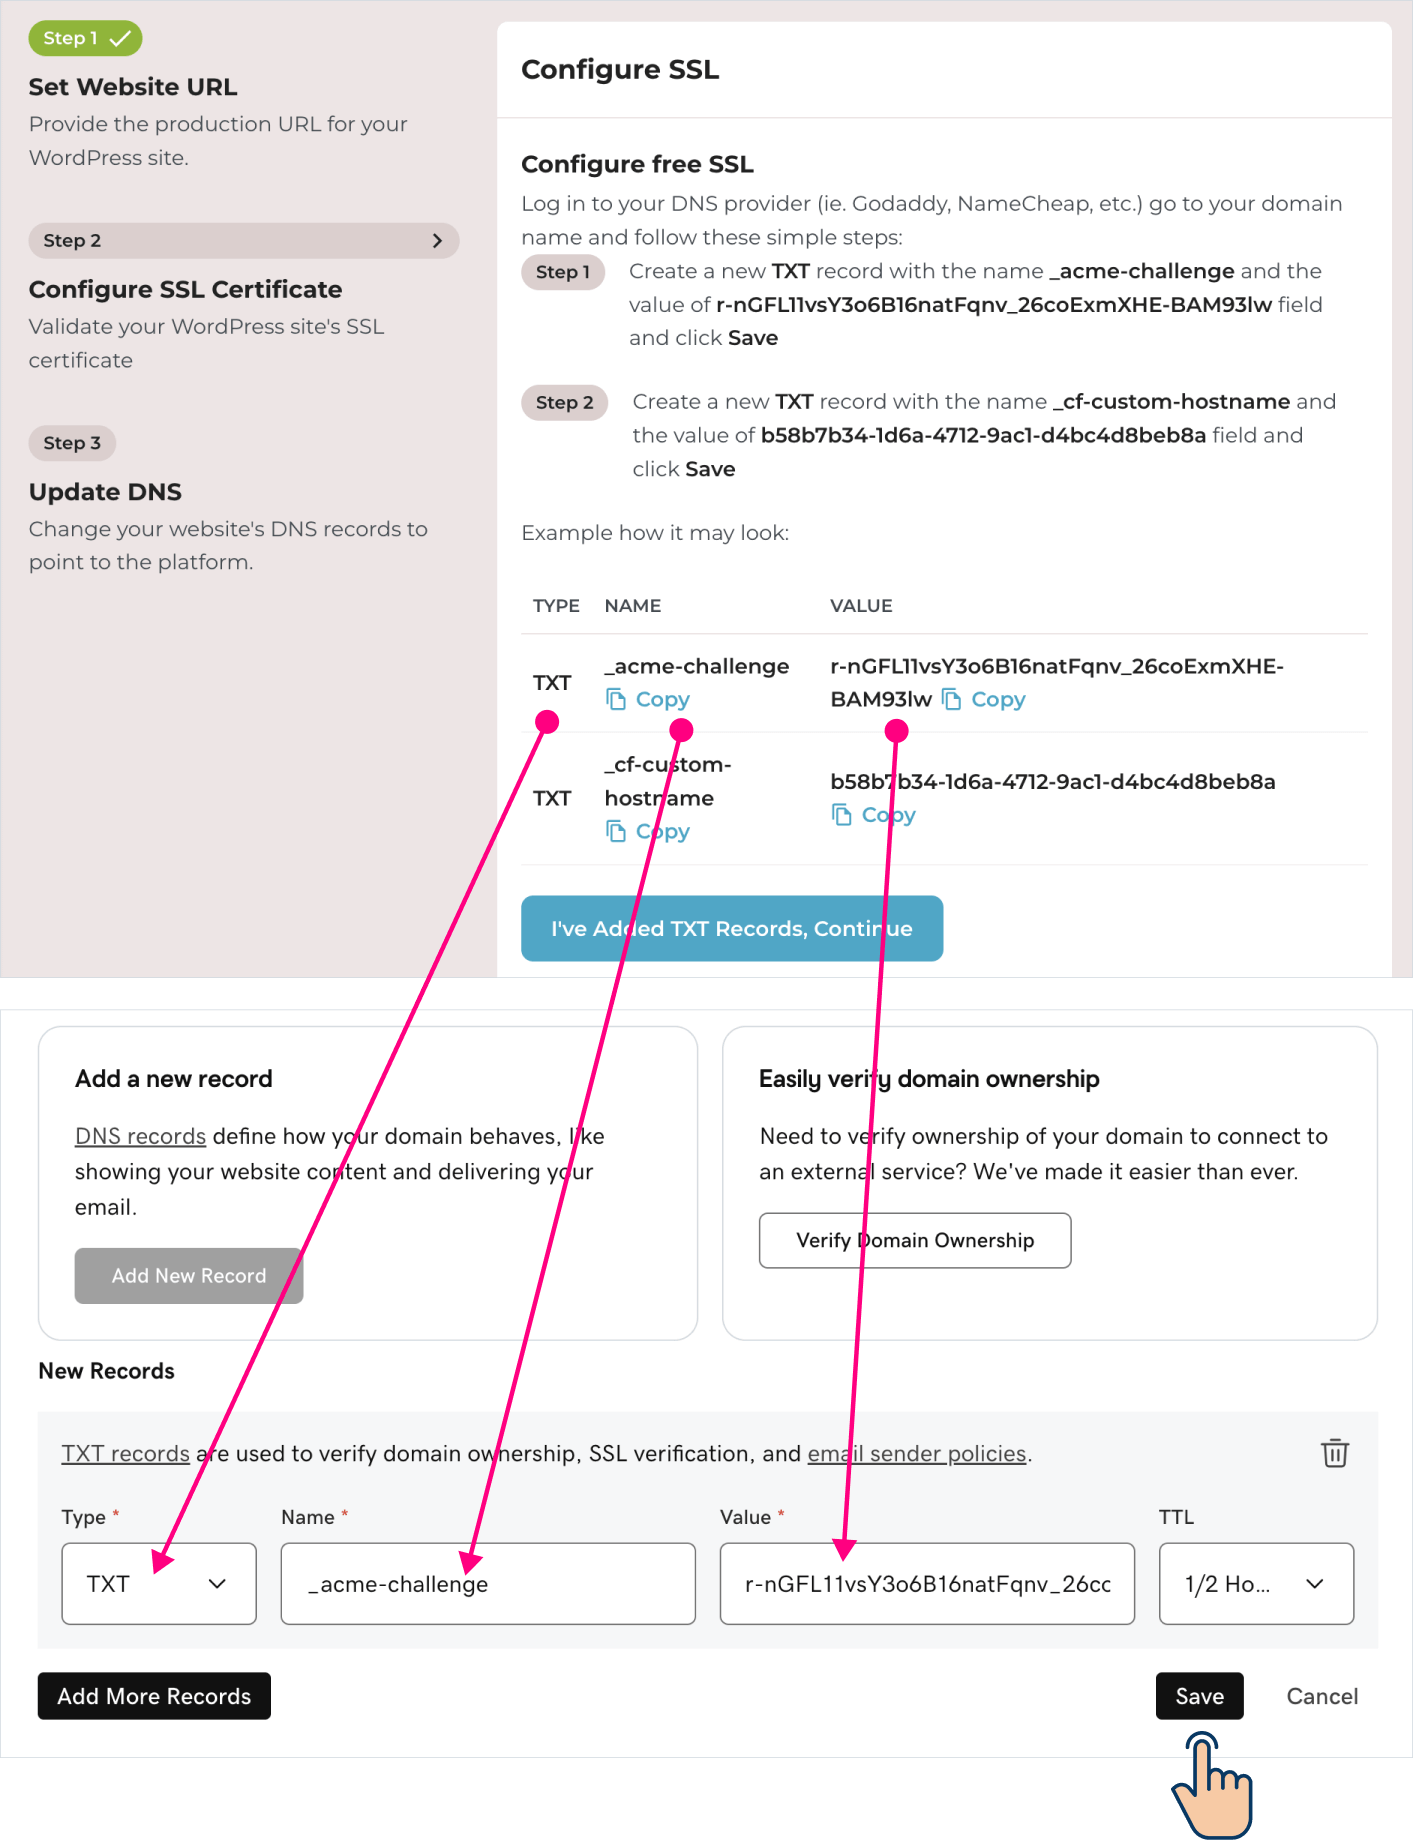
Inside the form:
- For the “Type” field, choose “TXT” option from the dropdown menu.
- For the “Name” field, copy the “Name” value from the Rocket.net’s instructions, that is “
_acme-challenge“. - Next, for the “Value” field, copy the “Value” from the Rocket.net’s instructions.
- Finally, click on the “Save” button.
Next, we need to add one more TXT record called _cf-custom-hostname according to the Rocket.net’s instructions.
So, by staying on Godaddy, click on the “Add New Record” button one last time and repeat the same process mentioned above for adding the second TXT record from the Rocket.net’s instructions.
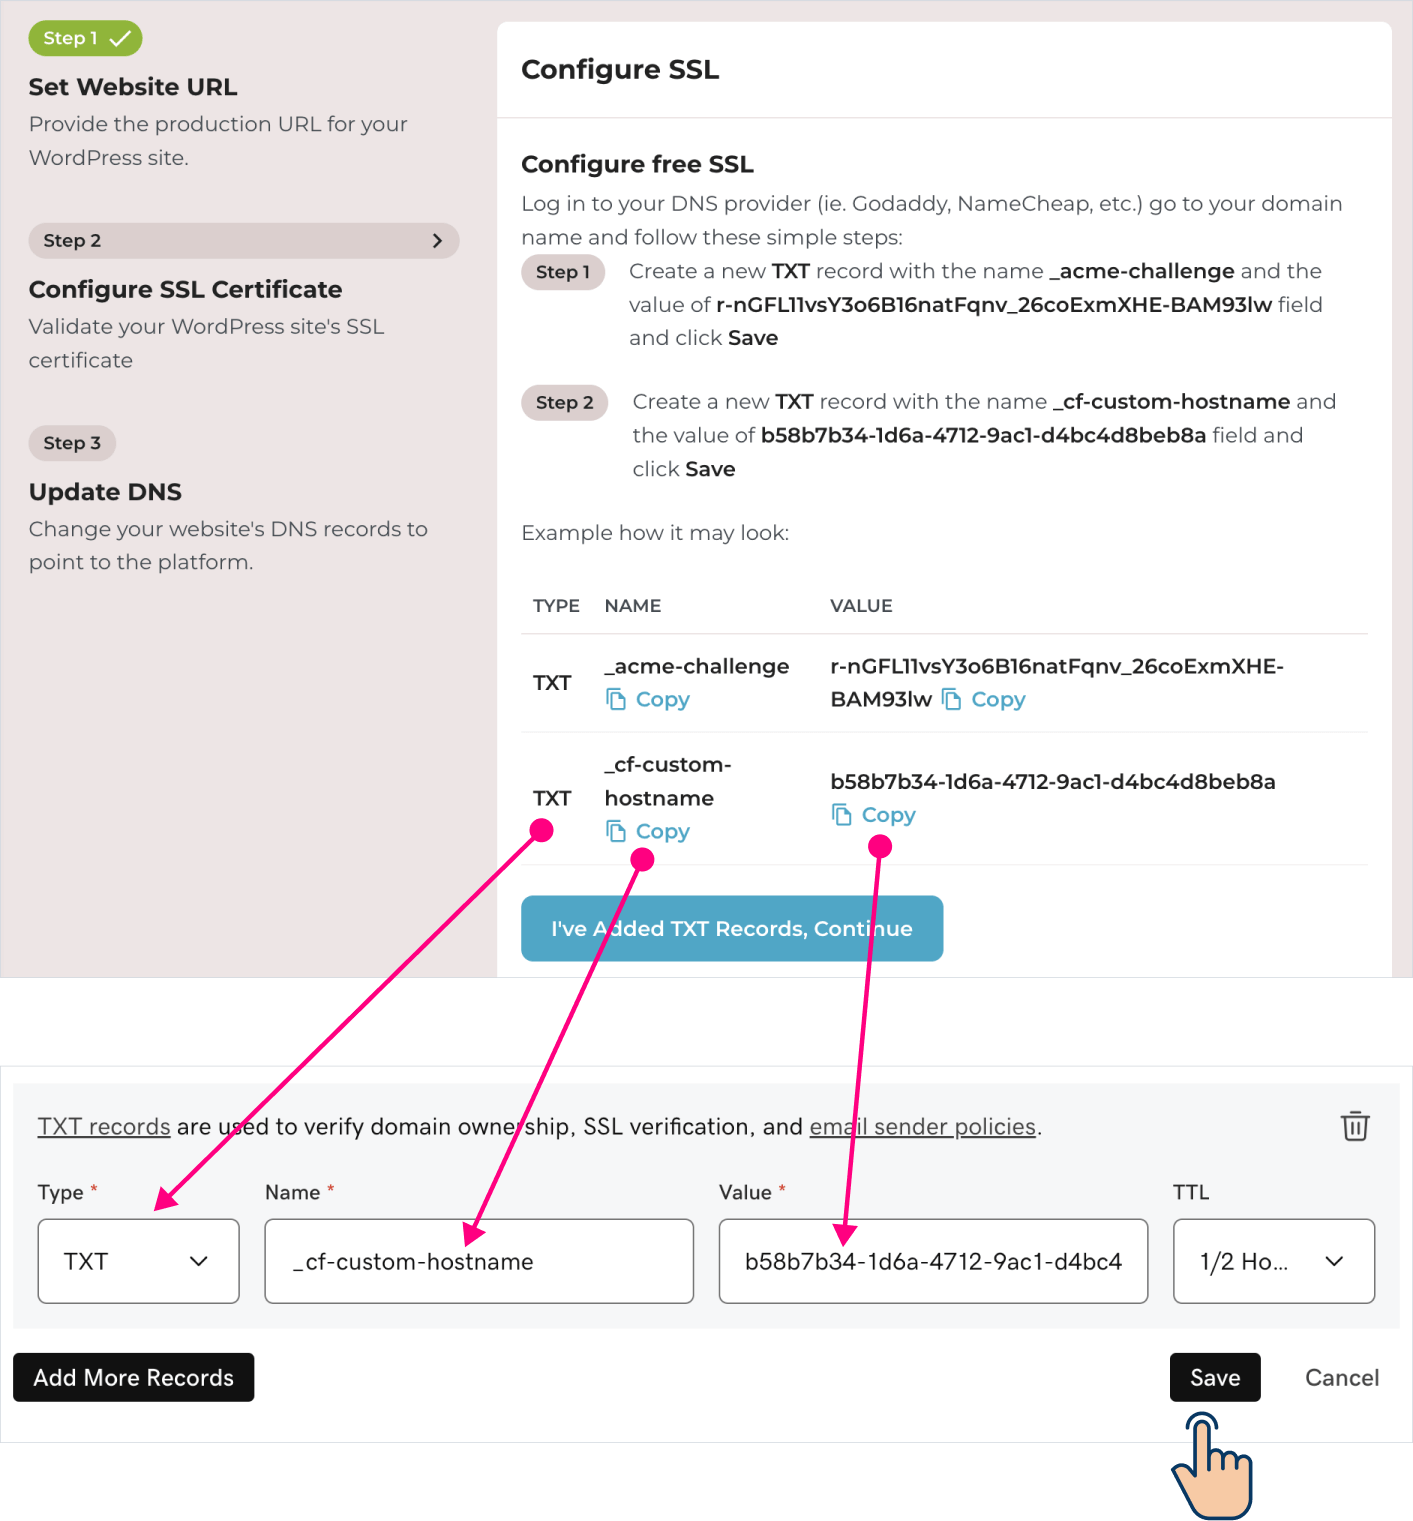
Finally, click on the “Save” button.
To recap, we have now added two TXT records to the DNS of our domain purchased on Godaddy:
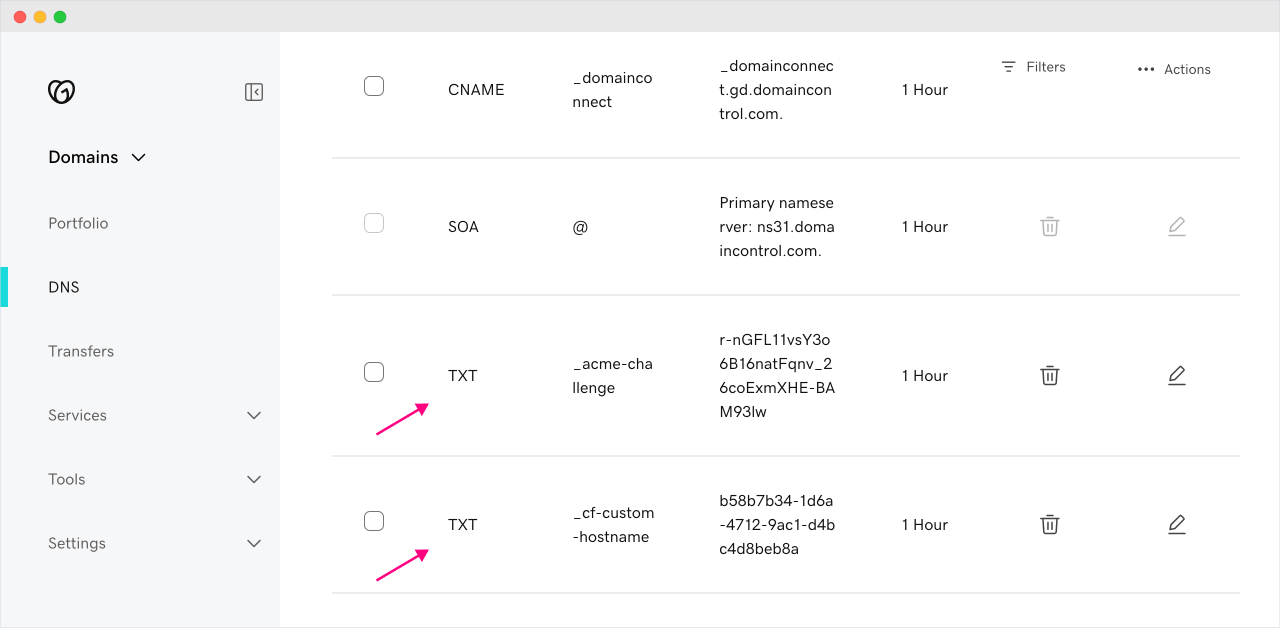
After this comeback to the Rocket.net’s instruction screen and click on “I’ve added TXT Records, Continue” button to confirm that we have indeed added the records:
And Bang!
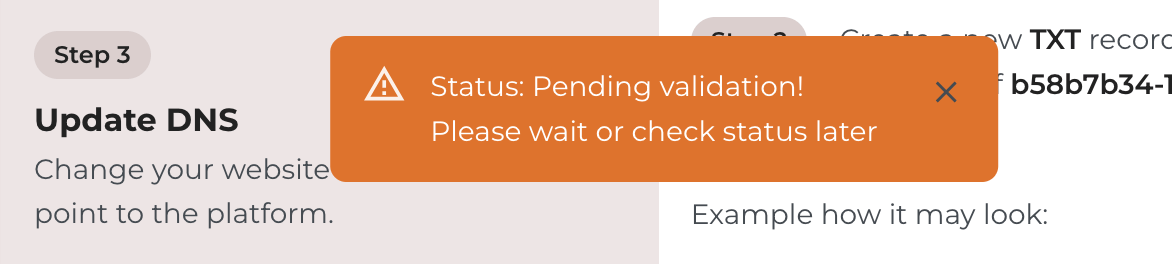
Rocket.net is saying that the SSL TXT records validation is pending.
Don’t worry—DNS updates may take some time to propagate.
So, try clicking the “I’ve added TXT Records, Continue” button after 15 minutes or 30 minutes.
After 10 minutes…
When I clicked on the “I’ve added TXT Records, Continue” button, my validation was successful and Rocket.net took me to the third and final step.
That is, linking the IP address to the domain name.
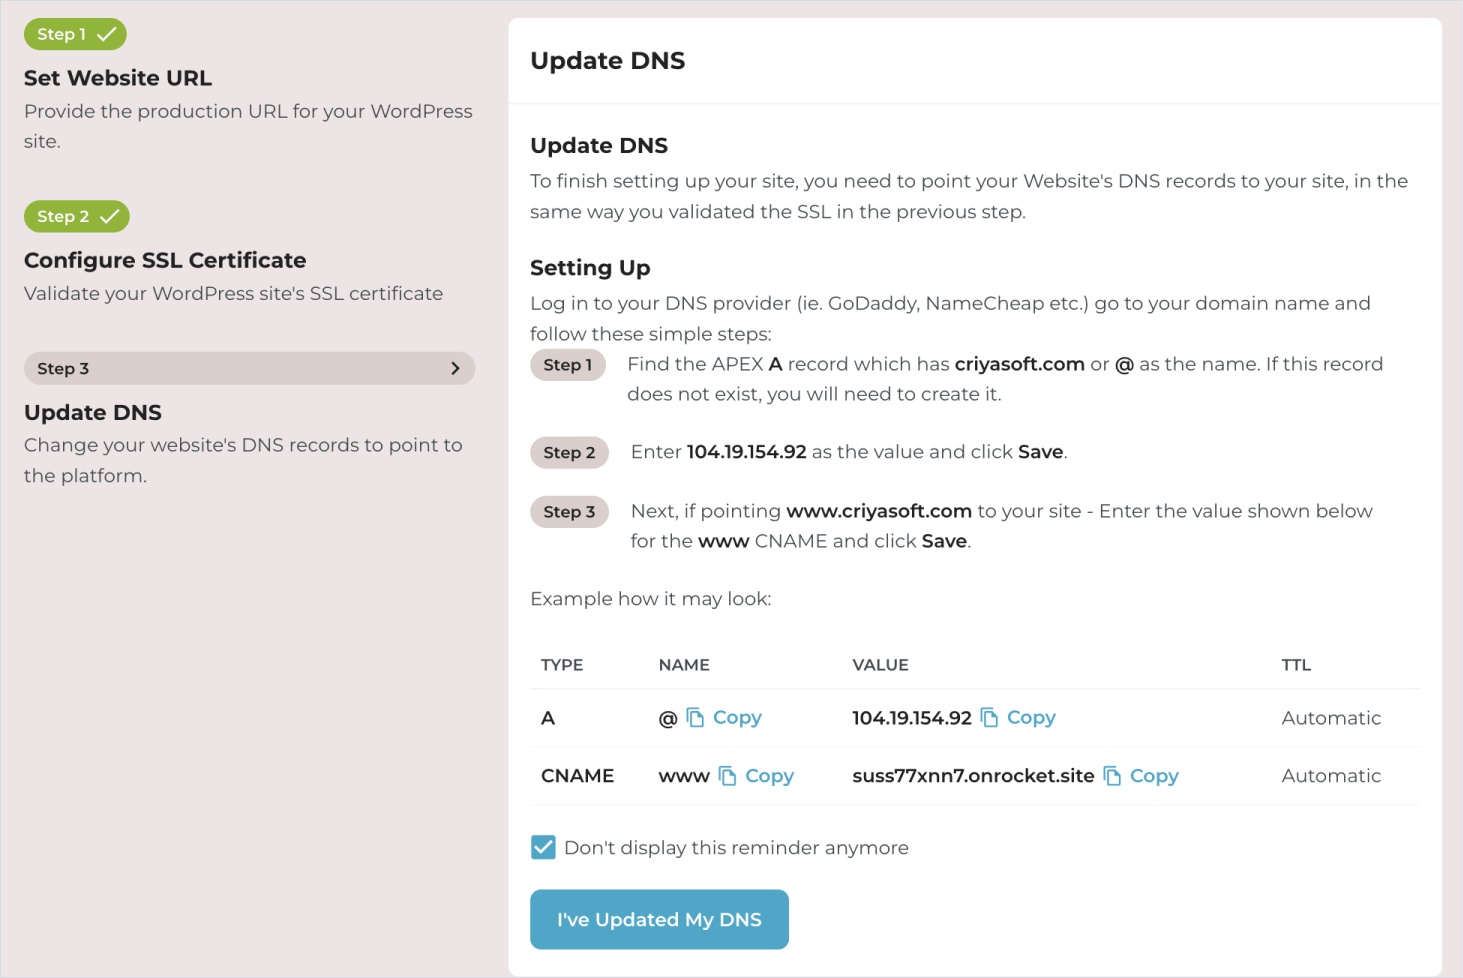
Step C: Adding the IP address provided by Rocket.net to the registered domain name on Godaddy
If you notice the instructions, Rocket.net is asking us update two records on Godaddy with the IP address and the temporary domain name:
- “A” Record – If we map the IP Address provided by the Rocket.net to the DNS record of the Domain name, the domain mapping is complete. This means people on the internet can access your website by entering your domain name into the browser.
- “CNAME” Record – Updating this record will ensure that “WWW” version of your domain name works too. For example, when some one enters
www.criyasoft.com, the website opens up as expected.
So, come on, let’s finish the domain mapping process by updating these two records on Godaddy.
Go back to the Products screen inside Godaddy’s dashboard and scroll down until you see the “All Product and Services” section.
Inside this section, there is a sub-section called “Domains”.
And inside “Domains”, you can see the domain name you have purchased recently.
Click on the “DNS” button to access the DNS records of your domain.
And if you notice, the “A” and “CNAME” records we are trying to update are already created by Godaddy.
So, we don’t have to create new records this time. Instead, we have to edit them.
First, we are interested in updating the “A” record.

If we add the “IP Address” to the “A” record of a domain name, the domain mapping will be complete.
To achieve this, click on the pencil icon to edit the “A” record.
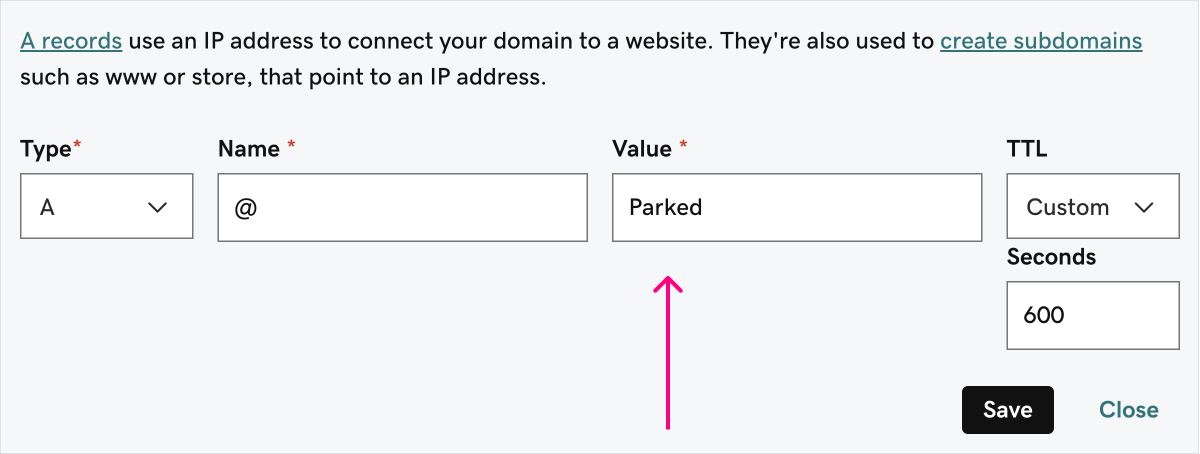
Now, if you notice, there is a field called “Value” and it is currently set to “Parked”.
Replace the value “Parked” with the IP Address of our Rocket.net’s instruction screen:
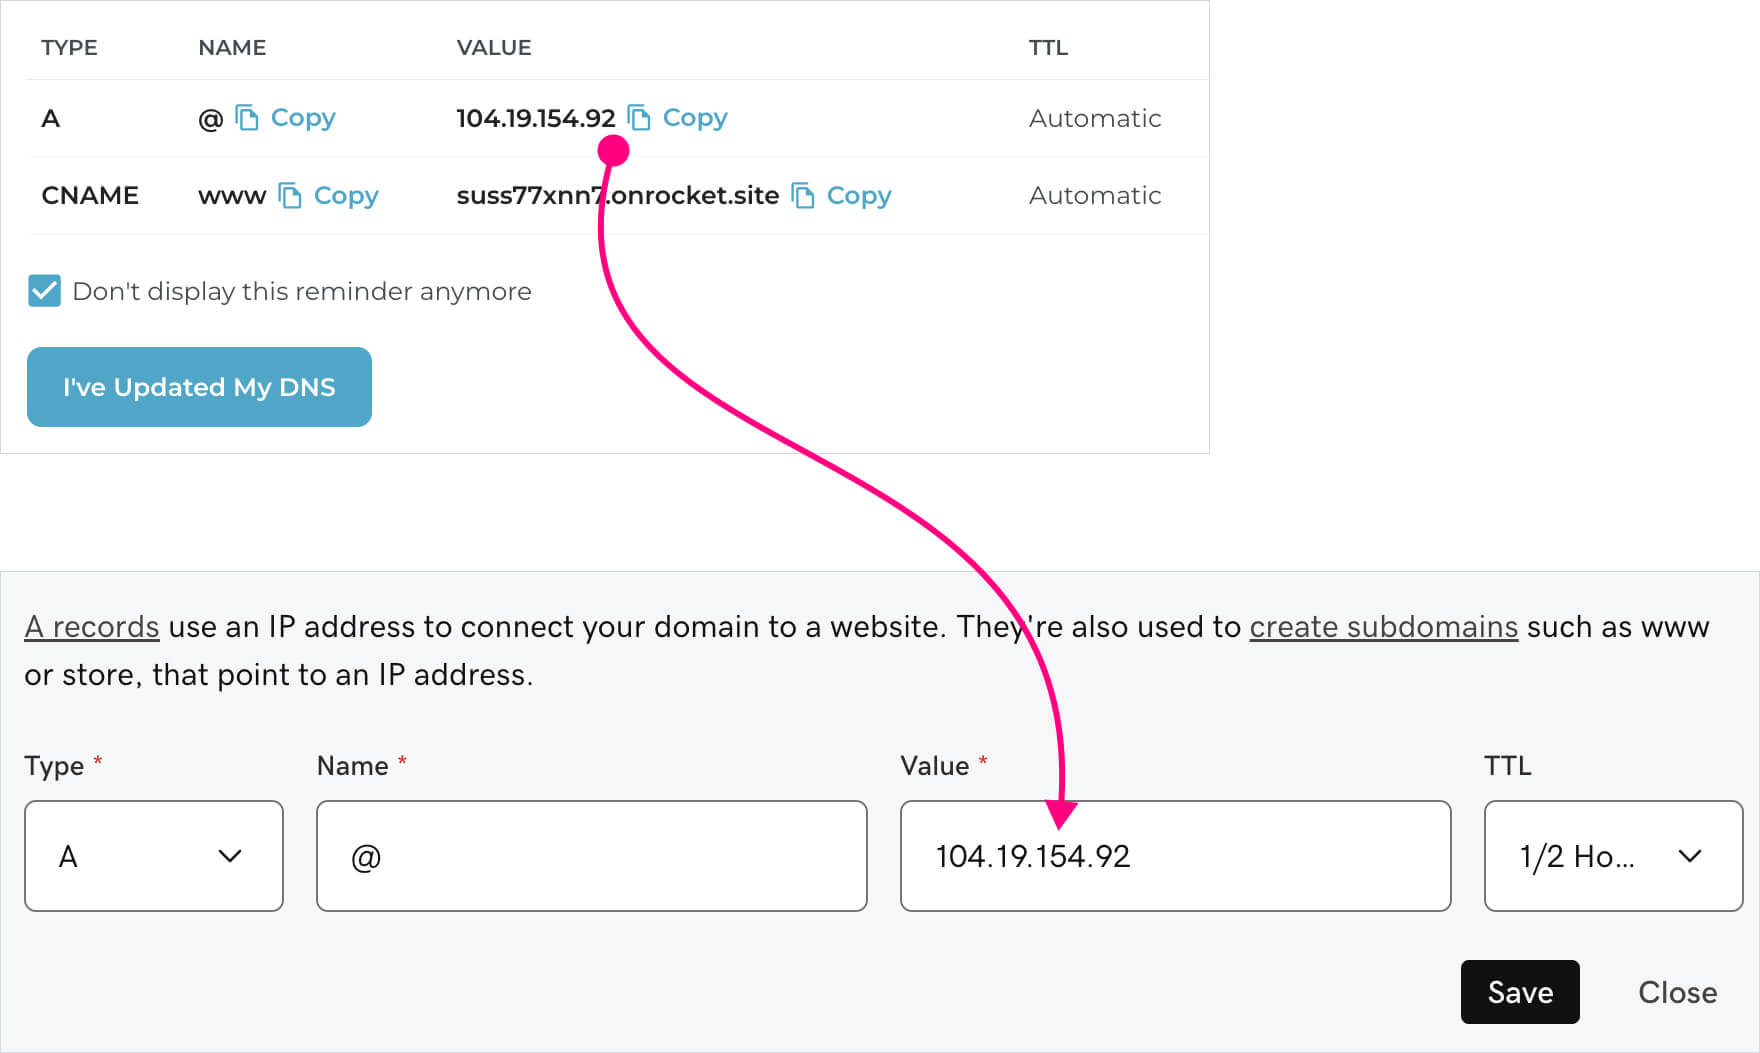
Click on the save button to save the changes.
Similarly, update the CNAME record with temporary domain name provided by Rocket.net:
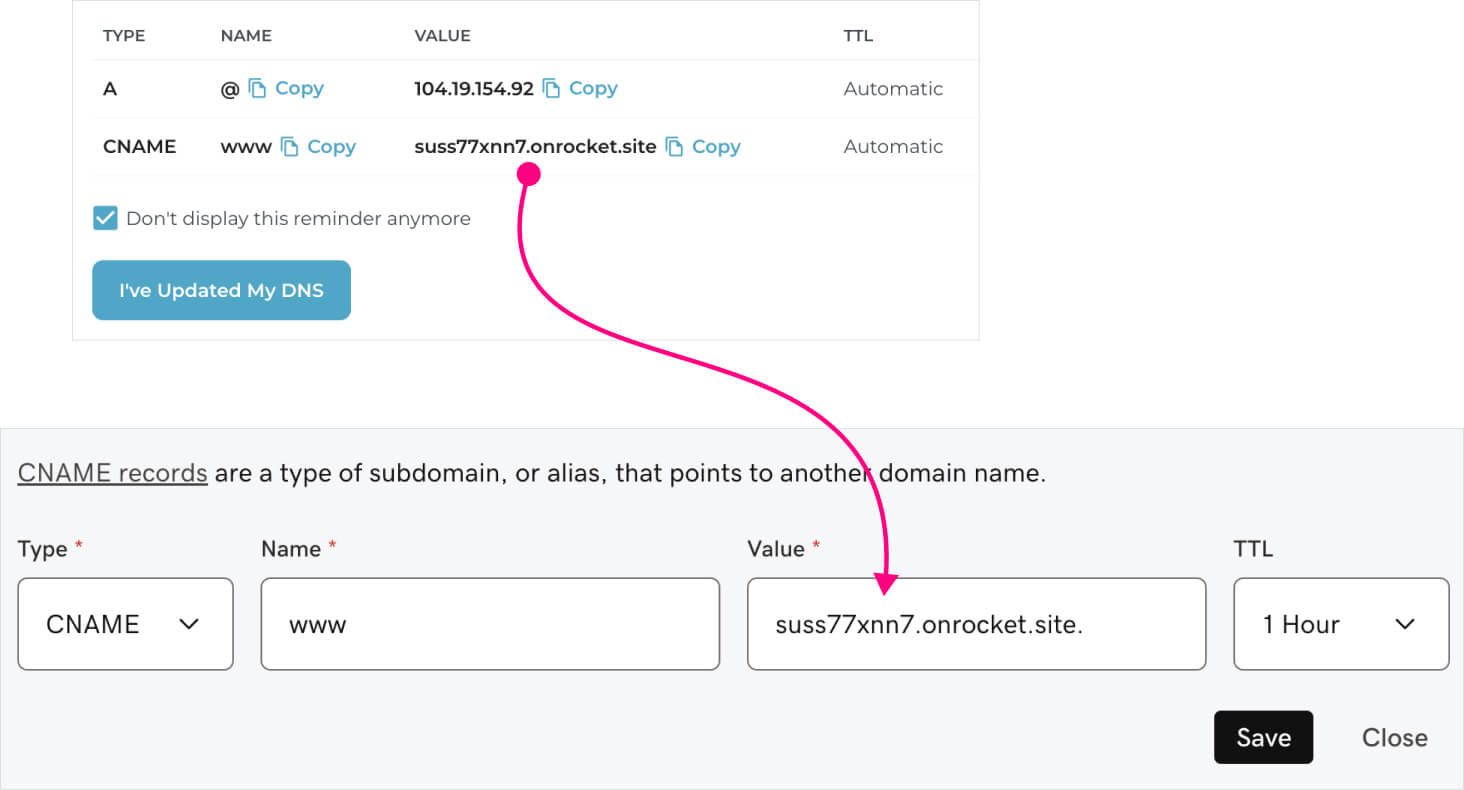
And click on the “Save” button to save the records.
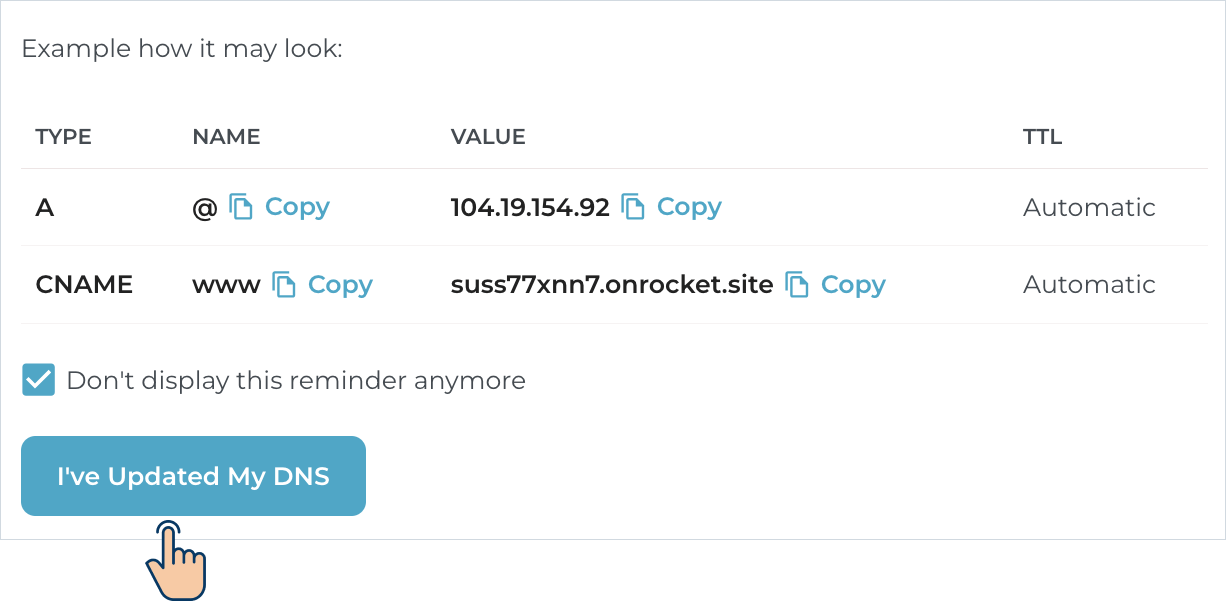
Finally, come back to the Rocket.net’s instruction screen and click on the “I’ve Updated My DNS” button to complete the domain mapping process.
That’s how you map a domain name to the Rocket.net’s WordPress site.
But the Domain mapping doesn’t happen immediately.
It could take 15 minutes to 24 hours.
But in most cases, it takes less than 15 minutes.
So, wait for 15 minutes and visit your domain in a browser to ensure it redirects to your WordPress site.
After 15 minutes…
…
…
When I enter my domain name, the WordPress site created on Rocket.net is opening up.
This means Linking the domain name with our hosting service is successful.
Yayyyyyyy!
I hope your domain mapping is successful, too.
Is it?
Yep! I can access my site using my domain name too.
Pretty, cool :)
Anyway, this is exactly how to get best domain name and web hosting for your WordPress site.
For now, we are done with setting up your website.
Here is the progress we have made so far:
- We purchased a domain name and web hosting
- Rocket.net created a basic WordPress site for us
- We linked the domain name and the WordPress website
- We have installed an SSL Certificate for our WordPress site
We will keep enhancing this setup in the future.
But so far, we have set up these things reliably.
So, it is less likely that you’ll face any problems with this setup.
Having said that, before we go to the next module, I want you to understand that:
- Your domain name renews every year
- And your Rocket.net hosting renews every month or every year depending on the term you choose when purchasing Rocket.net’s hosting.
If we are not paying for the renewal of these services, our website could become inaccessible and get deleted.
So, make it a priority to renew these services.
But for some reason, if you no longer need your website live, ensure these services do not renew and charge you unnecessarily.
That’s all for now.
This lesson marks the end of this module.
In the next module, we will understand how to use the WordPress dashboard.
 © 2026 UsableWP. A project by Naresh Devineni.