Changing the size of the image uploaded
Sometimes, after uploading the image, we might want to reduce the size of it.
If that is the case, WordPress provides us with many easy-to-use settings to achieve our goal.
Come on, let’s quickly go through it with several scenarios.
Scenario 1: Automatic image sizes
Let’s say we have uploaded a large image.
But we want to display it in a medium size.
If that is the case, we can easily achieve it using the “Image Size” setting.
When an image is uploaded to WordPress, the platform automatically creates three different sizes of the original image:
- Thumbnail size – 150px (Only if the image uploaded is larger than 150px)
- Medium size – 300px (Only if the image uploaded is larger than 300px)
- Large size – 1024px (Only if the image uploaded is larger than 1024px)
It creates these sizes so that it can use them in appropriate places on your website ( more on this later ).
Not just that, it also gives us the control to use these extra images inside the post editor.
Come on, let’s see how it works.
First, if it is not already, click on the image to select it.
This will open up the Settings sidebar for that specific image.
Next, inside the sidebar, there is a setting called “Image Size” with four options: Thumbnail, Medium, Large, and Full Size.
By default, WordPress uses the large size of the image for displaying it on the blog post.
But if we choose the “Thumbnail” option, WordPress will replace the large image with a thumbnail-sized image.
If we choose the “Full Size” option, it will use the original uploaded image.
For our scenario, we only want to use the medium-sized version of the image.
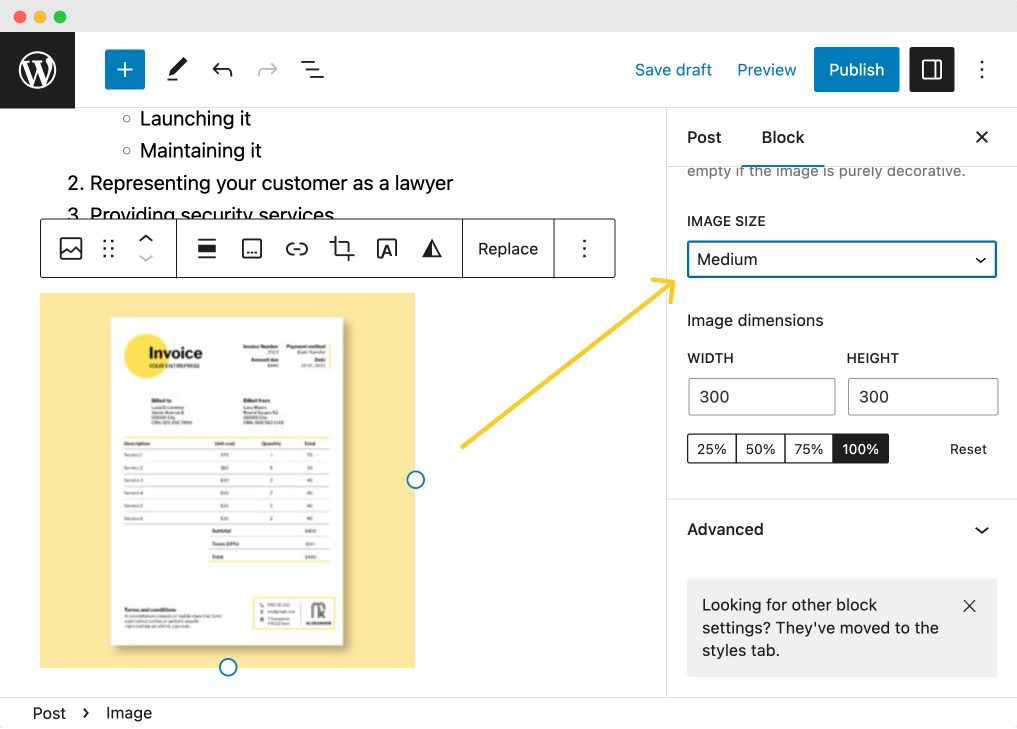
So, choose “Medium” for the “Image Size” settings.
That’s all. A medium-sized version of the image is now getting displayed.
Scenario 2: Taking control of the image dimensions
Sometimes, we want to display the image at a particular width.
For example, when we choose the “Medium” option, the image is getting displayed at 300px wide.
But we want the image to be displayed at 500px wide.
How do we achieve that?
Currently, The “Image Size” setting doesn’t have an image size for displaying an image at 500px.
How do we fix this problem?
This is where the “Image Dimension” setting comes in and helps us manually enter the image dimensions we want.
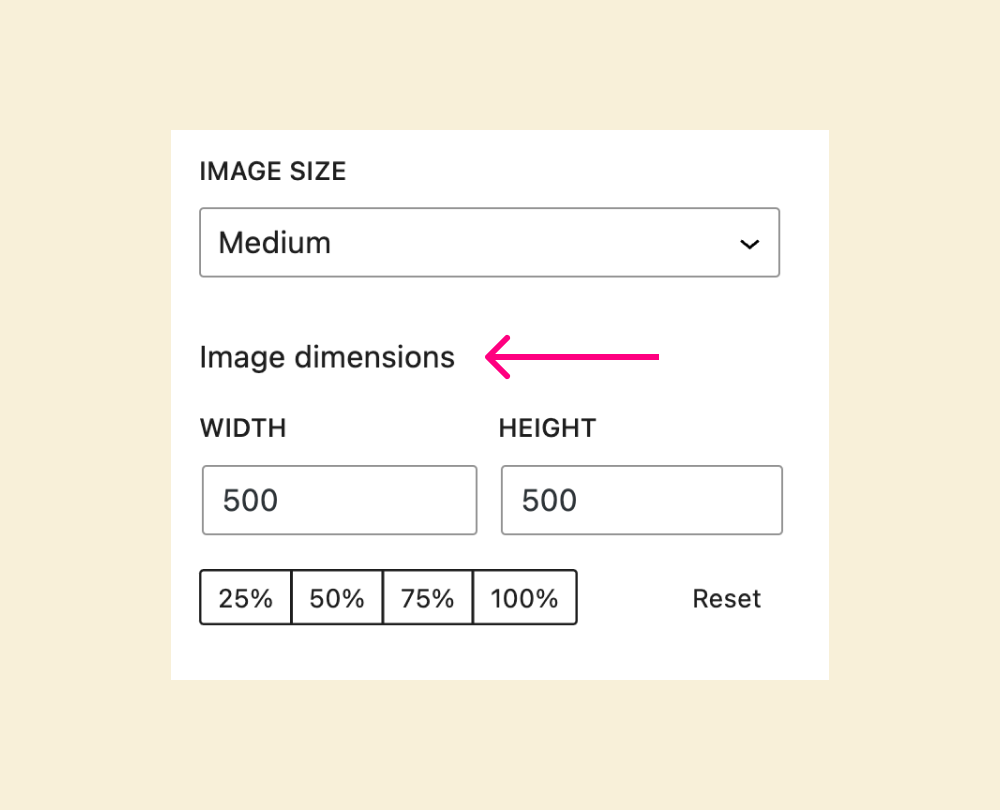
Come on, let’s use it and increase our image display size.
And bang!
Why did the image get pixelated and blurry?
The reason behind this is pretty simple.
We have chosen the image size as “Medium”. So, WordPress is displaying an image that is 300px wide.
But when we changed the image dimensions to 500px wide, WordPress is now trying to display the same 300px wide image at 500px wide.
When you try to display a low-resolution image (300px) at a higher resolution (500px), the image will appear low-quality and blurry.
This is the natural behavior of the browser.
The thing is, the “Image Dimensions” setting doesn’t automatically generate an image that is 500px wide.
It works in association with the “Image Size” setting.
If the image size is Medium (300px) and if you change its dimensions to 500px using the “Image Dimensions” setting, it will only try to enlarge an existing image.
So, to make the image look high-quality at 500px wide, we have to use an image size larger than 500px wide.
If we take a higher-resolution image (1000px) and shrink it down to 500px, the image won’t lose its quality.
To cut to the chase, to display the image at 500px, we either have to use the large size (1024px) or the full size (2000px) and then shrink down the image to 500px using the “Image Dimensions” setting.
Come on, let’s go with the Large size and see what happens:
Did you see that?
That’s exactly how you take control of the image display size inside the Post editor.
Anyway, I understand that the last couple of lessons are a bit exhaustive for you.
So, take a little gap, and in the next lesson, we will learn how to:
- Save the draft written so far
- Preview the blog post we have written so far

Previous Article

 © 2026 UsableWP. A project by Naresh Devineni.